
Potter & Pehar Sling + Sip Social - Register Now! (Free Event With Care)
Babywearing is a lifesaver for so many parents, but only when you know how to use your carrier safely and comfortably. As a Babywearing Educator I love helping families learn how to make the most of their carriers. That's why I'm so excited to join Potter & Pehar at their upcoming Sling + Sip Social to offer a FREE Ring Sling 101 Workshop. (Full Details Below *Space is very limited so don't wait to register. RSVP to hello@potterandpehar.com)
Babywearing is a lifesaver for so many parents, but only when you know how to use your carrier safely and comfortably. As a Babywearing Educator I love helping families learn how to make the most of their carriers. That's why I'm so excited to join Potter & Pehar at their upcoming Sling + Sip Social to offer a FREE Ring Sling 101 Workshop. (Full Details Below *Space is very limited so don't wait to register. RSVP to hello@potterandpehar.com)
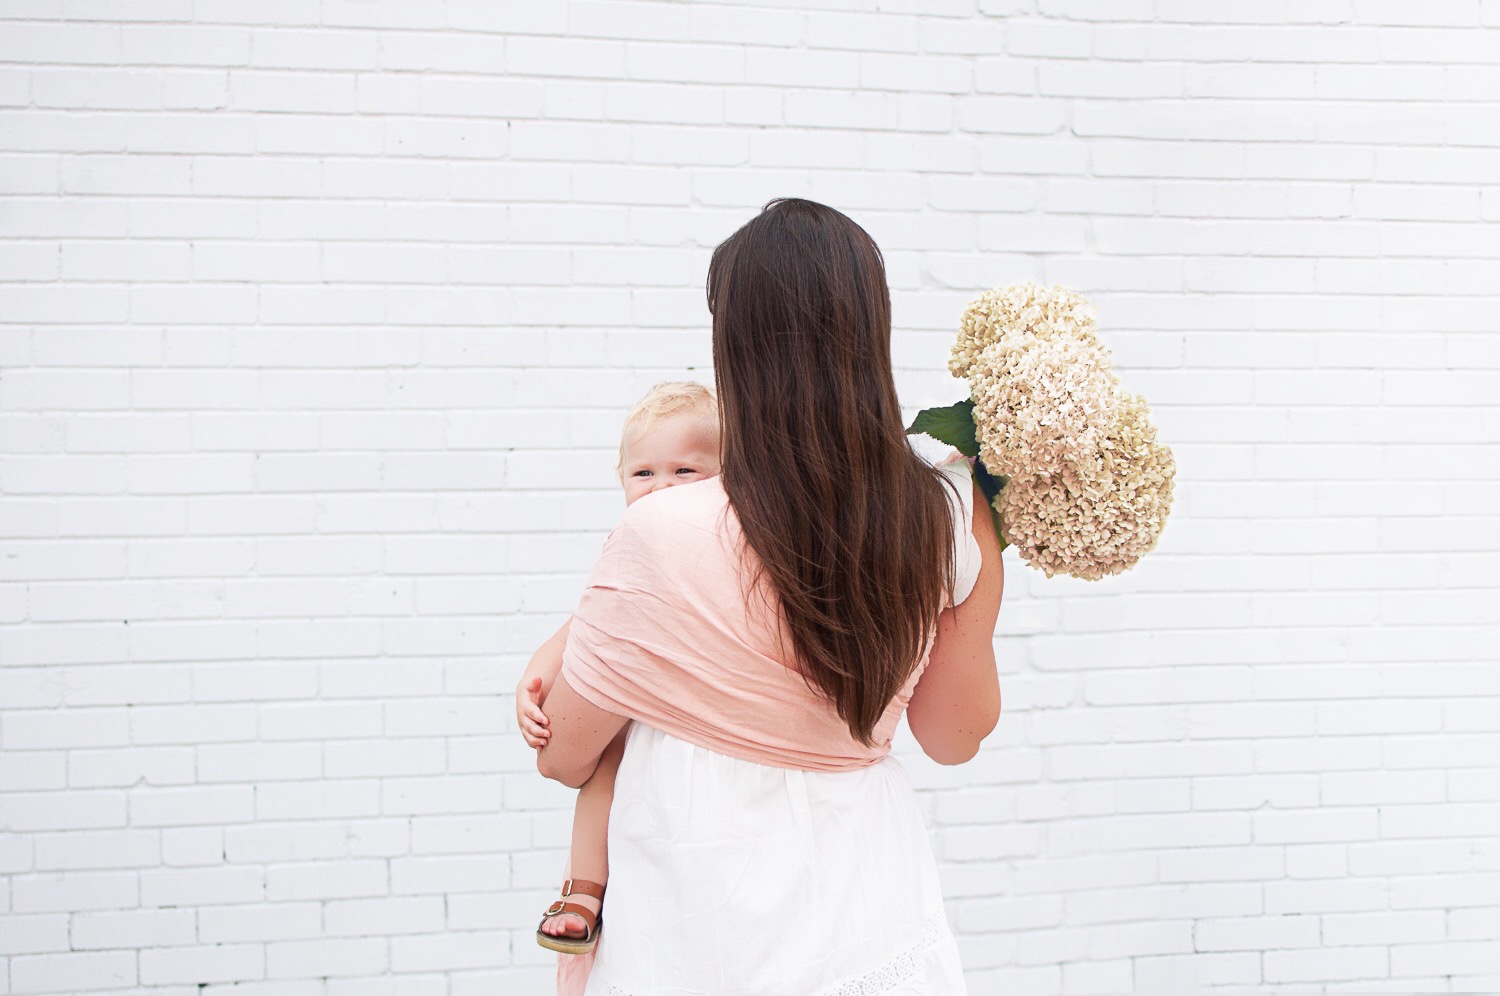
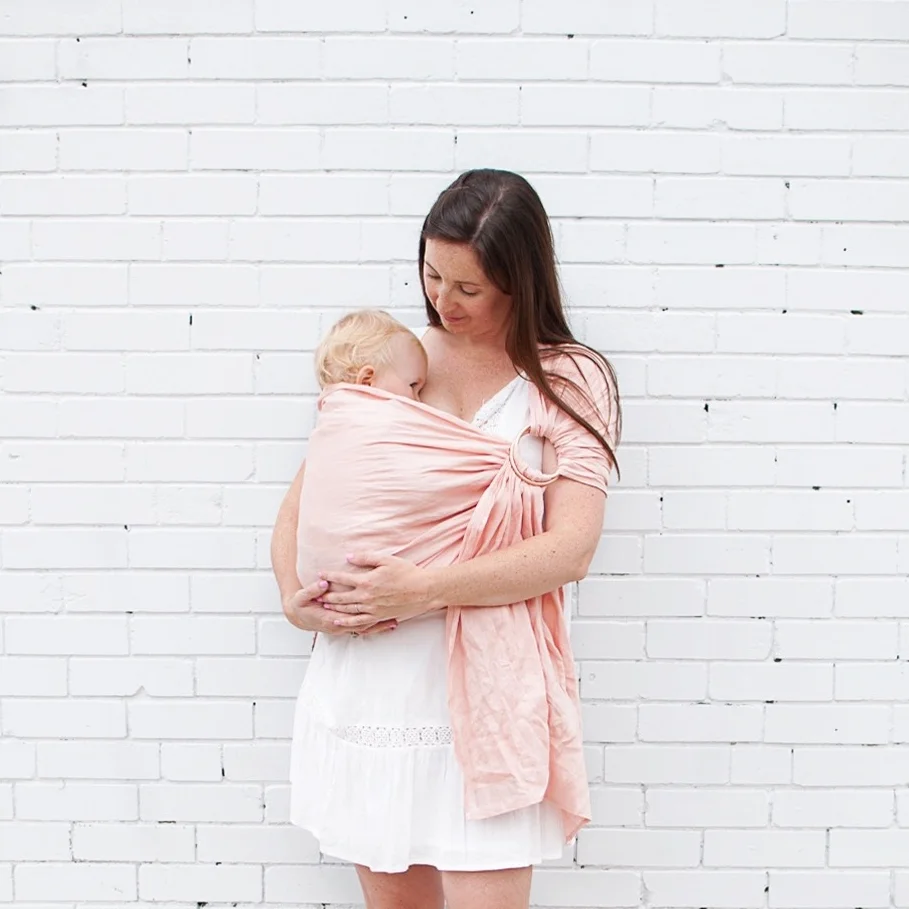
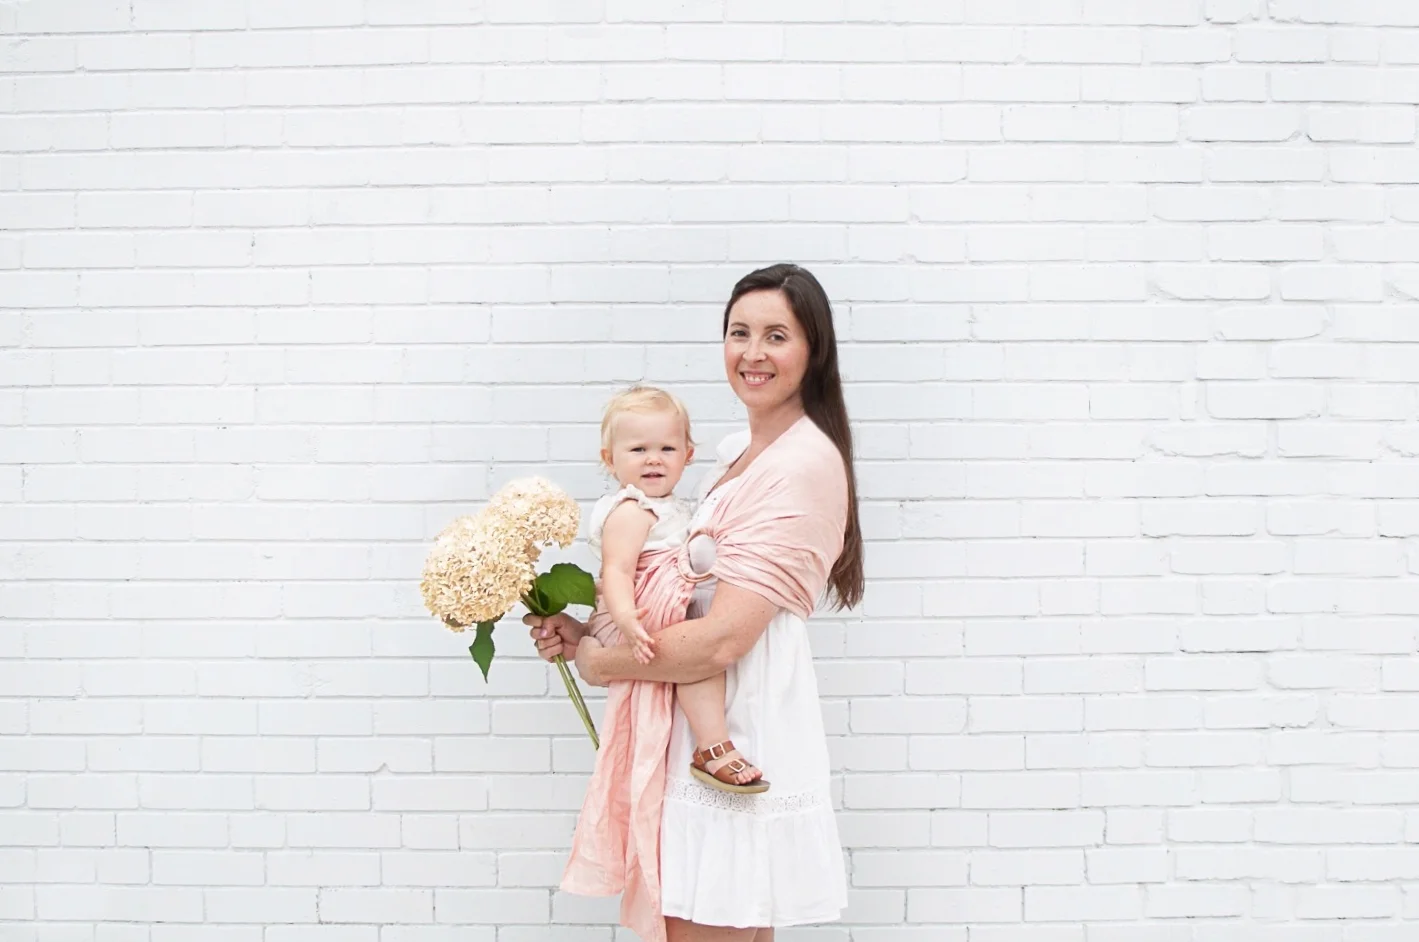
Ring slings are one of my favourite carriers from infancy right through toddlerhood. In the early days they are perfect for our little babes who need to be kept snug up on our chest. As our baby grows and develops, ring slings are ideal for quick trips using a hip carry. Ring slings are great because they fold up nice and small for travel, can be put on and adjusted relatively quickly, are lightweight for hot weather, and are great for wearing to fancier events. I have worn all of our babies to weddings in my ring slings. I also love ring slings because they are one of the easiest carriers to nurse in.
Even with all of these amazing qualities I find that ring slings often get a bad wrap. I have spoken to lots of parents at my community events and on social media who just couldn't seem to make their ring sling work. They often reported pain, or felt insecure about their baby's position. Neither of which are any fun. The majority of the time some minor adjustments to the carrier would make a huge difference, and impact both the wearer's comfort, and the baby's comfort and security. Learning the basics of how to use a ring sling properly is essential to your long term enjoyment and safety while babywearing with one.
If you're a local parent join me at the Potter & Pehar Sling + Sip Social on Thursday August 17th to learn all about ring slings. This FREE event takes place from 11am-2pm at 1830 Bloor St W (3rd floor event room).

Pop by to enjoy some light refreshments and get your photo taken by Jamie Mack Photography for $15. Come and check out Potter & Pehar's beautiful collection of Canadian made ring slings. As a special gift to all attendees they will be offering sale prices on their end of season slings. *Please Note: No purchase is necessary to attend this event.
*Remaining Space is very limited so please don't wait to register. Email hello@potterandpehar.com to reserve your spot. Feel free to ask any questions below in the comments
Happy Babywearing!
Care
In this post:
Potter & Pehar Berkeley Ring Sling | Tiny Trendsetter Saltwater Sandals | H&M Care's Dress
*This is a sponsored post which means I was provided compensation and/or product for this post. All thoughts and opinions are 100% my own. I only partner with products and services that I genuinely love and want to recommend.

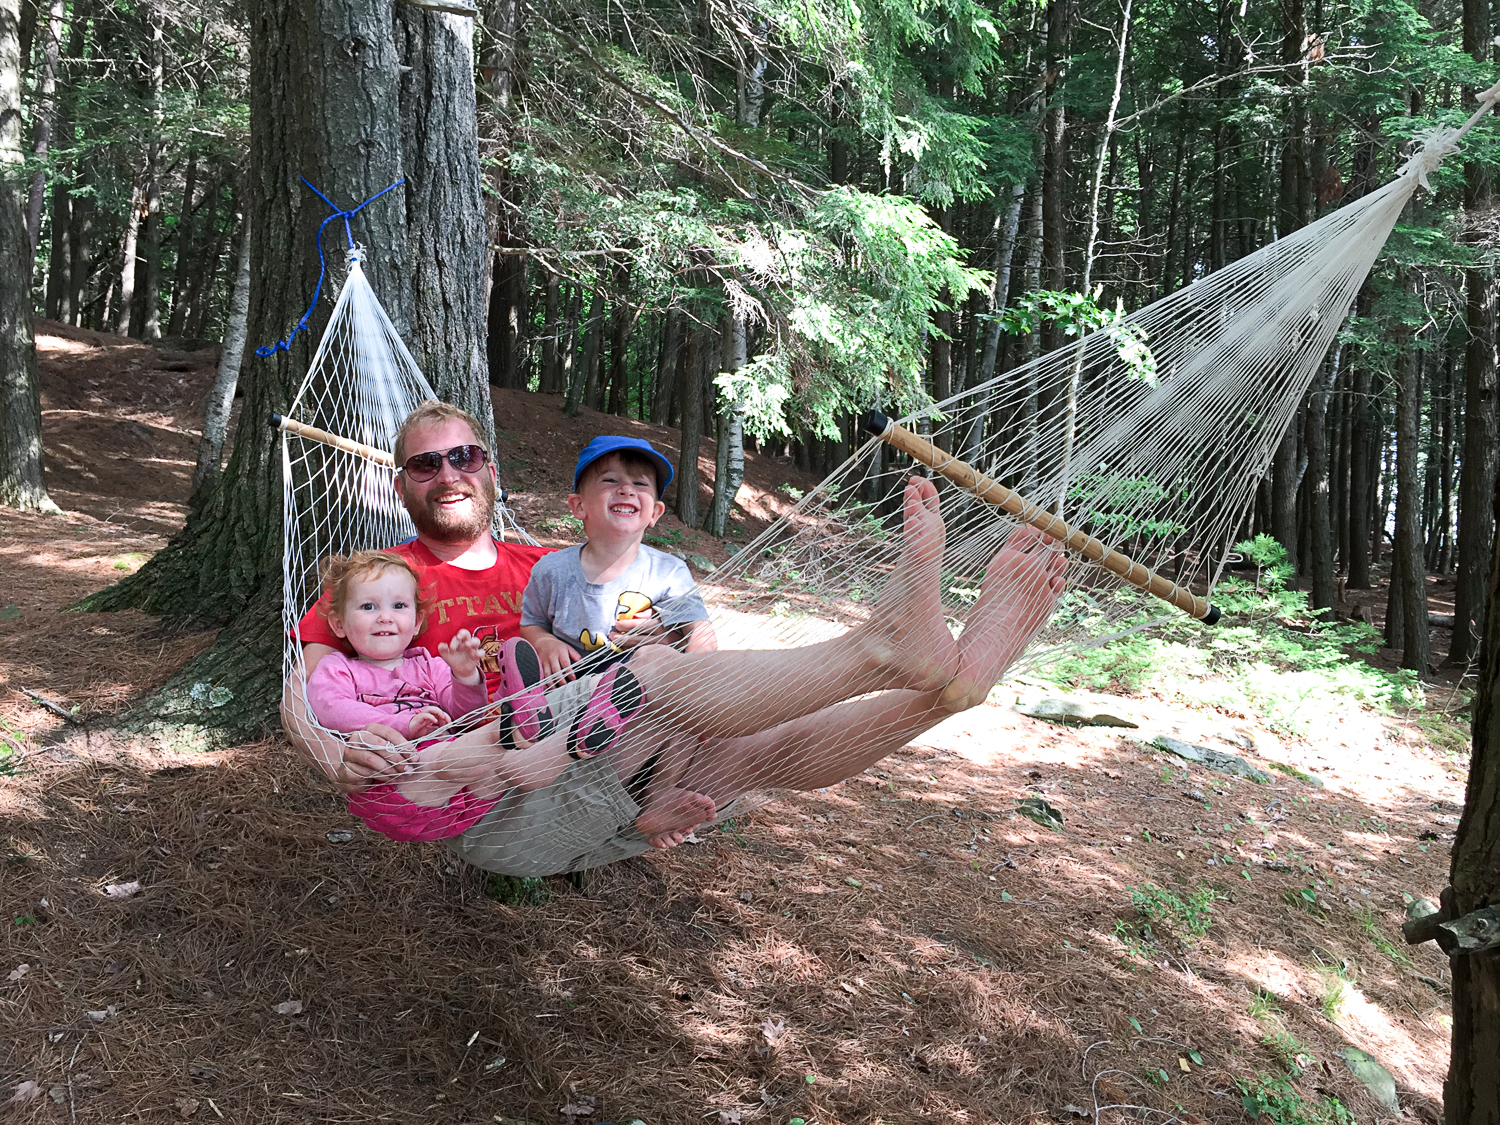
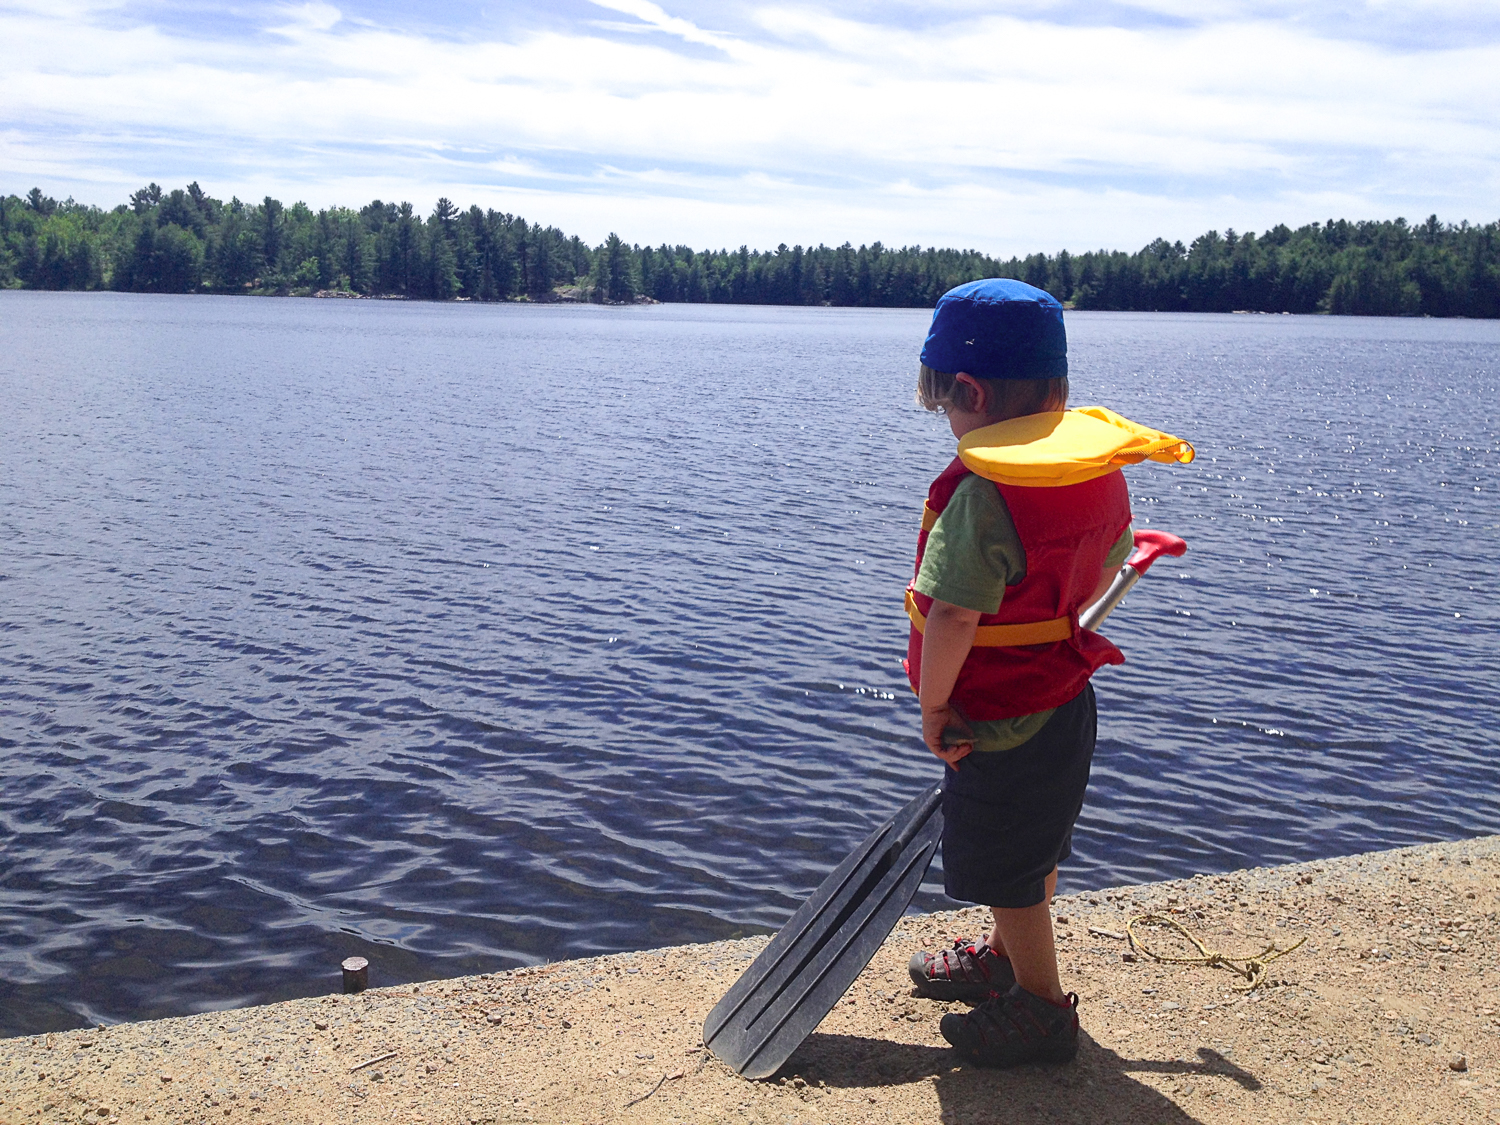
Summertime With Kids: Let's Talk Motherhood
Motherhood is one of those things no one can ever really prepare you for. That's why a supportive mom community is so important. I love how social media has opened up my life to a whole new group of amazingly supportive women who genuinely care about one another. Although we might not all agree on everything in motherhood, we know that we all love our kids and want the best for them, and that's what's most important.
Motherhood is one of those things no one can ever really prepare you for. That's why a supportive mom community is so important. I love how social media has opened up my life to a whole new group of amazingly supportive women who genuinely care about one another. Although we might not all agree on everything in motherhood, we know that we all love our kids and want the best for them, and that's what's most important.
I was so excited to be asked to be part in this month's Let's Talk Motherhood Series with a group of awesome fellow moms. We have all answered a few questions about summertime with our littles, so check it out below. Links to each post can be found at the end.
1. What are your favorite summertime activities with your little ones?
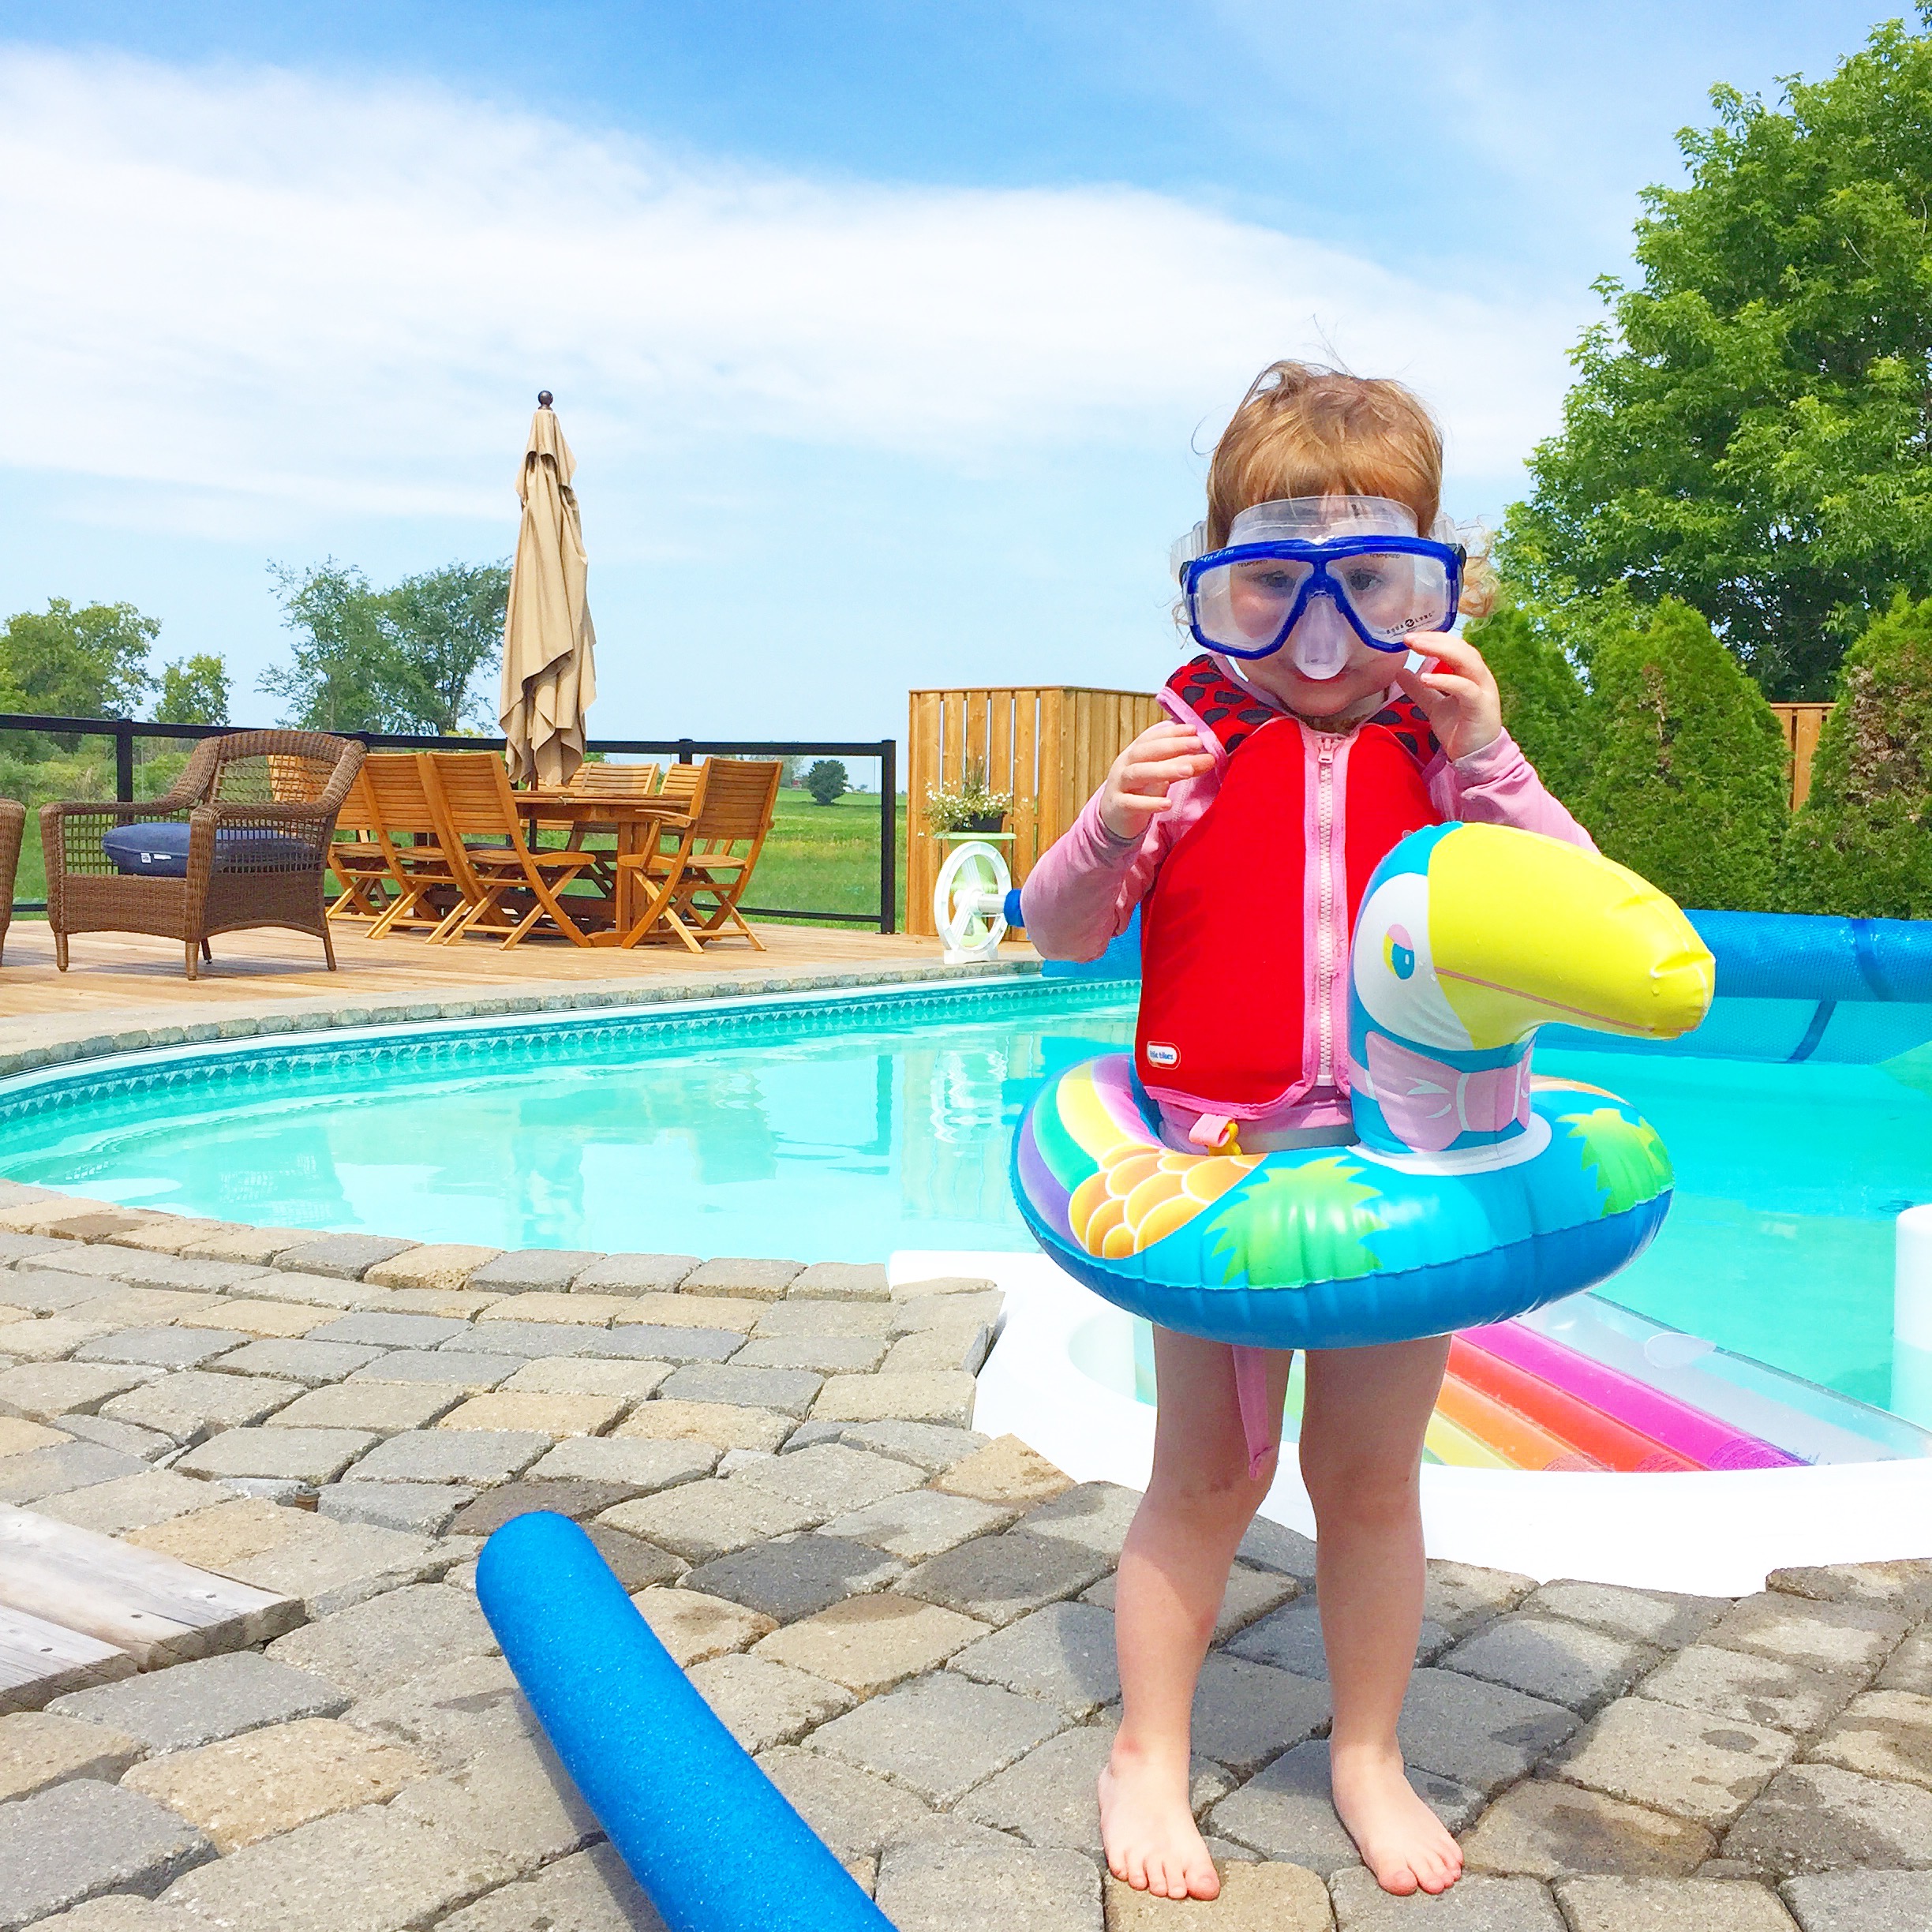
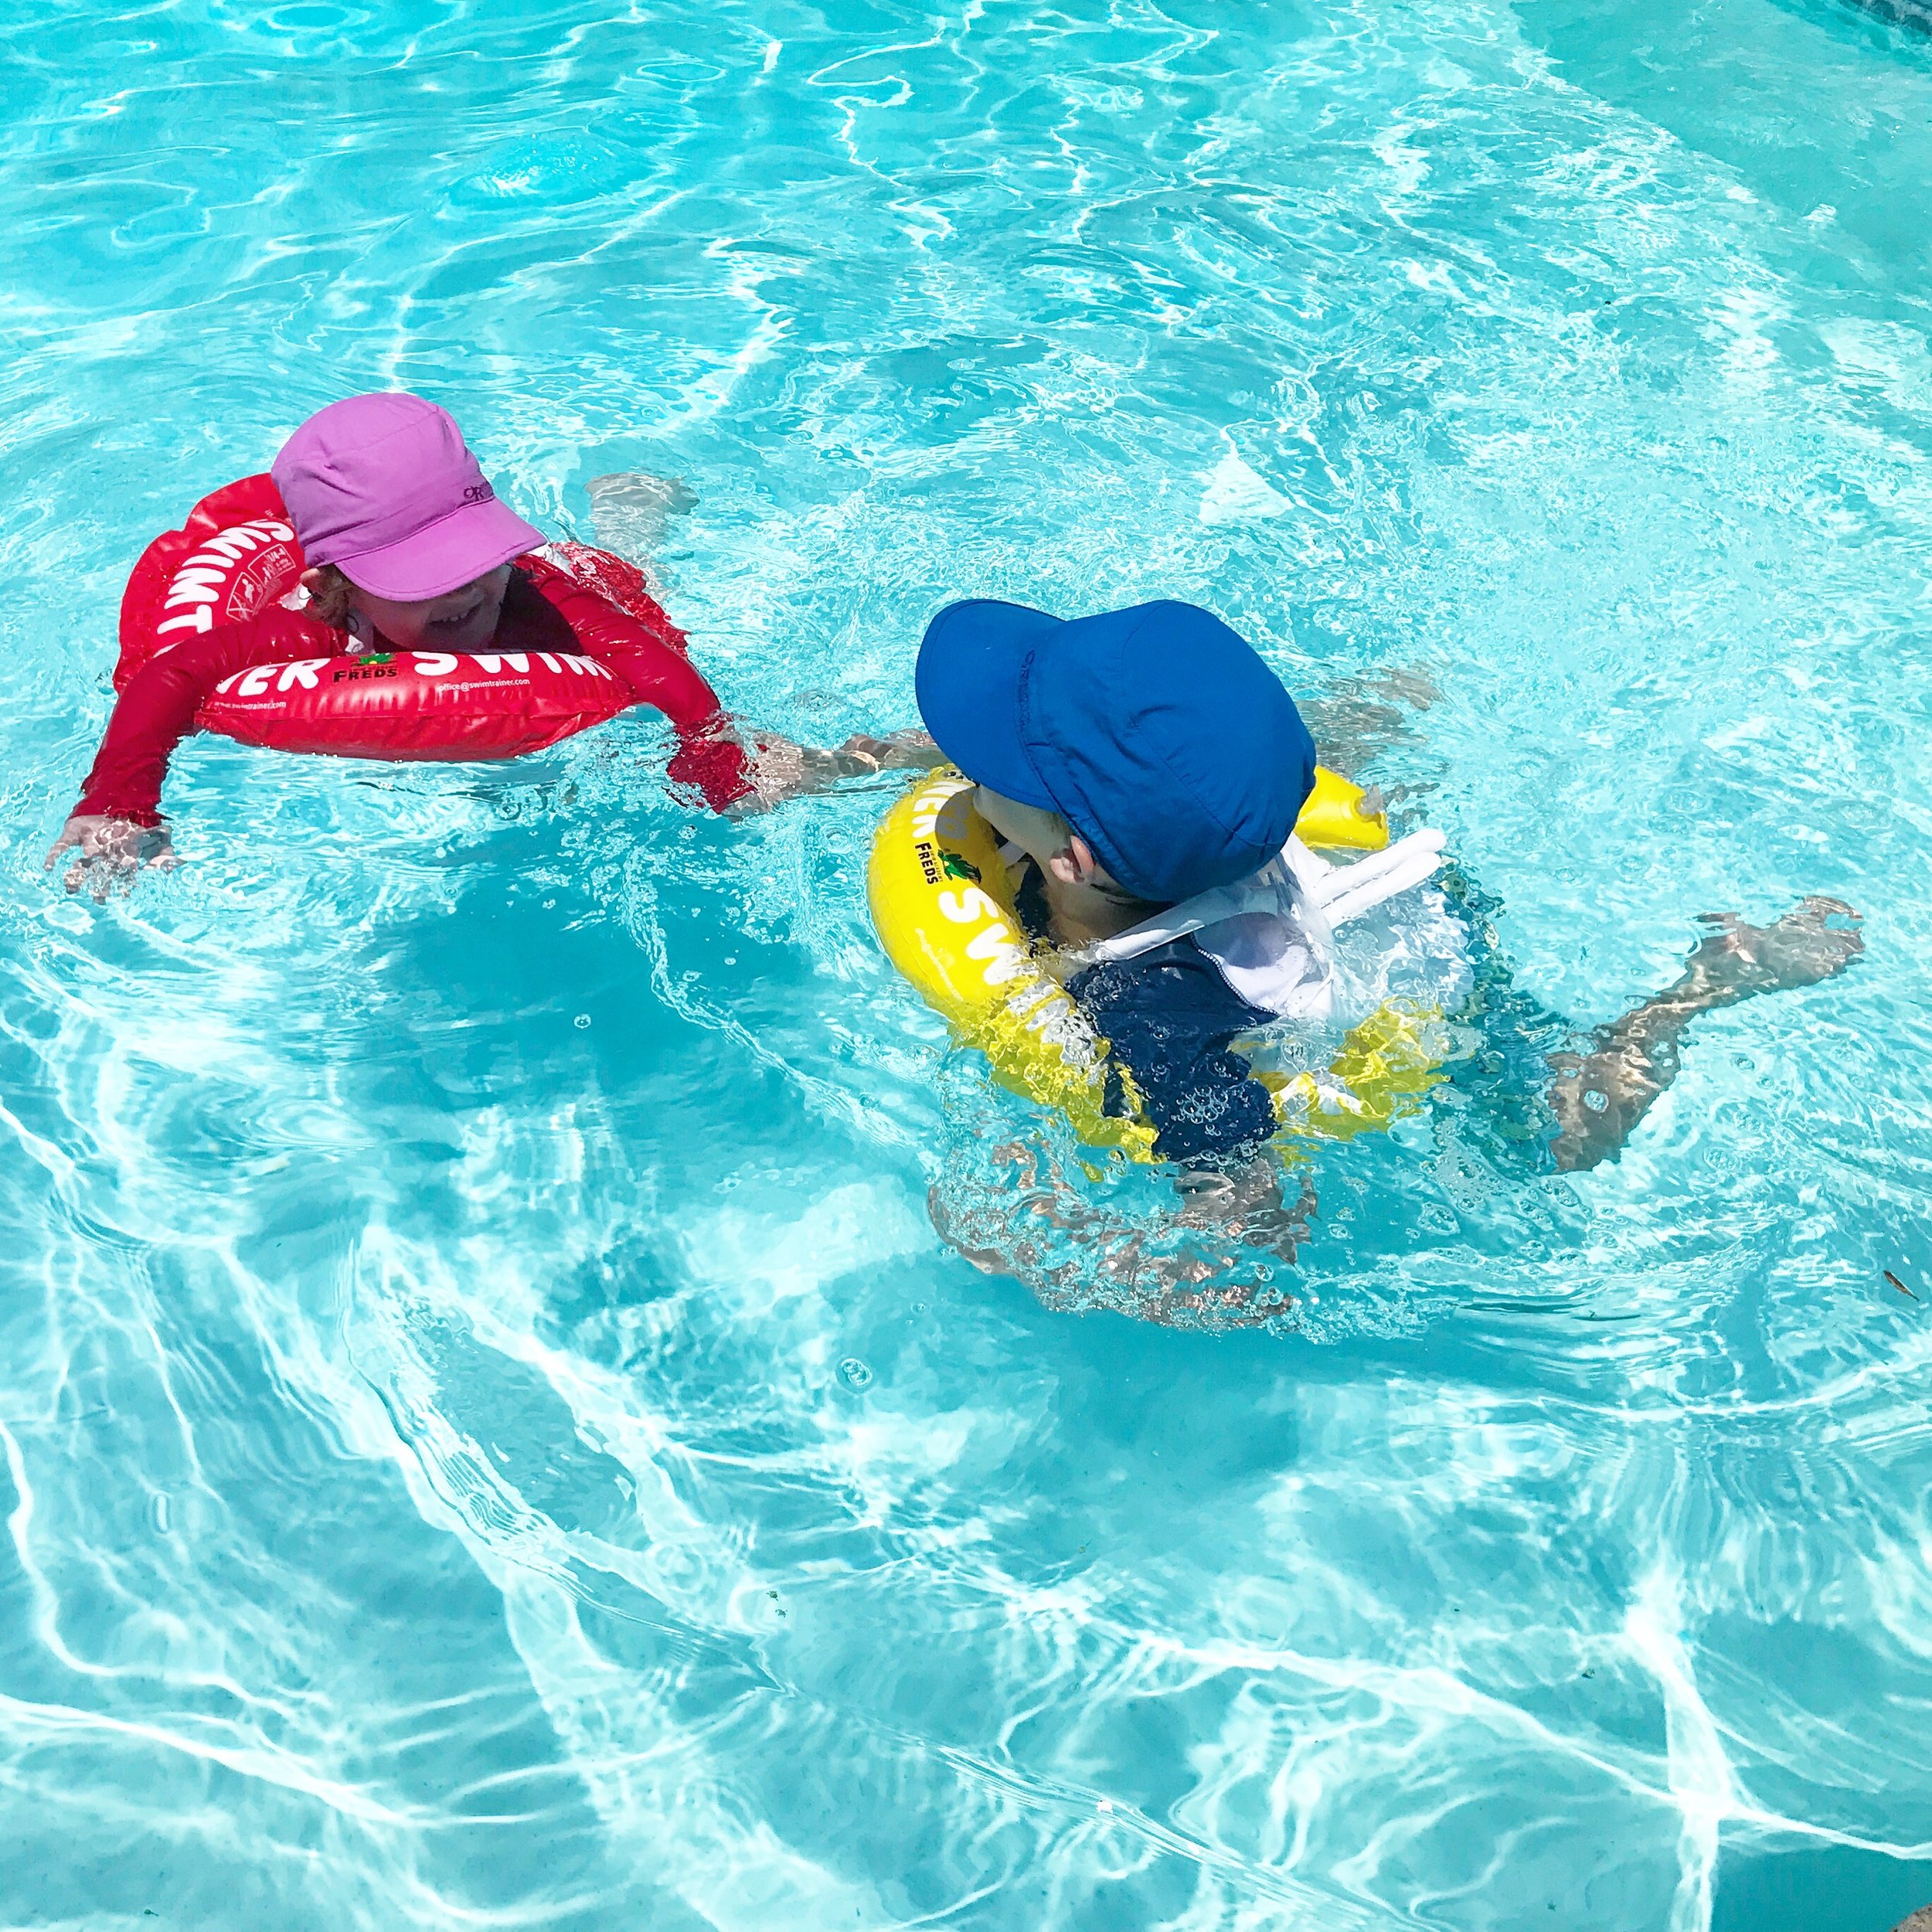
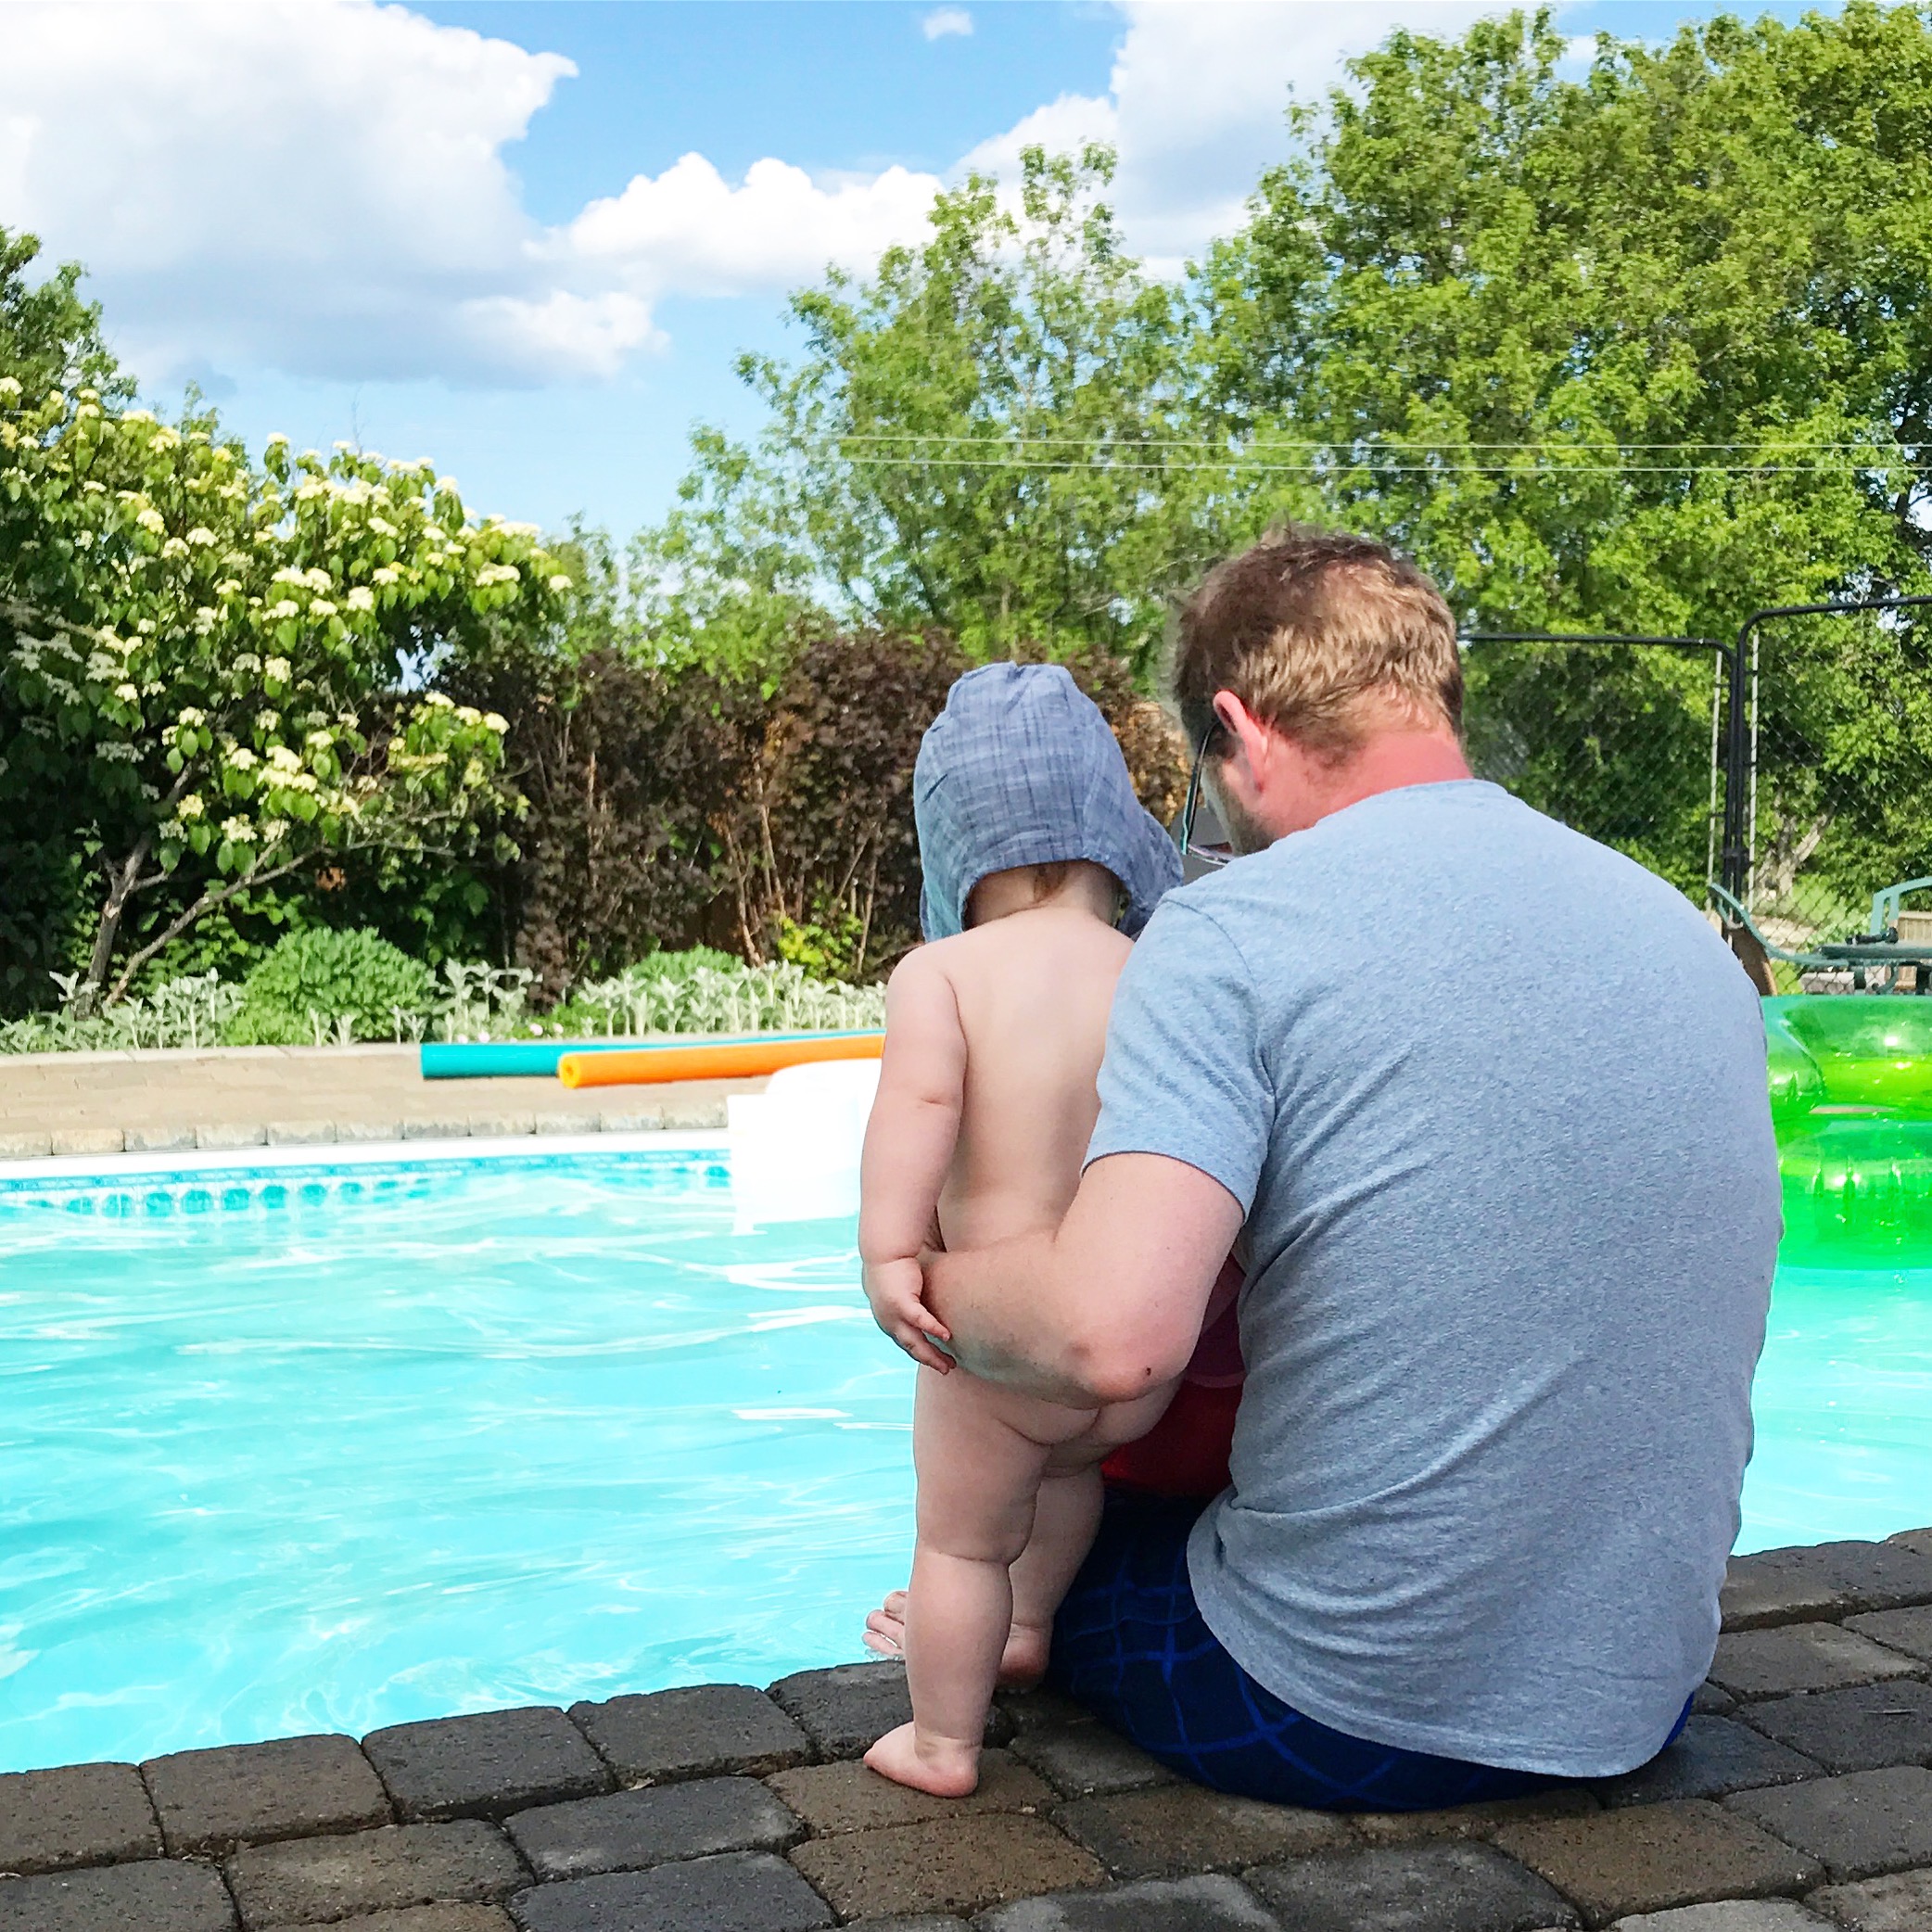
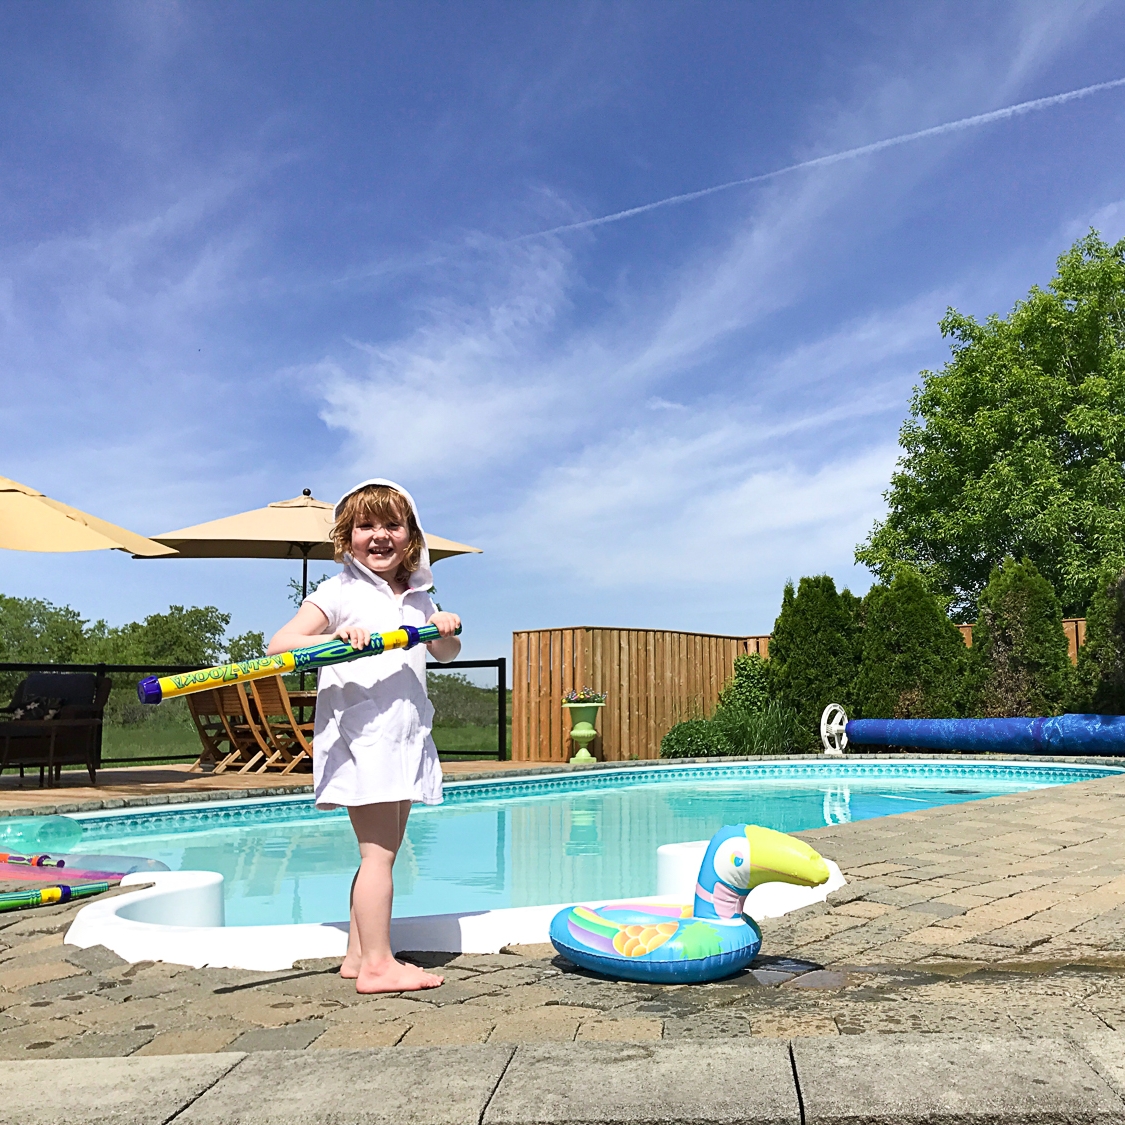
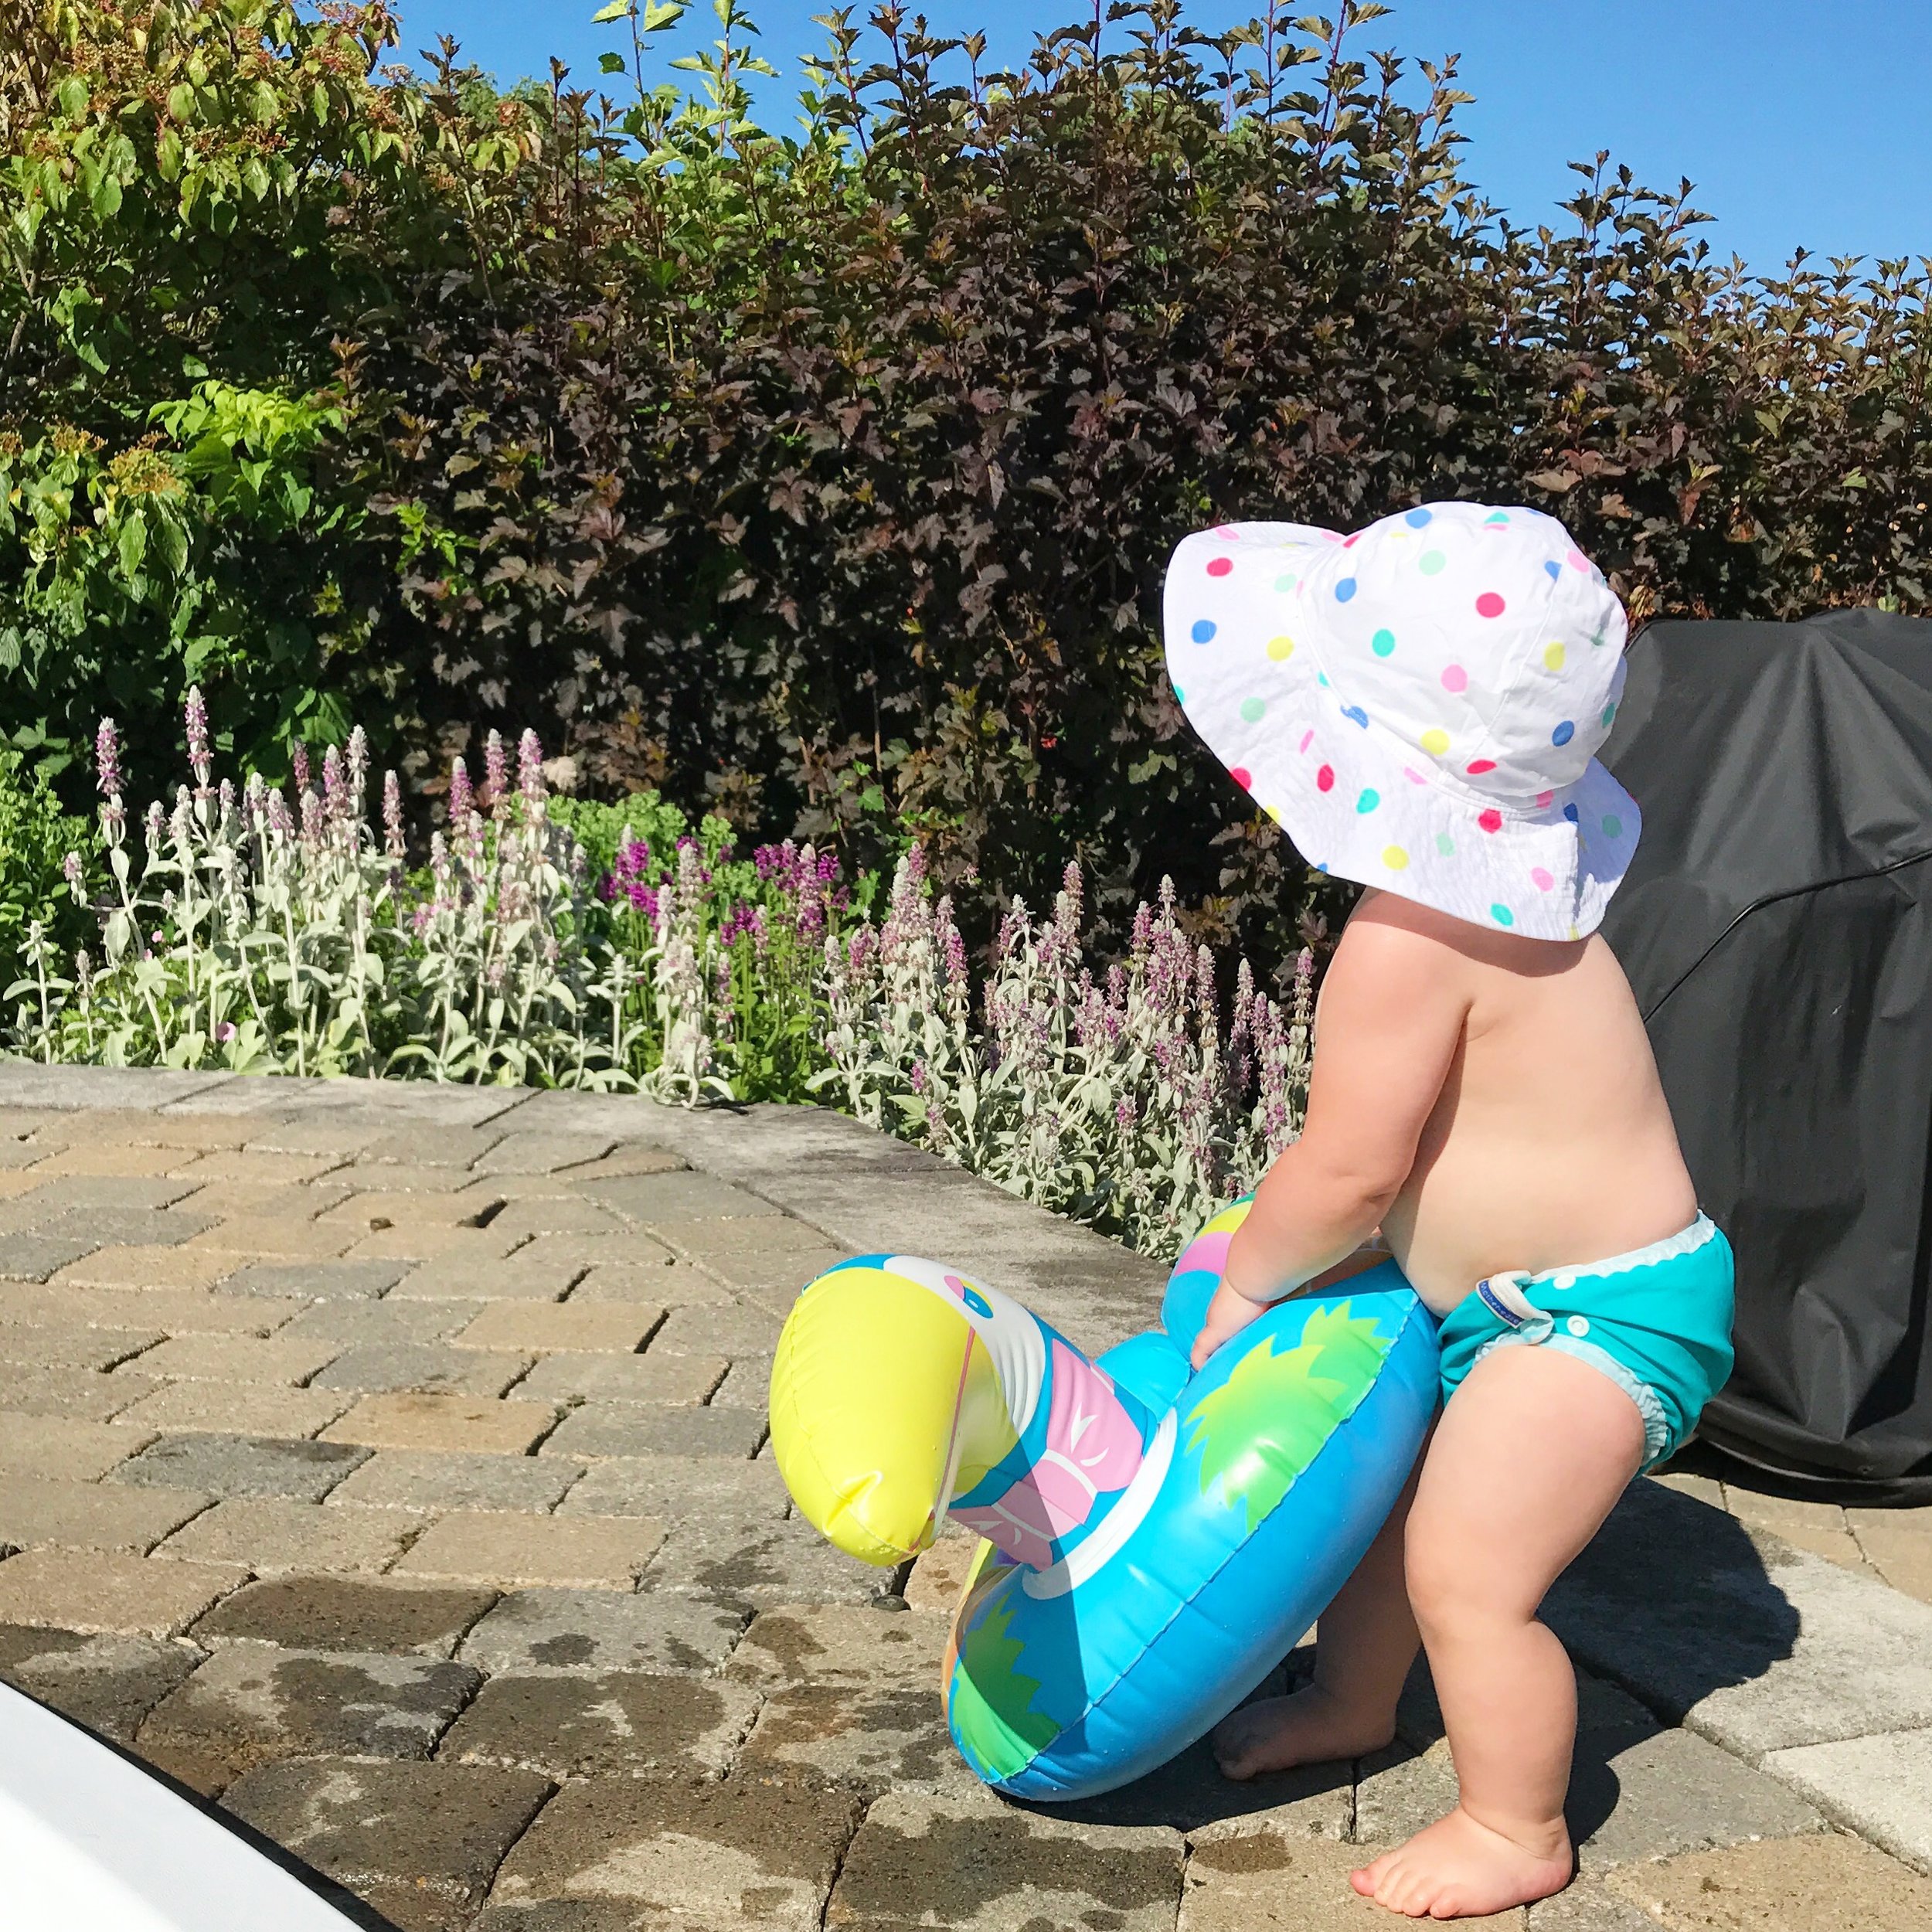
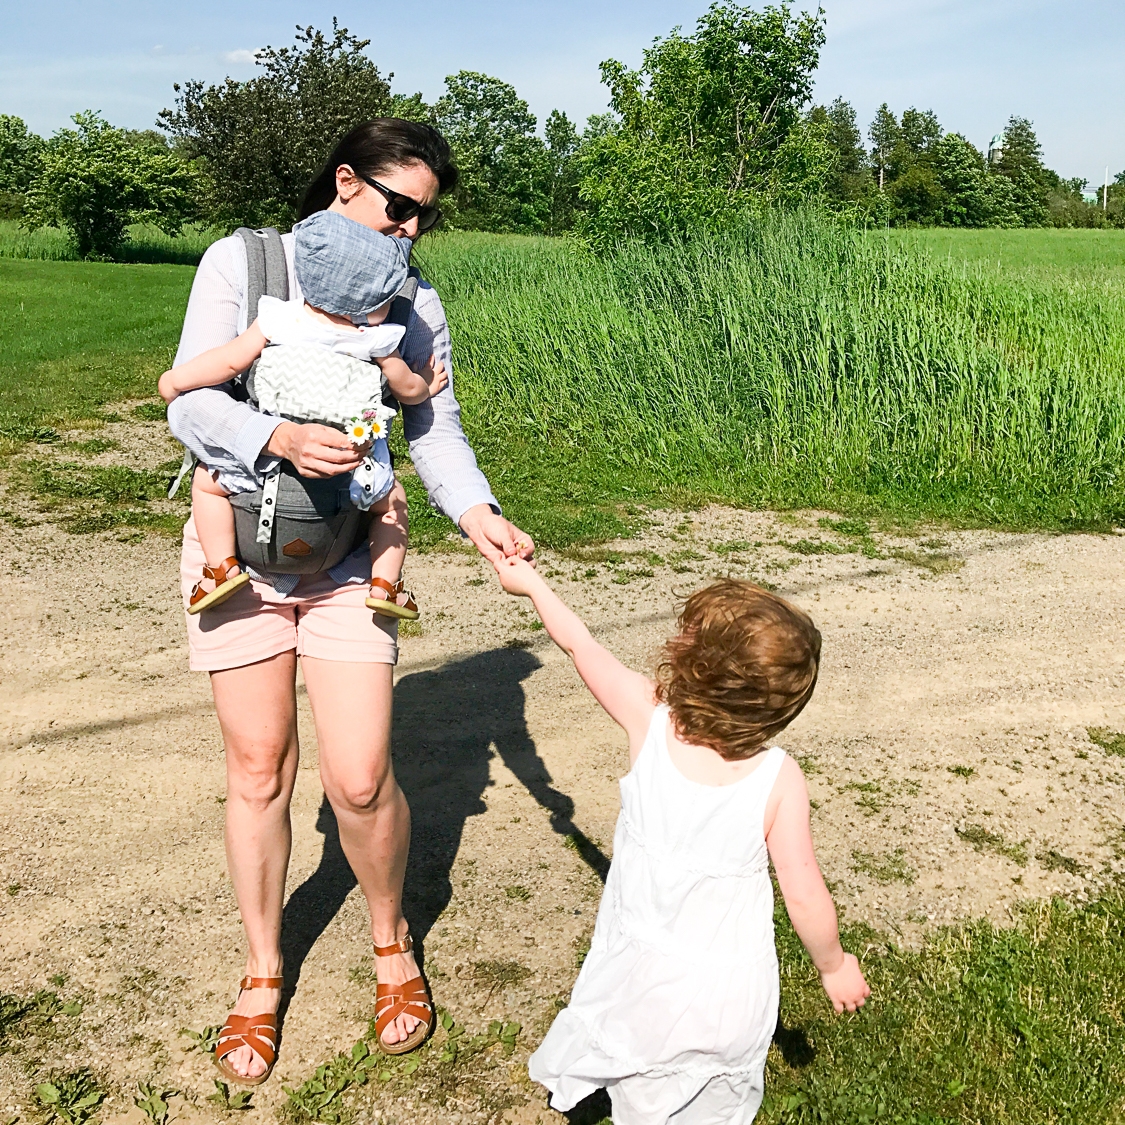
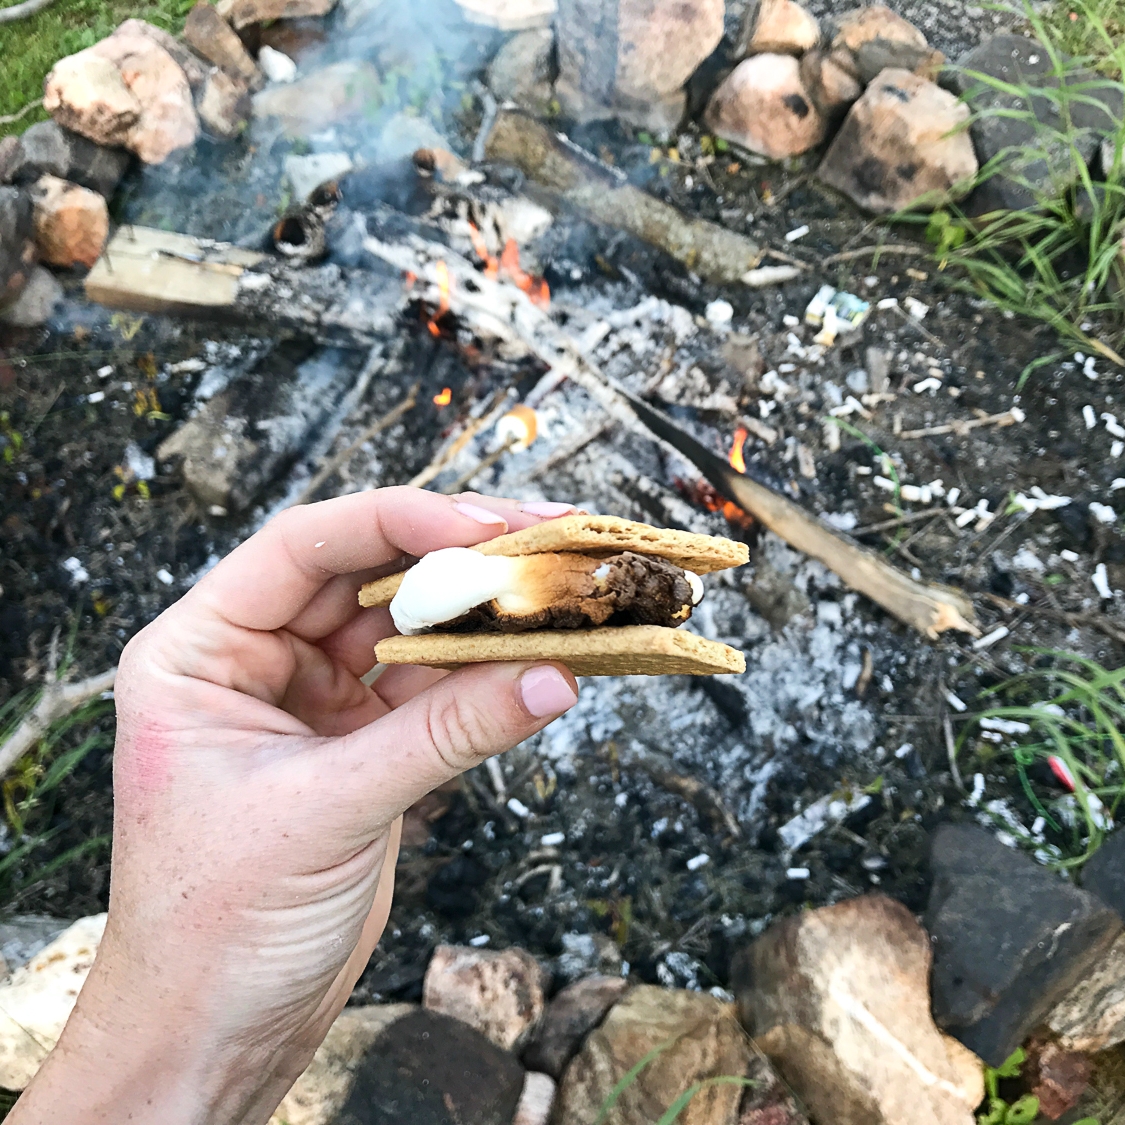
Hands down my favourite thing to do with my kids in the summer is spend time around the pool at my family farm. As a long time swimmer and lifeguard I am so happy that all 3 of my littles love the water. Our farm is a place that the kids can run wild and have lots of unstructured time outdoors. When we're not in the pool we love to go on walks to pick wild flowers, check out the cows in the neighbouring fields, and of course enjoy bon fires with s'mores.


2. How do you help keep your young ones cool when it's hot outside?
It can be really difficult to keep little ones cool and hydrated when our heat advisory days arrive. When we're at the splash pad or poolside it's easy to wade in the water to cool off, or sit in the shade of a big tree, but if we're headed out on a long summer day trip around the city I always plan ahead and freeze water bottles or juice boxes in the deep freeze the night before. The frozen drinks stay cold late into the day and keep the rest of the food/drinks cool. The cold water bottles can also be applied to the back of the neck/wrist, or poured over a piece of fabric as a compress to help cool someone off if need be.
Stay tuned for an upcoming post on Summer Safety With Kids focusing on Preventing, Recognizing, and Treating Overheating and Dehydration.
3. How do you handle having less time in the summer, since your kids are out of school?
With all 3 kids home full time for the summer I find having a mix of structured time, and vacation/go with the flow time, is important. I want my kids to enjoy the carefree days of summer. The slow days where you get so bored you create the best game or invention ever. That's what I remember loving about summer. This year we have our big kid in Camp a few weeks scattered throughout the summer, plus I have some occasional help from local babysitters for my 2 littlest. Ultimately, I have to slow down my community offerings during the summer months, so I can keep up with the kids.
4. At what age were your kids when you started taking family summer vacations with them?
We took our first babe on a road trip to our farm when he was only 3 weeks old, and have never looked back. We try to spend about 3 weeks each summer at our farm, we also go on an annual back country camping trip (Learn about Camping With Kids Here & Here), and we always love getting away on local adventures. My husband and I love to travel, but we probably won't be going on any big fancy trips anytime soon with 3 littles in tow and a tight budget. Hopefully as the kids get older we'll be able to plan more elaborate family trips again.

5. What tips would you suggest for new moms traveling with their little ones for the first time?
Read my Travelling with Tots Series. Hahaha...no seriously. Although it doesn't contain everything you need to know about travelling it has a lot of tips that I have learned over the years. Travelling with kids isn't like a pre-kid vacation, but it can still be wonderful if you go into it prepared and with realistic expectations. When all else fails, lower your expectations ;)
Hope you enjoyed hearing my take on summertime with my littles. Don't forget to check out these 4 awesome moms to hear about their perspectives on Motherhood in Summertime.
McKell lifeasmrswilson.com (@mckellwilson) | Aurora auroramccausland.com (@auroramccausland) | Jenn whatyoumakeitblog.com (@whatyou_make_it) | Hannah mundanemummy.com (@_hannahsilver_)
What's your favourite thing to do in summer with your kiddos? I would love to hear in the comments below.
Care
IN THIS POST:
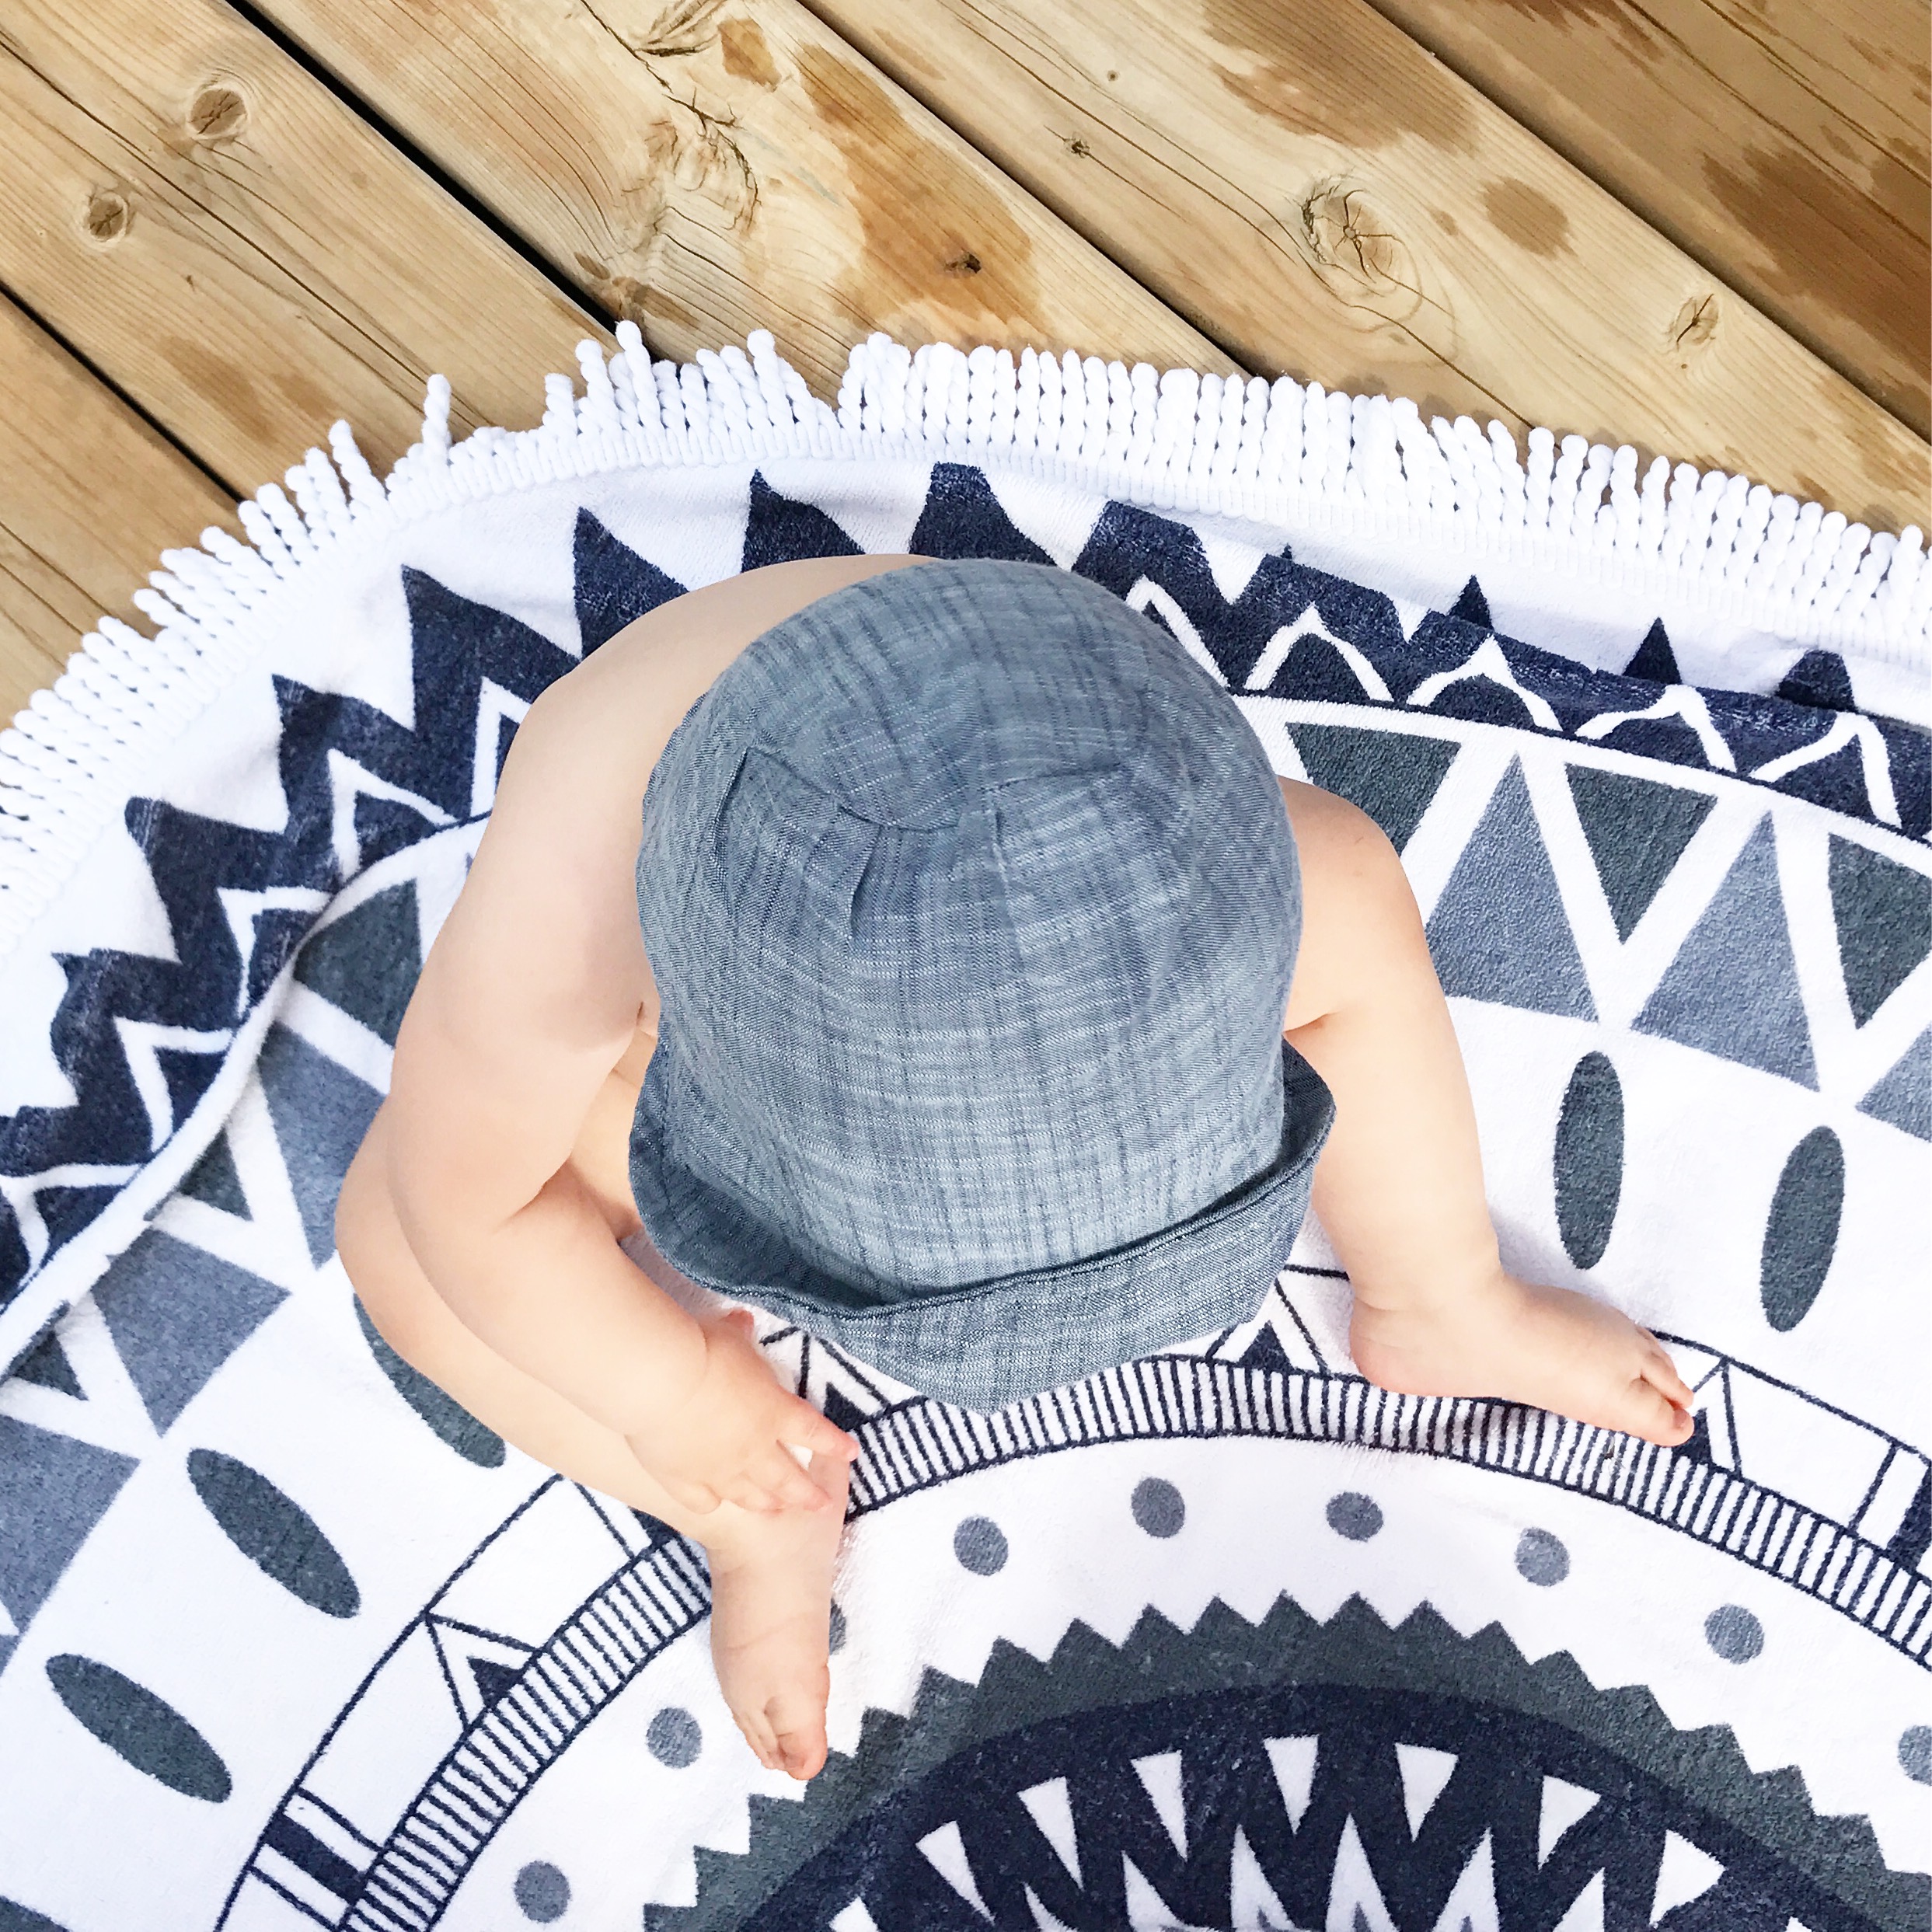
Anchor Studio: Photo with kids at top (Julia Salk Set Stylist) | Rollo Towel: Roundie Towel | Tiny Trendsetter: Chambray Bonnet & Saltwater Sandals| Diaper-eez: Motherease Swim Diaper & Swim Trainer *10% off code: Withcare | Sakura Bloom: Linen Ring Sling | I Angel: Grey Chevron Hip Seat Carrier
*This is not a sponsored post

Oven Roasted Tomatoes with Burrata - Simple Summer Recipe
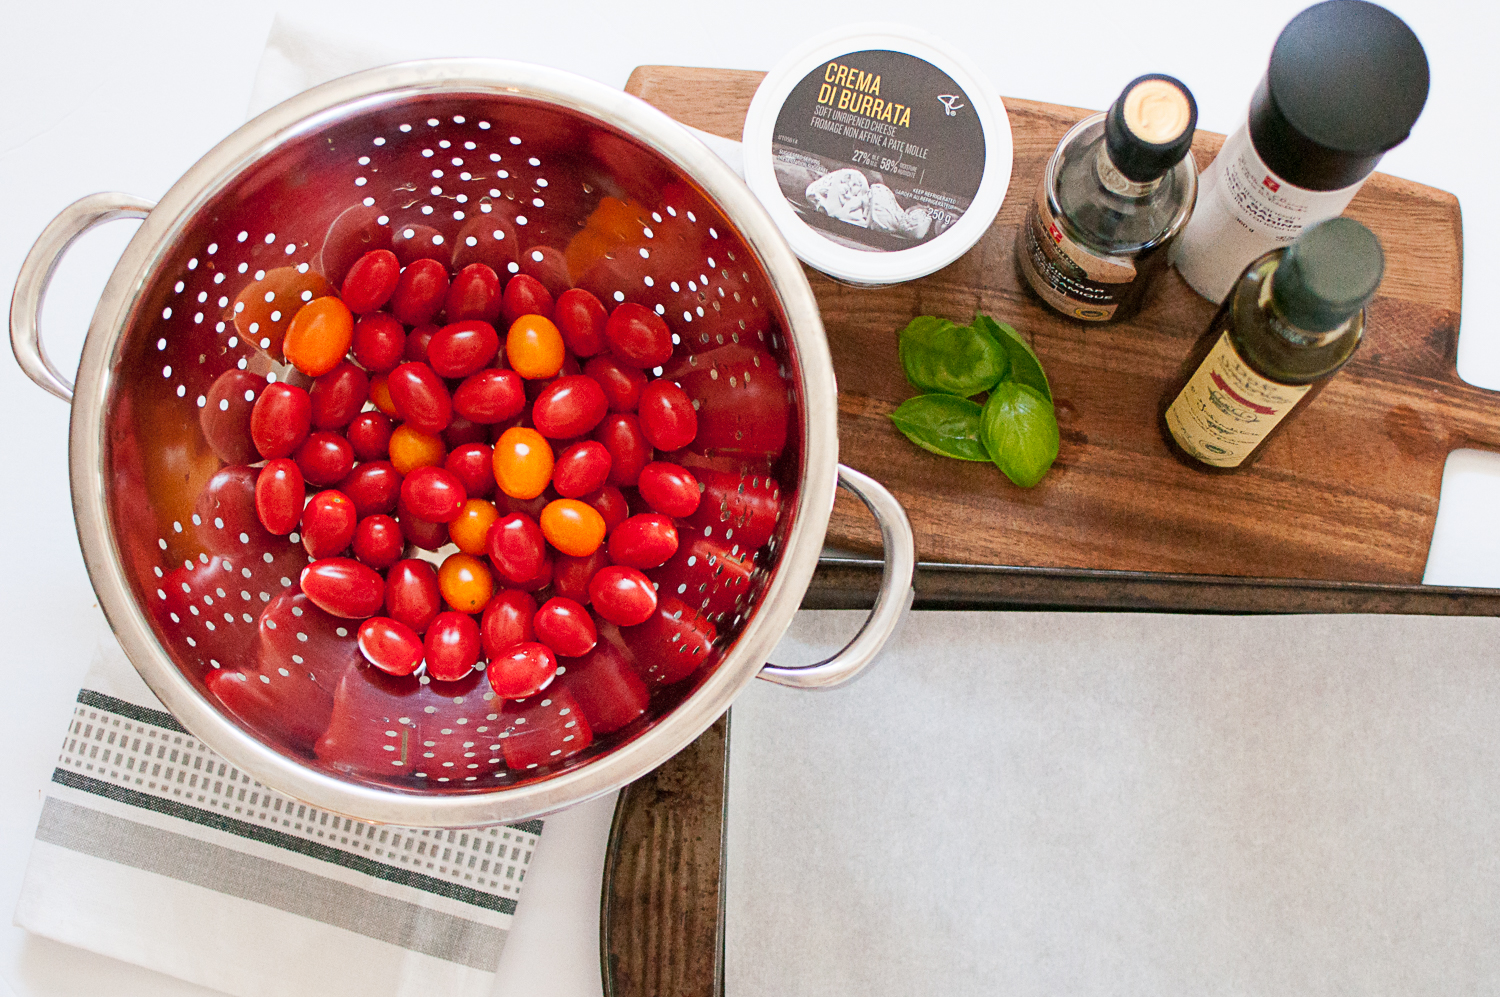
Summer is here and local tomatoes are hitting the farmers markets, so I wanted to share one of my favourite seasonal recipes. I was forced to recreate this recipe at home, because the local restaurant I usually get it at sadly closed this spring. I'm so happy with how it turned out. I always think it's a good sign when you need to make a new recipe twice in one weekend. That's exactly what I did with this one.

Summer is here and local tomatoes are hitting the farmers markets, so I wanted to share one of my favourite seasonal recipes. I was forced to recreate this recipe at home, because the local restaurant I usually get it at sadly closed this spring. I'm so happy with how it turned out. I always think it's a good sign when you need to make a new recipe twice in one weekend. That's exactly what I did with this one.
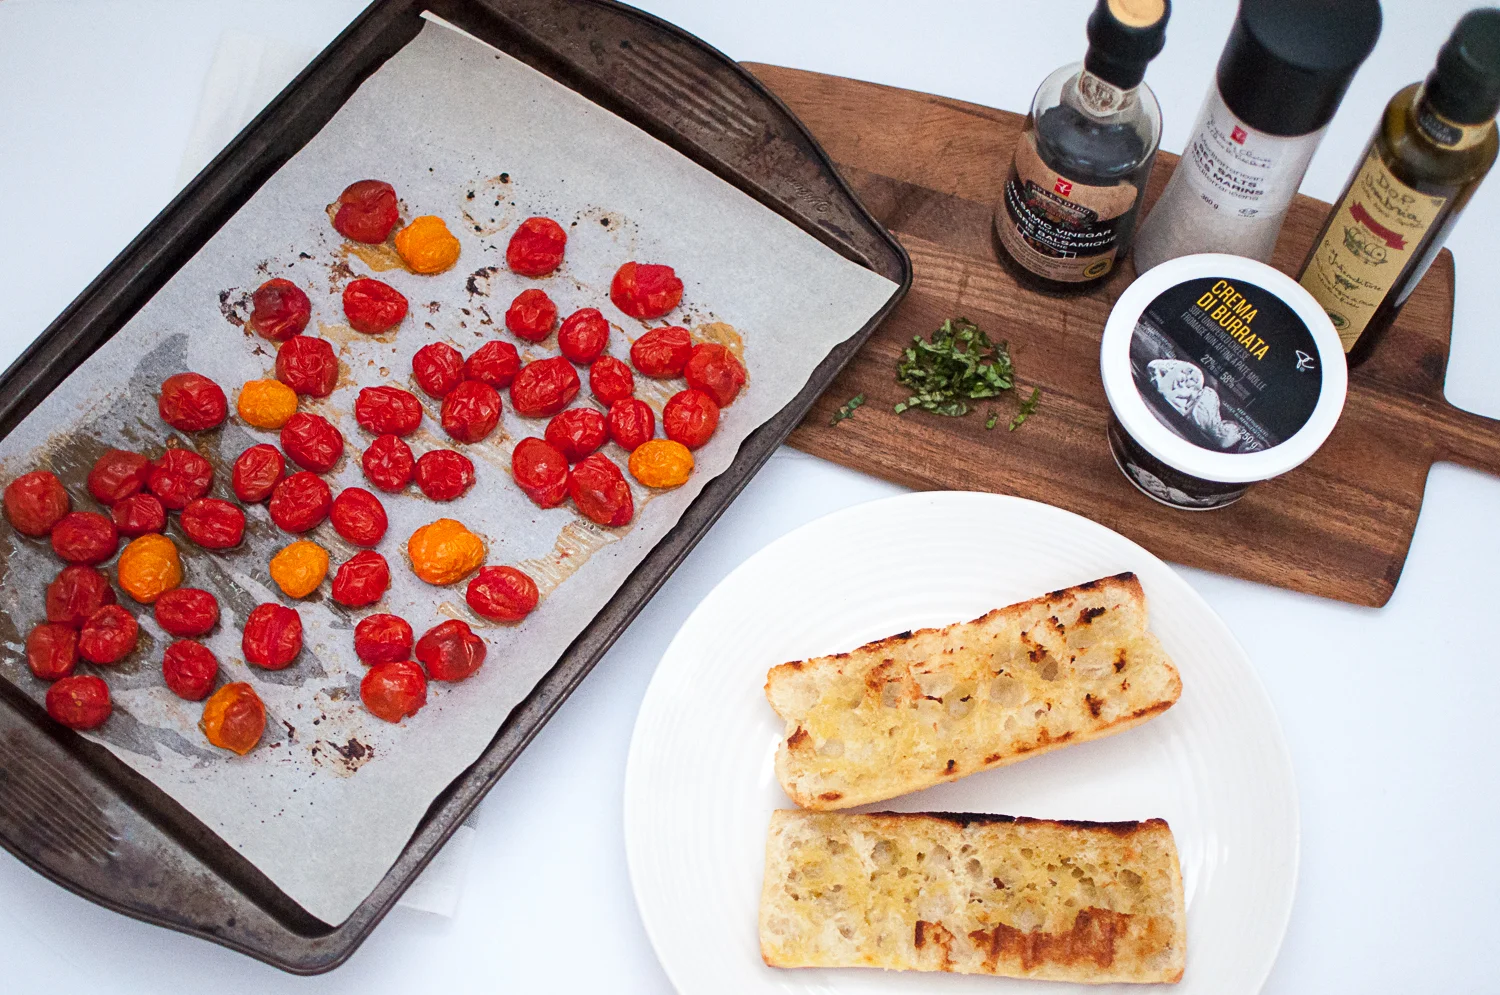
If you're anything like me you won't be able to get enough of these soft, warm roasted tomatoes drizzled with olive oil, balsamic, sea salt, fresh chopped basil and a generous helping of burrata. Add in some grilled bread and you really can't go wrong.
This recipe includes only 7 ingredients, 6 of which we typically have on hand ...not the buratta ;) It takes about 20 mins to make from start to finish, and tastes like pure summer, so that makes it pretty perfect in my books.
INGREDIENTS: 1 quart of grape or cherry tomatoes, a few basil leaves, olive oil, sea salt, balsamic vinegar, 1 pkg of burrata cheese, baguette.
DIRECTIONS:
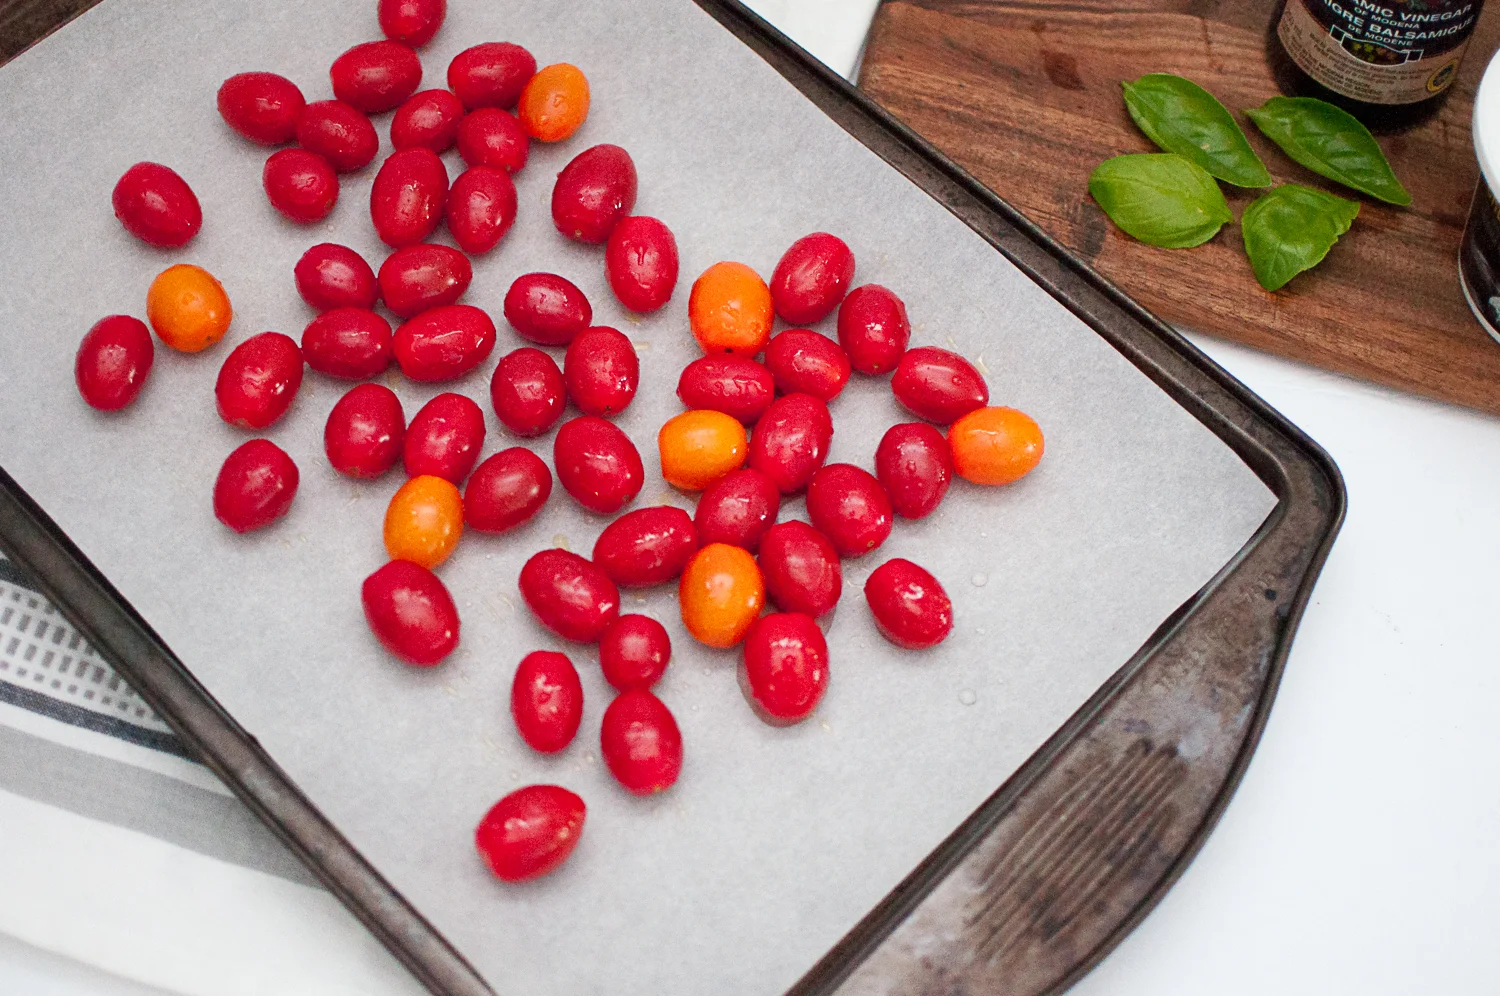
1. Wash tomatoes & basil
2. Toss tomatoes with olive oil and sea salt and place on parchment lined baking sheet. Bake at 400 for 15-20 minutes
3. Brush baguette with olive oil and grill in a grill pan over medium high heat while tomatoes roast.
4. Once tomatoes are done, remove from oven, let cool for a few minutes, and then transfer to plate.
5. Add generous helping of buratta, and drizzle with balsamic, olive oil, sea salt and fresh chopped basil. Serve with grilled bread.

This recipe is going to be in heavy rotation around here this summer. I can't wait until we can make it with our own homegrown tomatoes.
Care
Basement Playroom Makeover Reveal + Amazing Decor GIVEAWAY! (Special Discount Included)
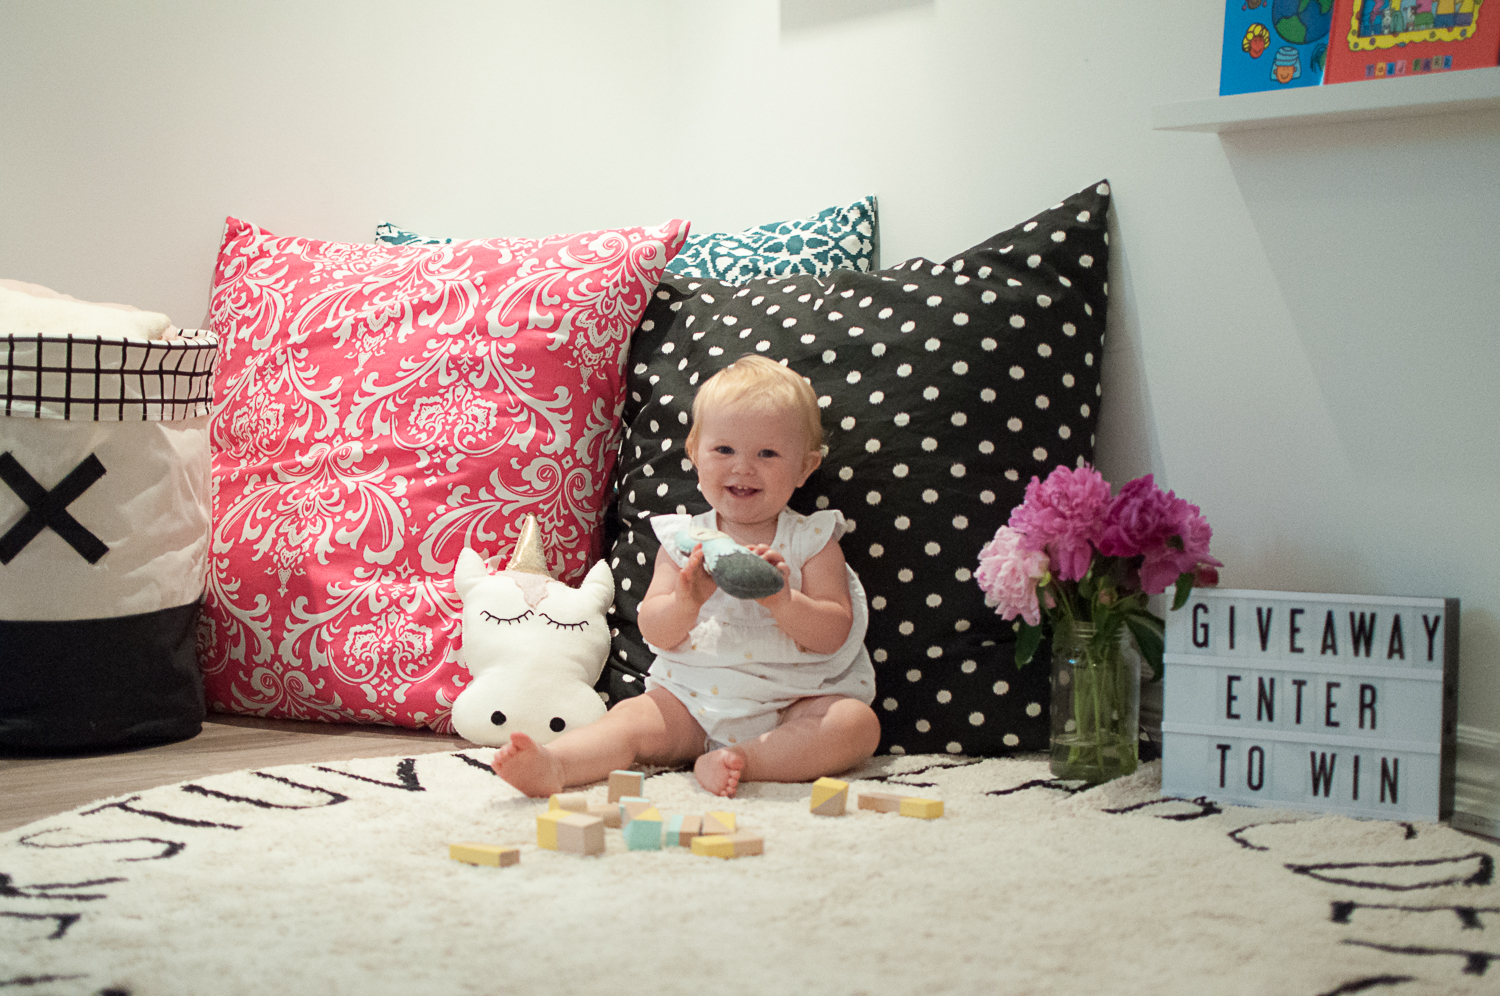
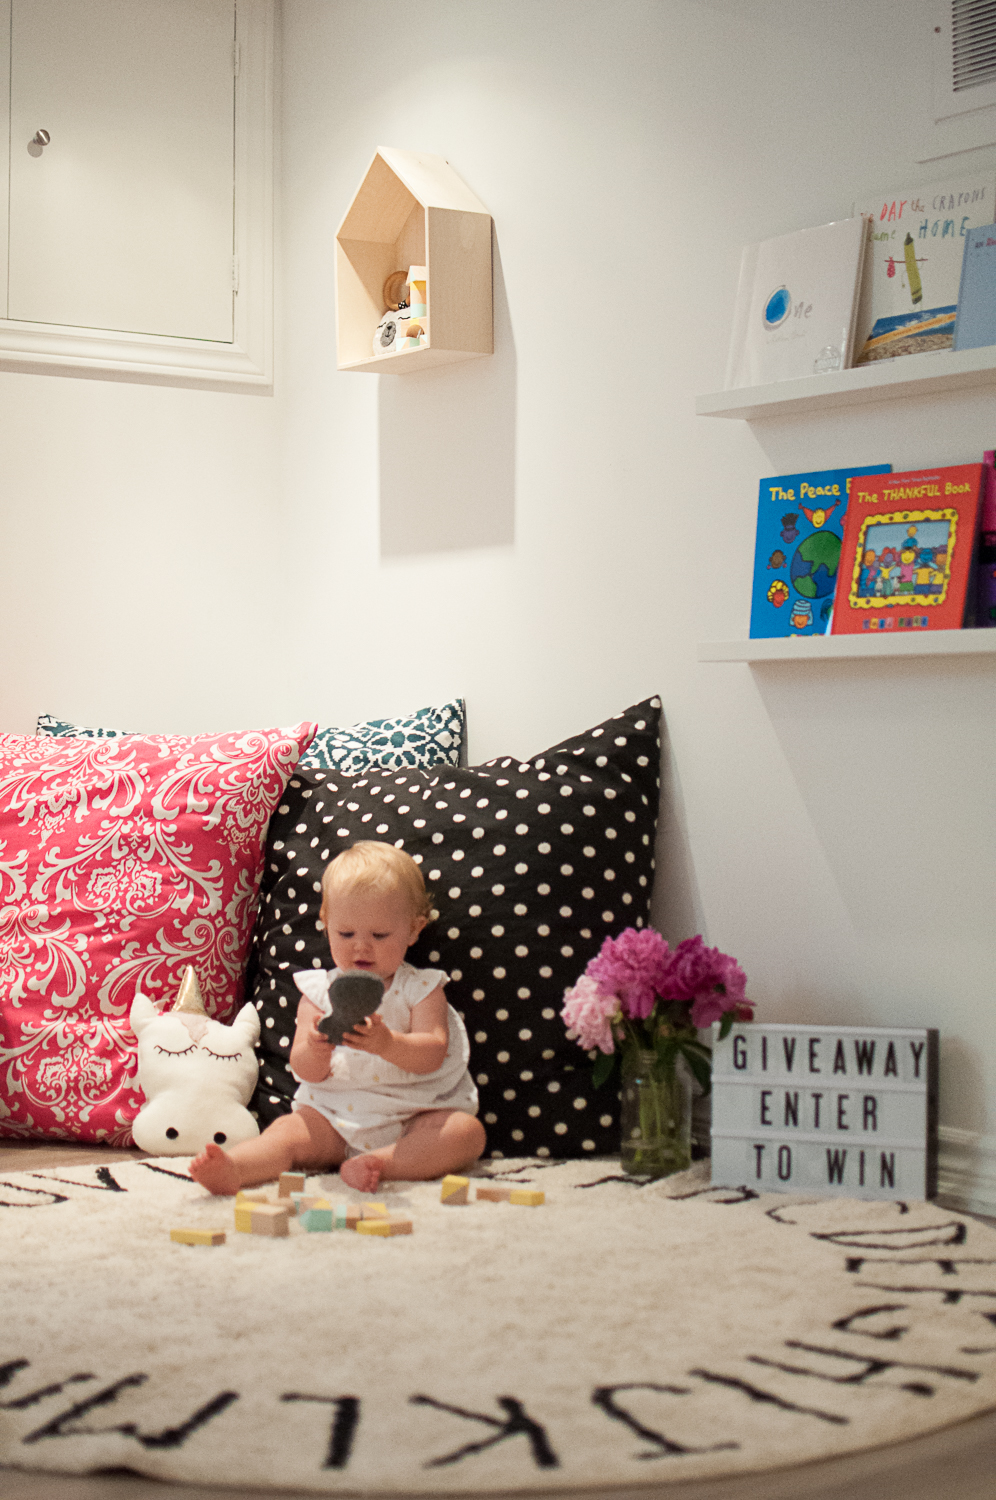
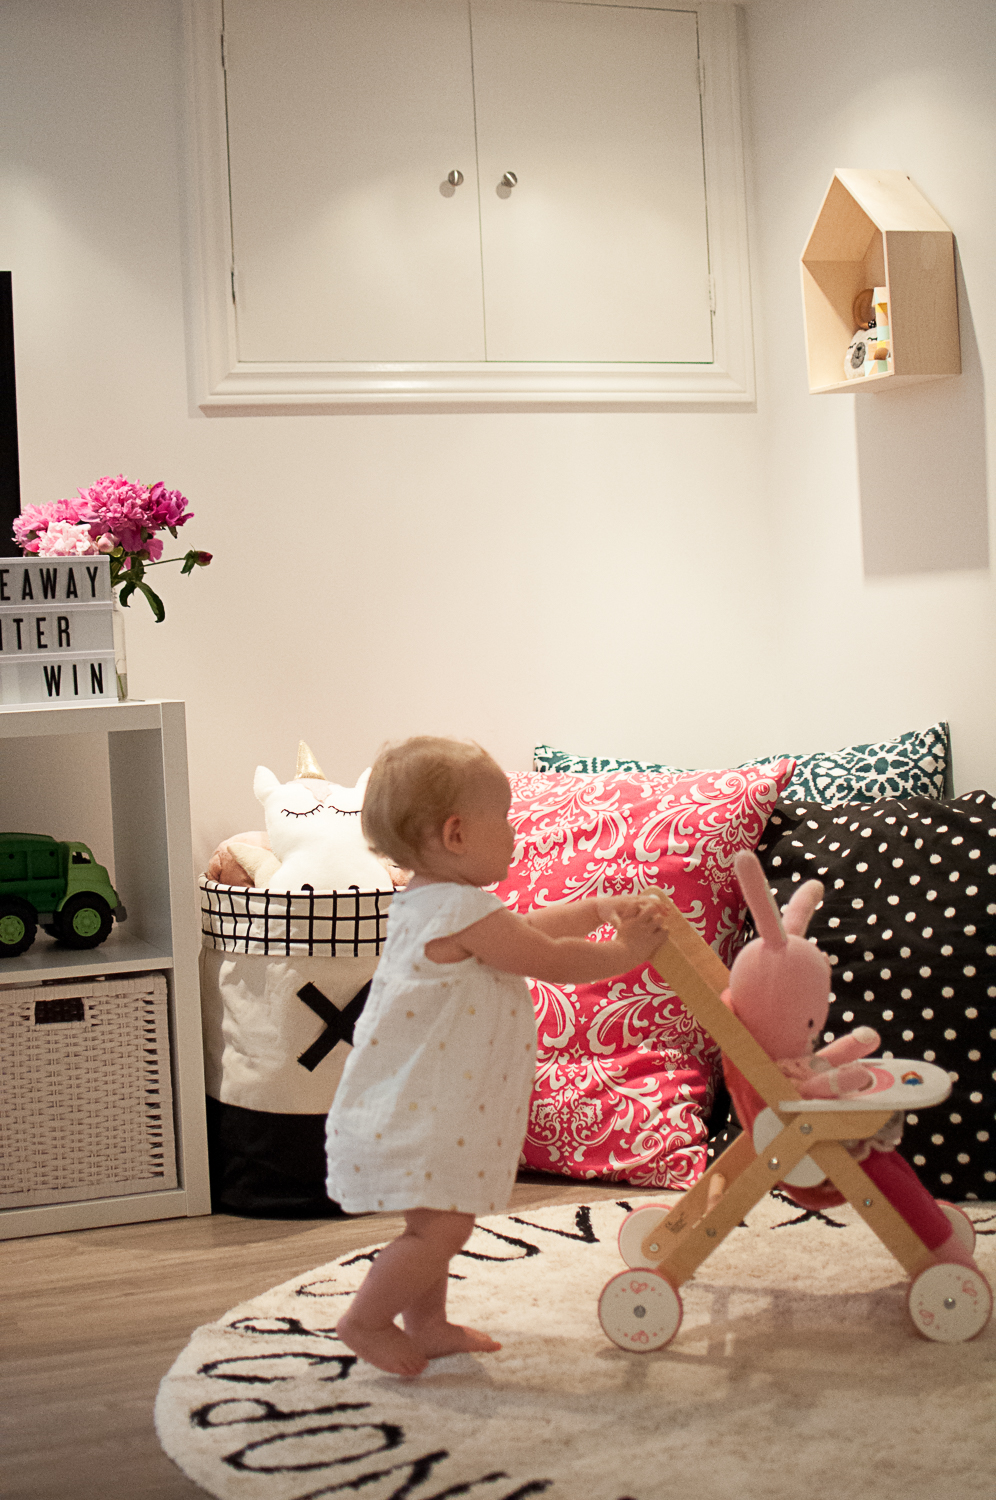
Last year as we awaited the arrival of Penny, our 3rd baby, we realized that we desperately needed more usable space in our Toronto home. We made the big decision to finish our basement, and set out to create a comfortable space for our family that wouldn't break the bank. Originally it was a dark and dingy 70's inspired space with cement floors covered in ripped linoleum and walls cladded in old-school wood panelling. My inspiration for the makeover was light and bright.
Last year as we awaited the arrival of Penny, our 3rd baby, we realized that we desperately needed more usable space in our Toronto home. We made the big decision to finish our basement, and set out to create a comfortable space for our family that wouldn't break the bank. Originally it was a dark and dingy 70's inspired space with cement floors covered in ripped linoleum and walls cladded in old-school wood panelling. My inspiration for the makeover was light and bright.
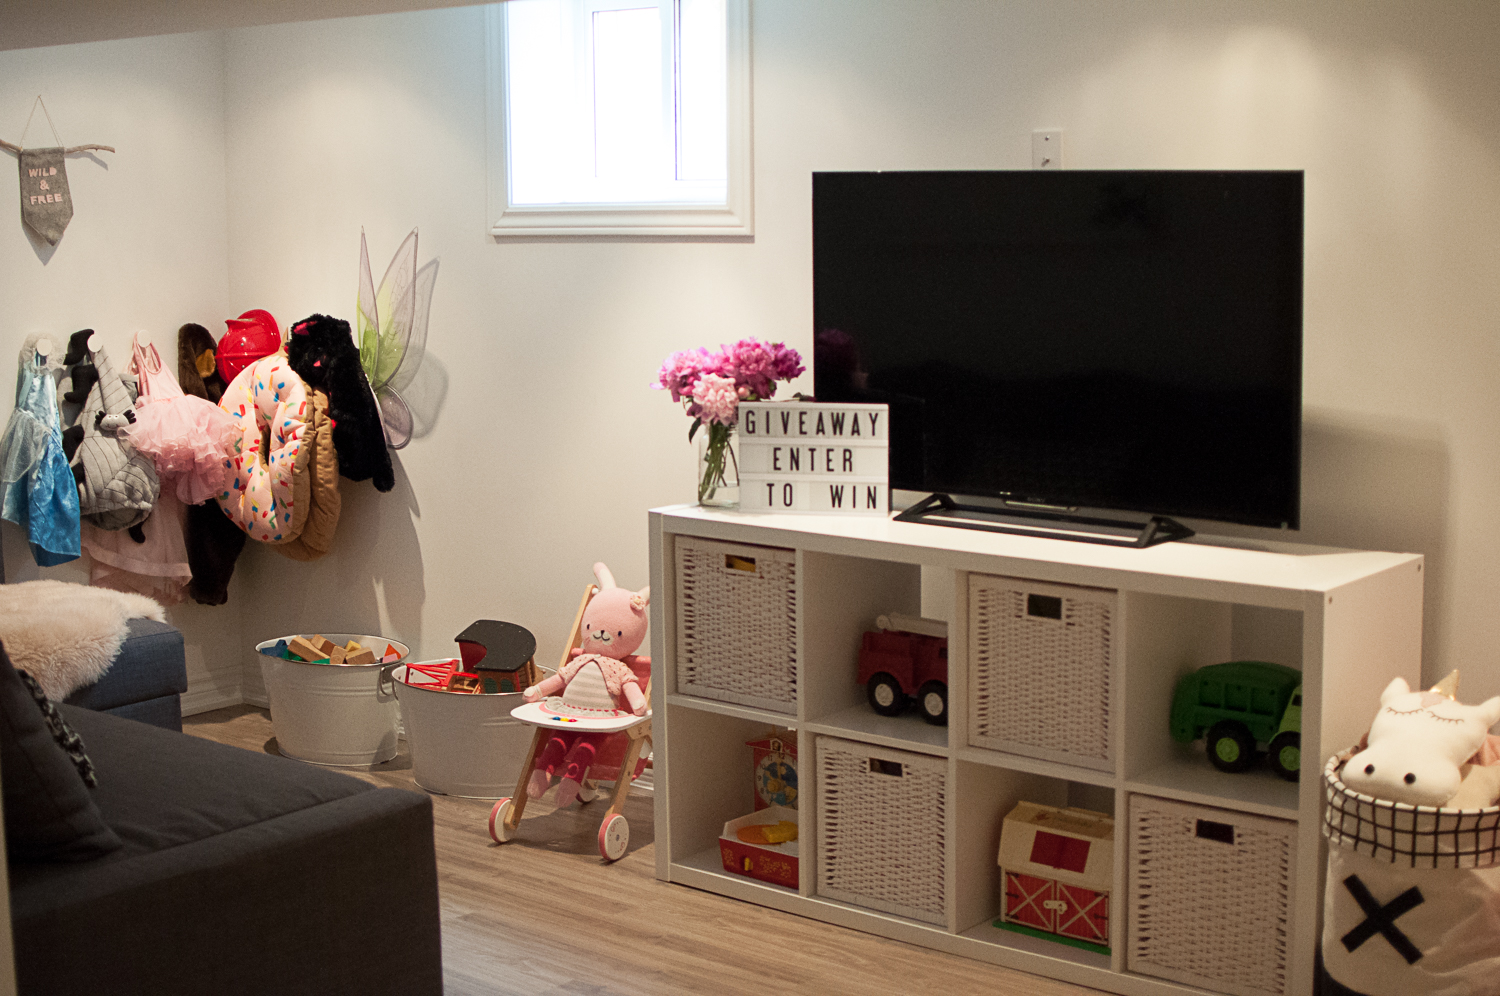
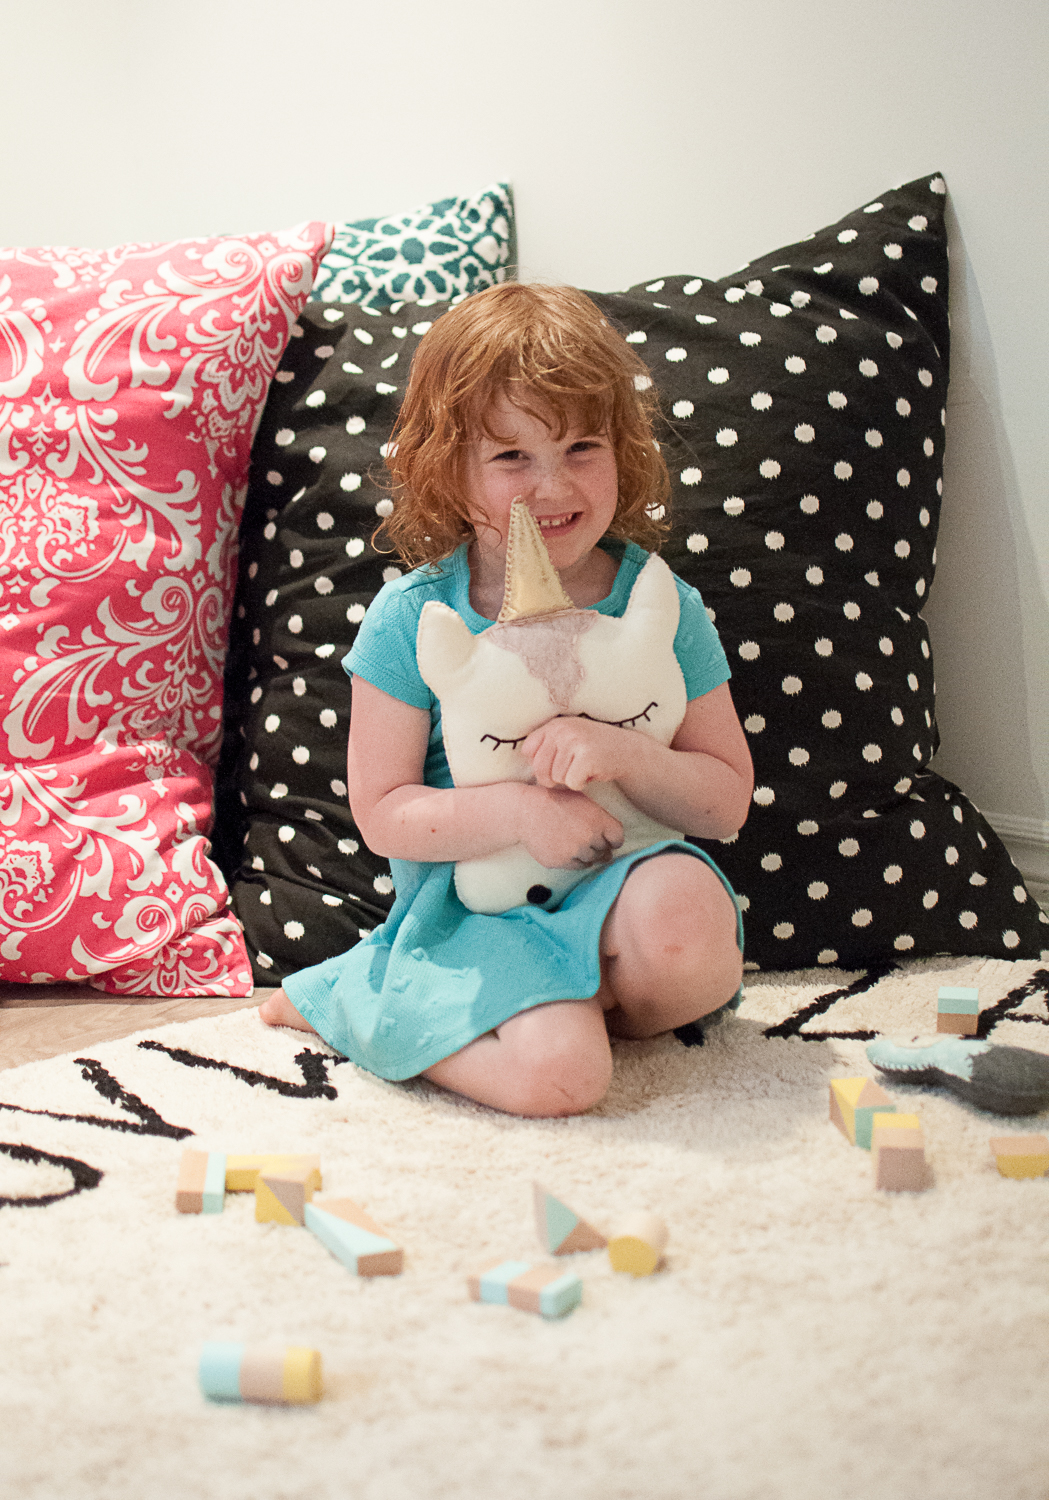
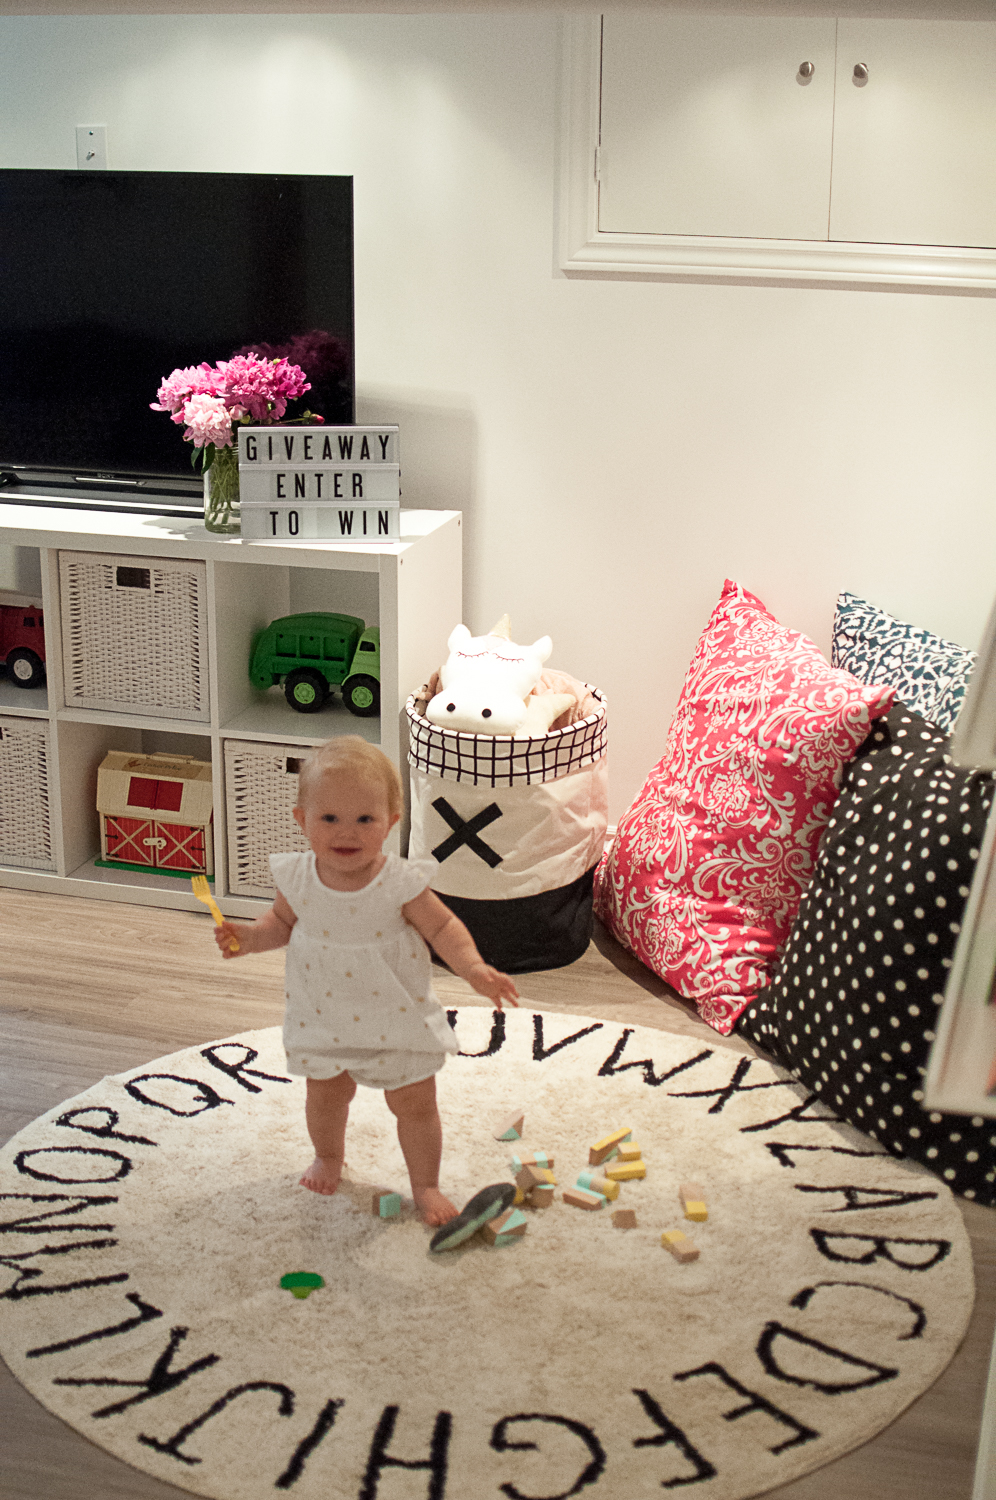
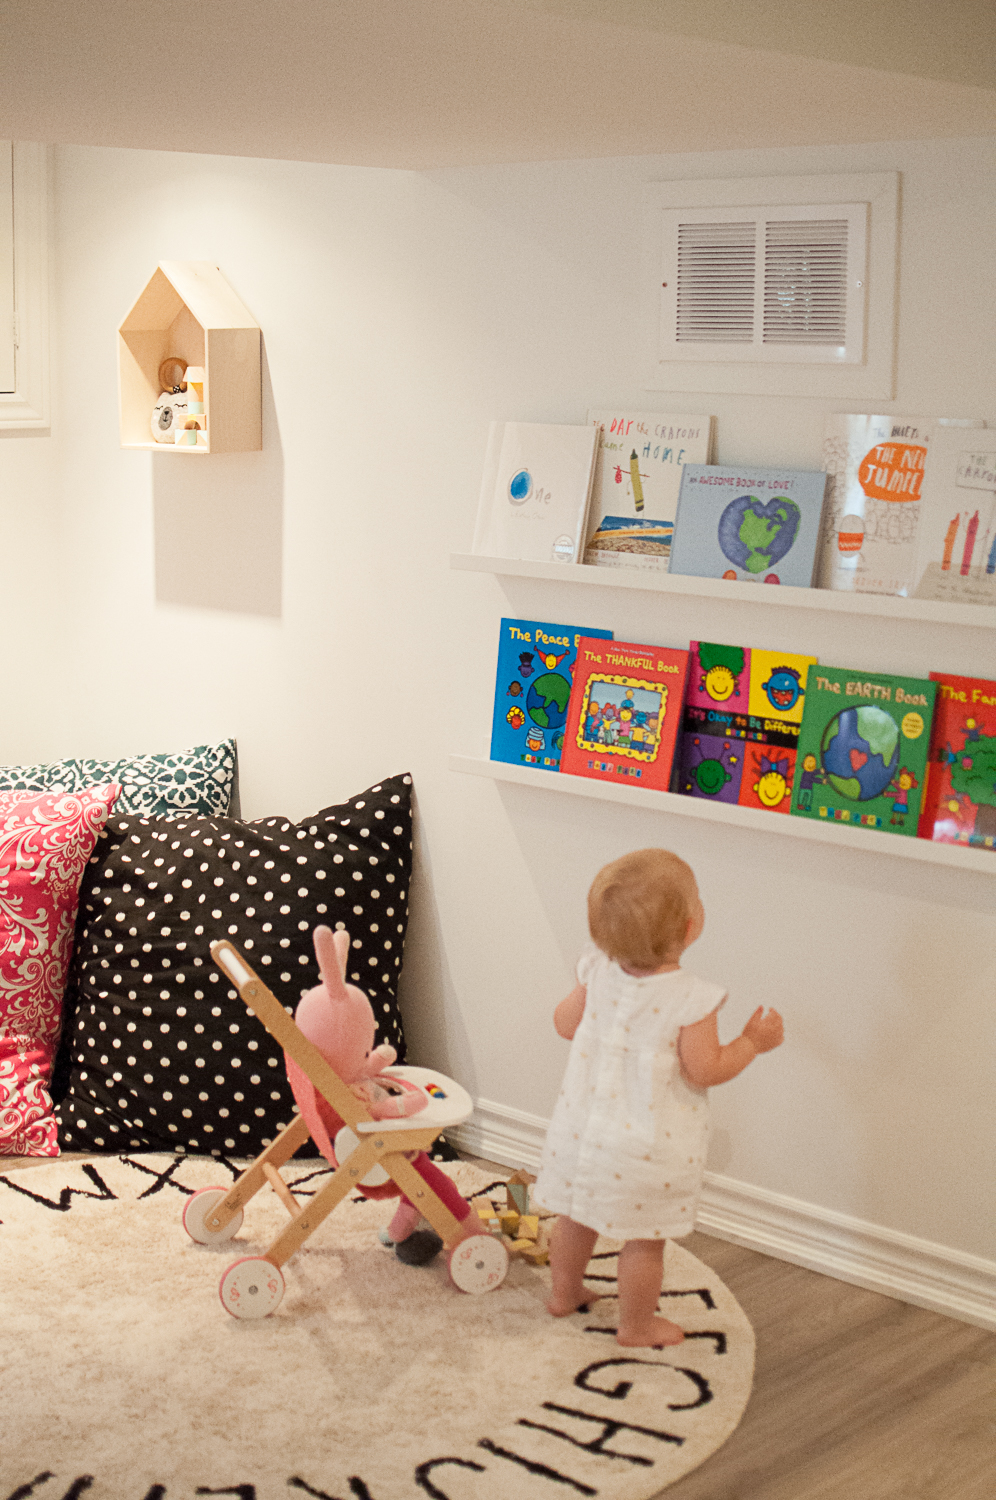
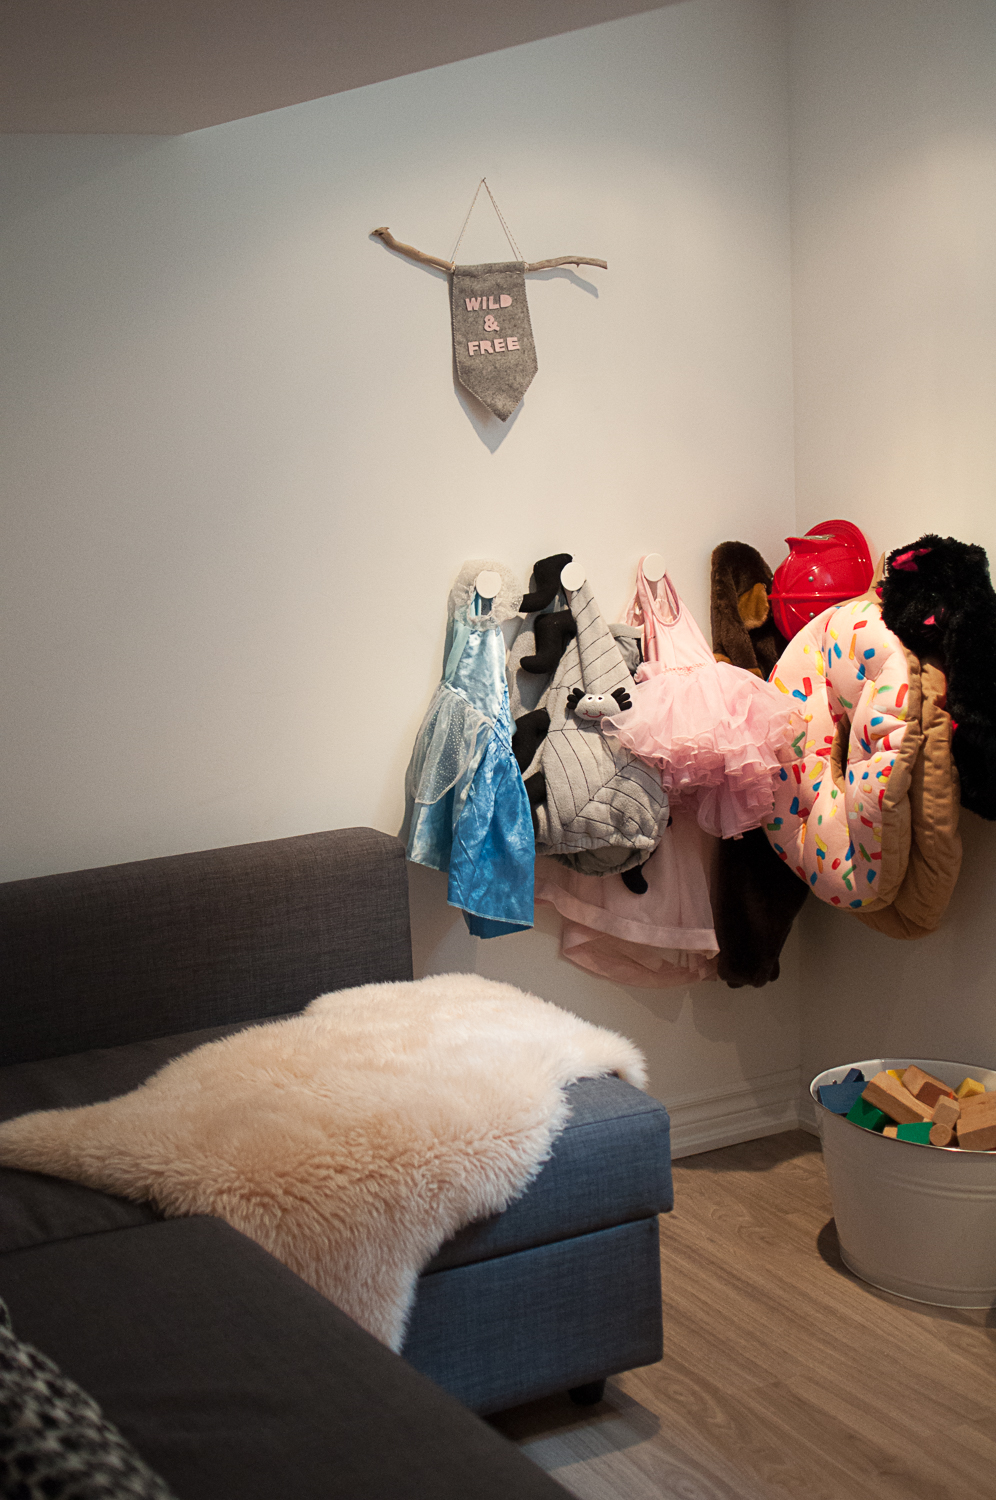
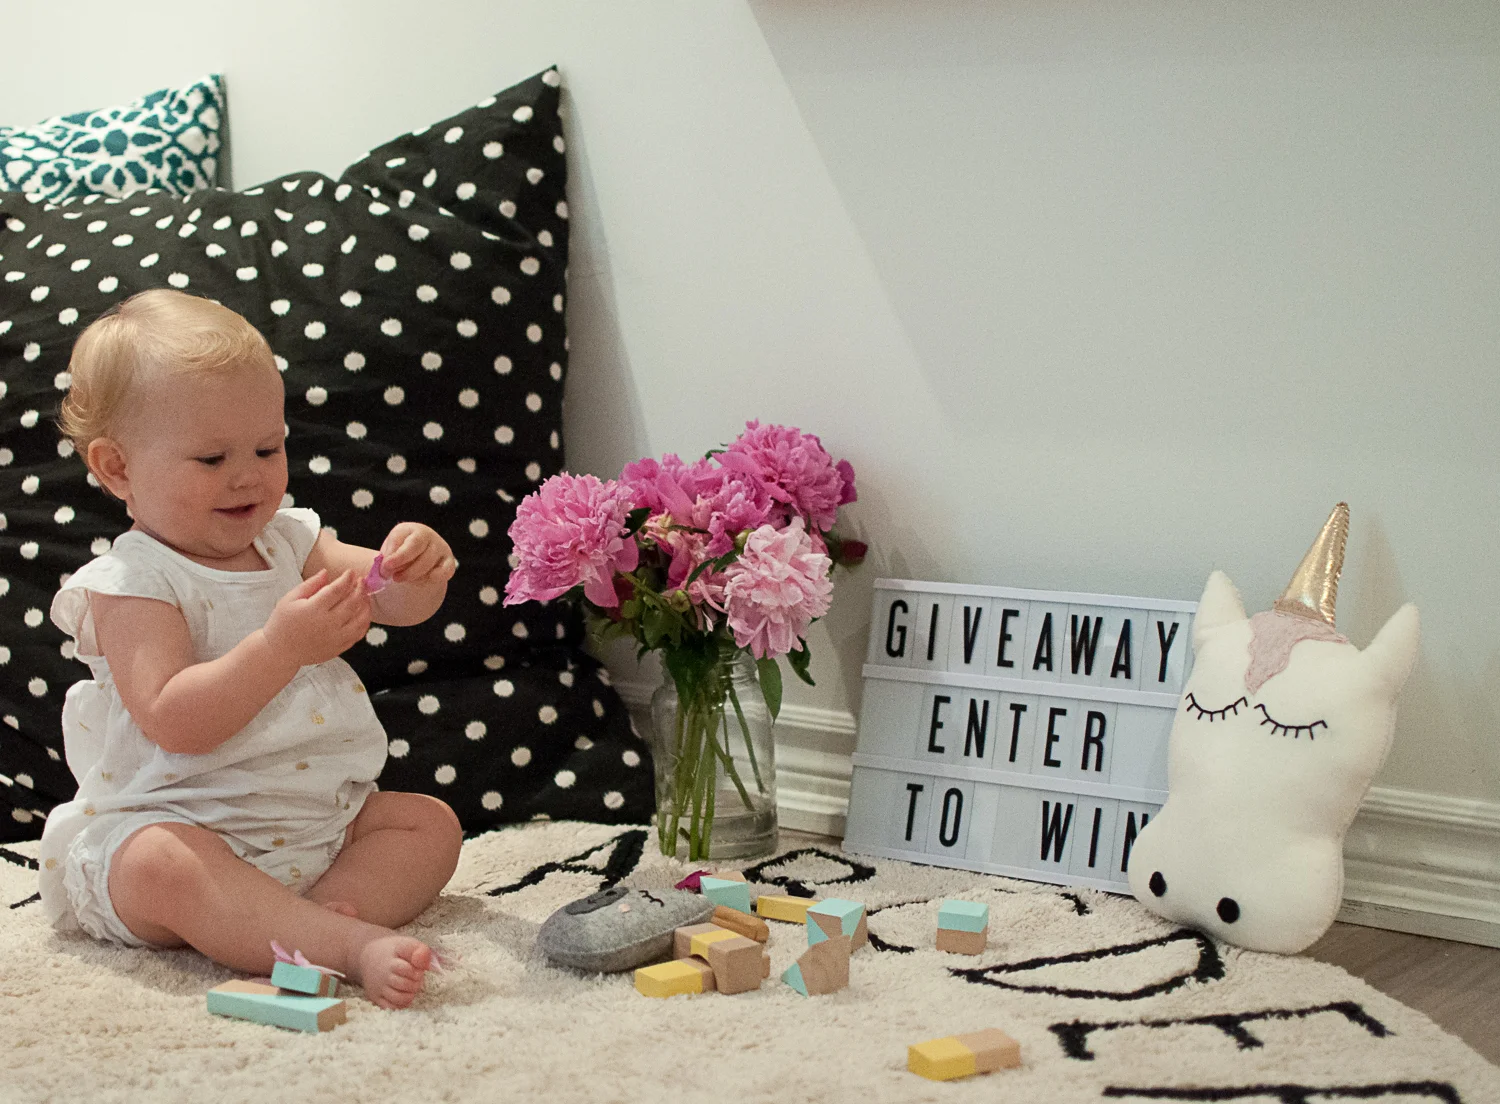
The main part of the renovations were completed just days before Penny's arrival. Every contractor who entered our house looked terrified when they saw me waddling around talking about my home water birth, that was to be held in said basement ;) With 3 kids in tow it has taken me a year to pull together accessories and fun stuff for this kid friendly space. I'm so excited to finally share the kids' favourite new space and give away shop credits for two of our favourite finds! *Please note: the playroom was only this tidy for photos. Typically every basket and bin get emptied out onto the floor daily ;)
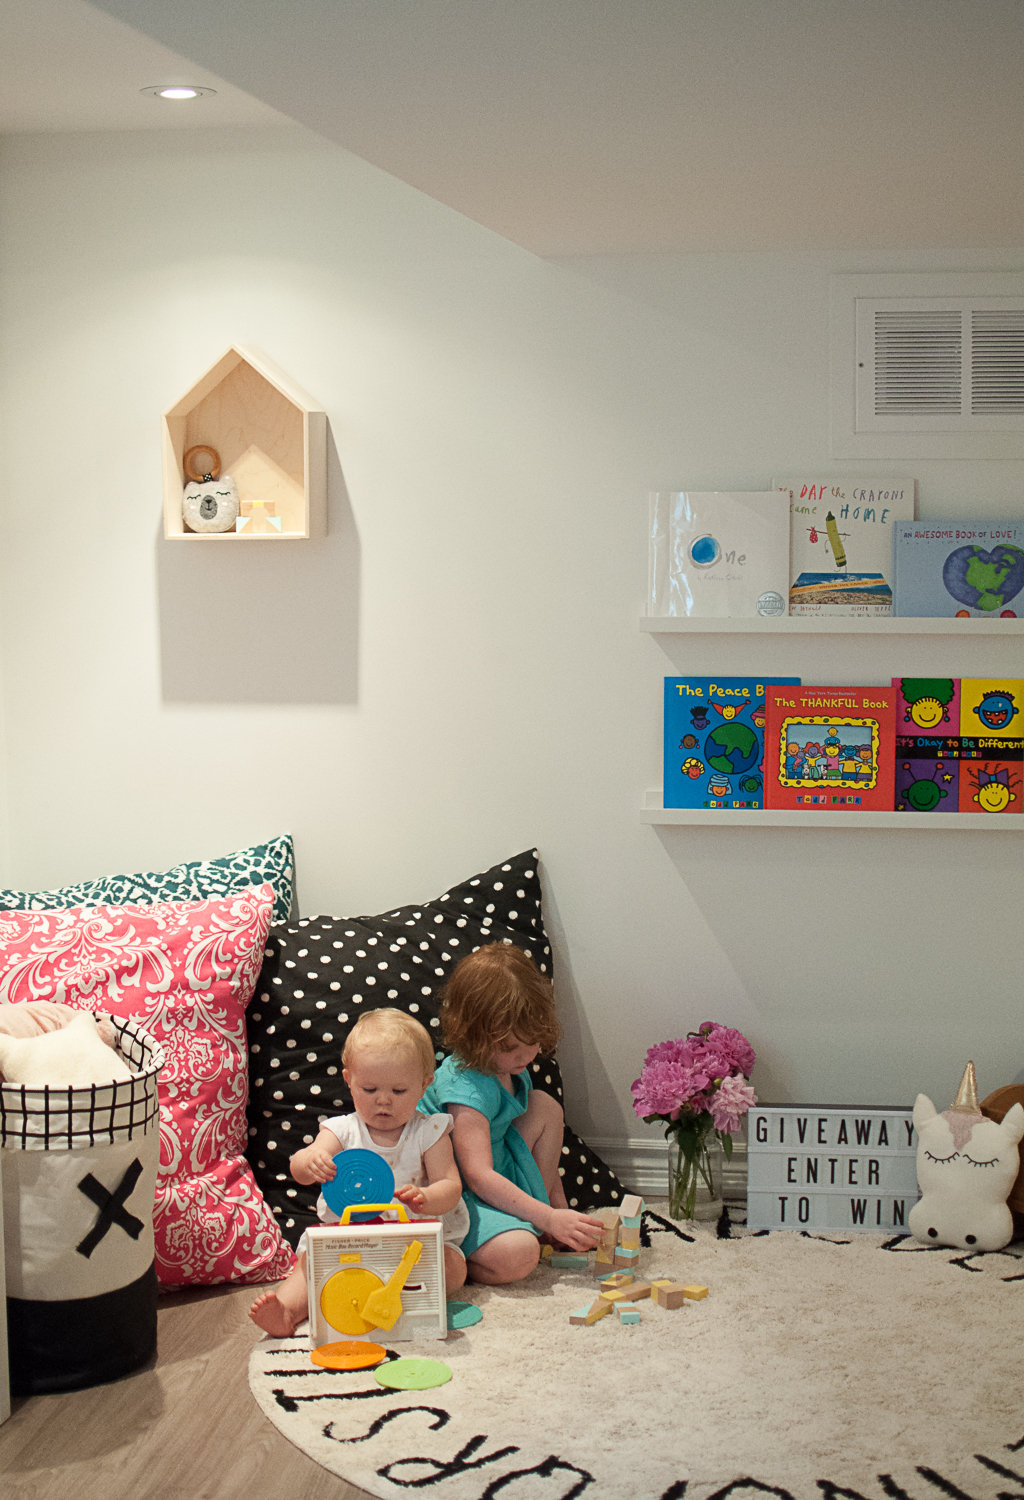
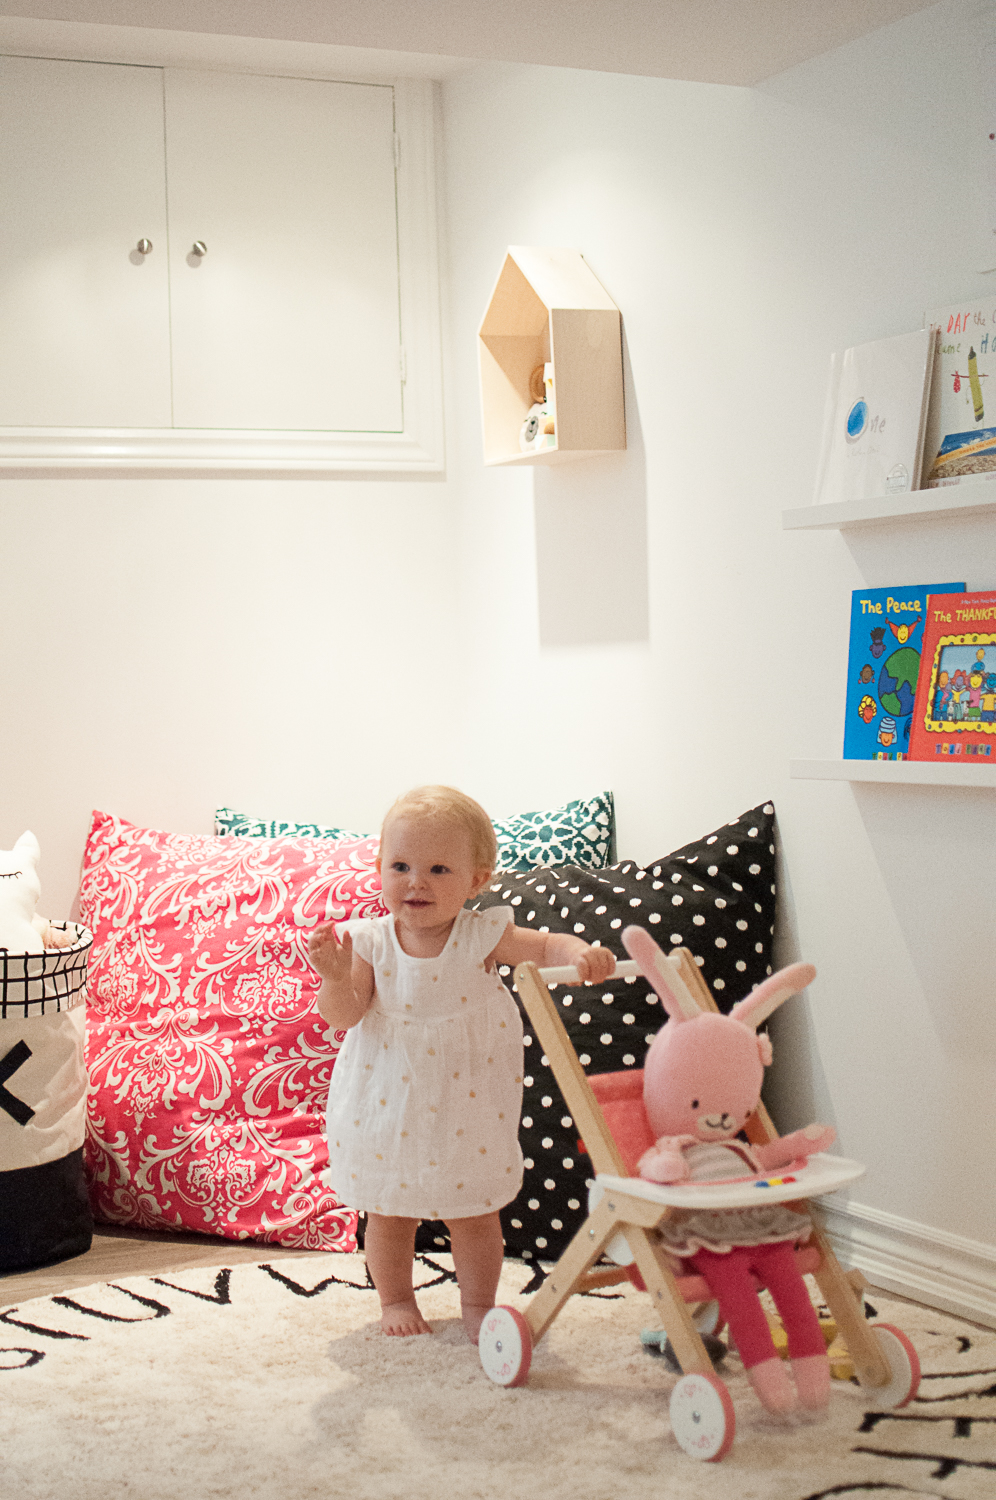

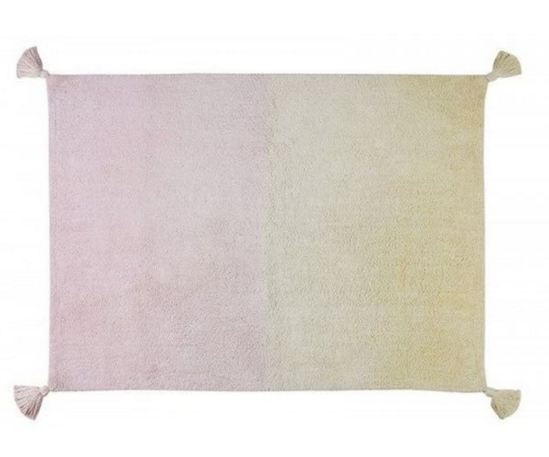
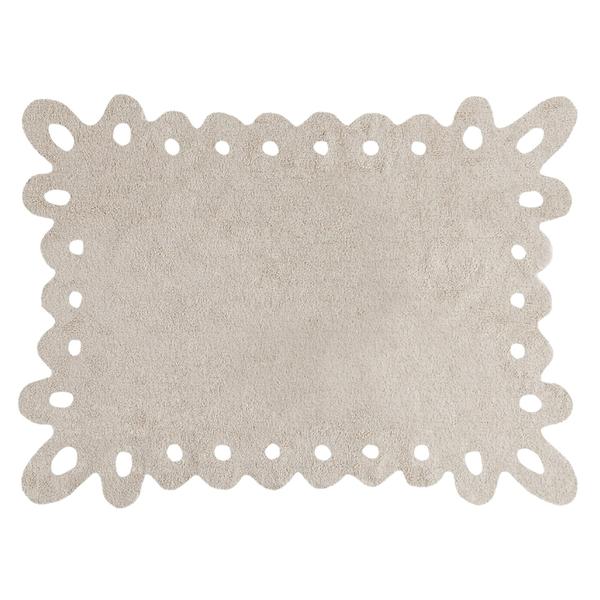
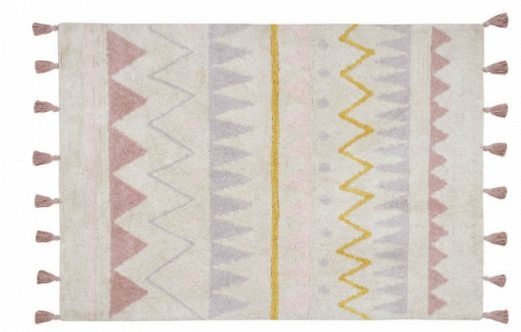
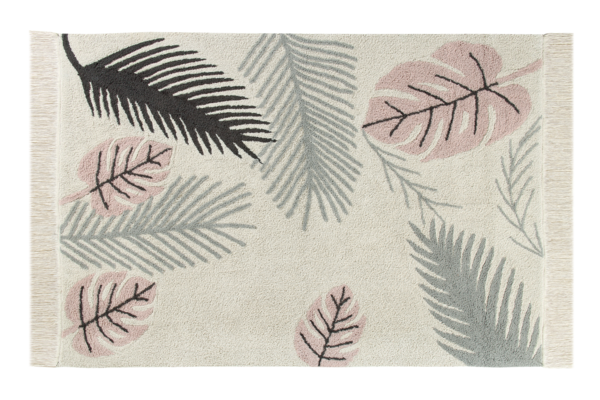
1. Lorena Canals Machine Washable & Dryer Friendly Rugs
Kid's are messy little creatures, so when I set out to find a rug to make a cozy reading space for the kids I knew I wanted a Lorena Canals. These rugs are incredible. They are machine washable, made from all natural materials and dyes, and free from any dangerous chemicals. We have already washed and dried our rug a few times and I can tell you I am so happy with the choice. There are tons of amazing designs and colours to choose from at Amelie & Max. I loved so many of them, but was limited to choosing one without fringe, because we have a cat who loves to destroy all fringe. I love this ABC one the kids helped me choose. Enter for a chance to WIN a $100 credit toward a Lorena Canals Rug from Amelie & Max! (entry details below)


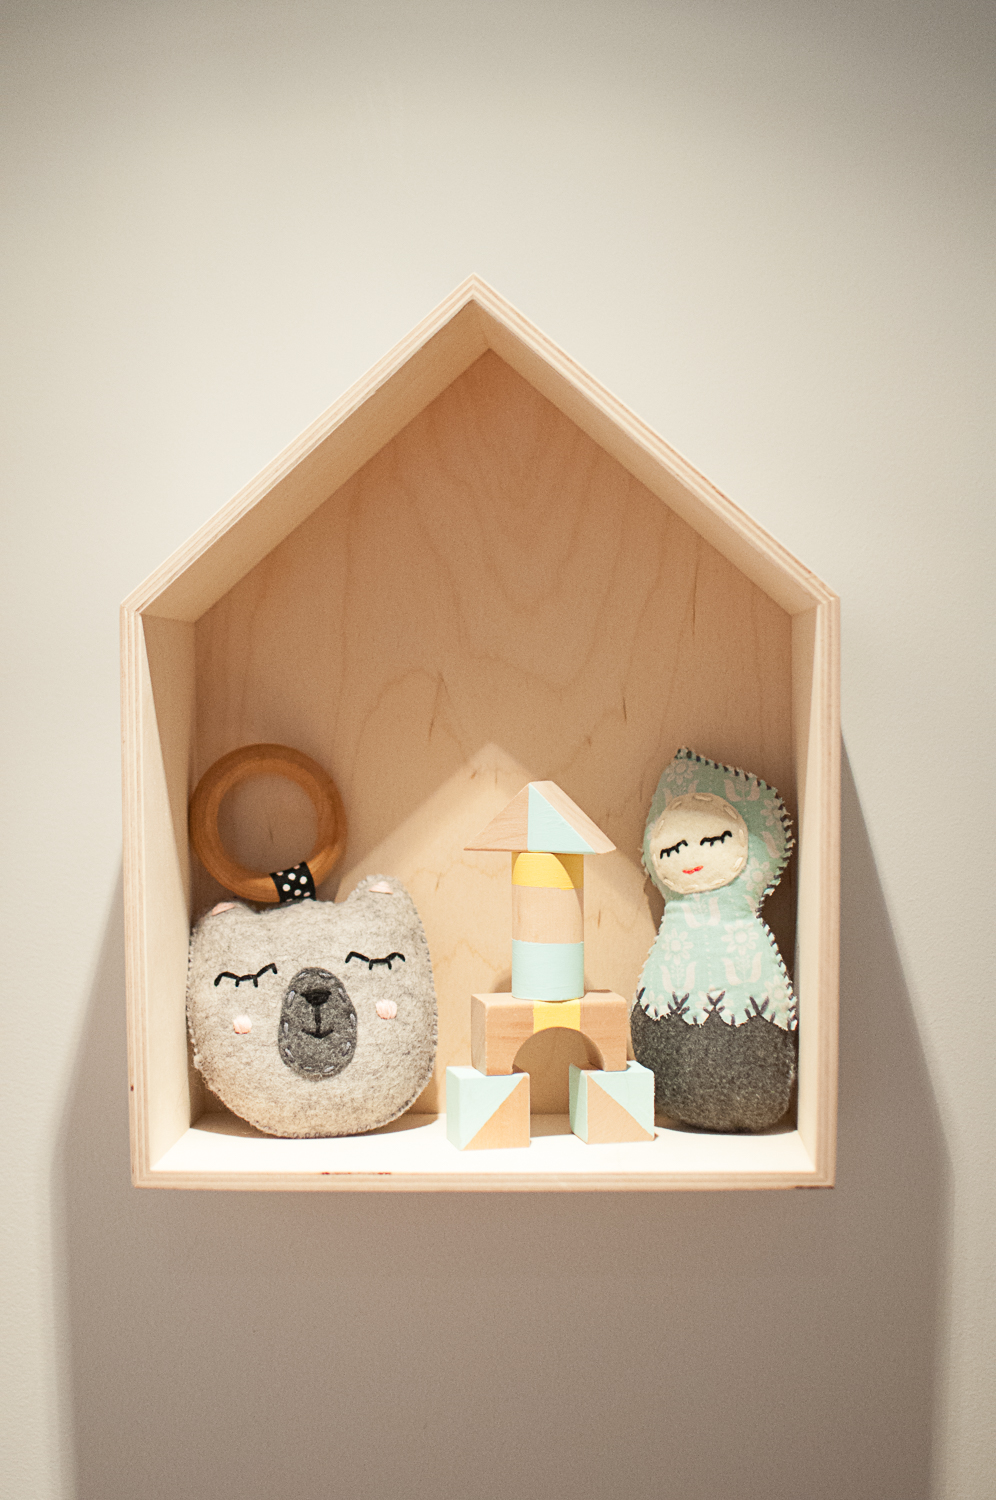
2. Newmies Eco-Friendly Baby & Toddler Developmental Toys
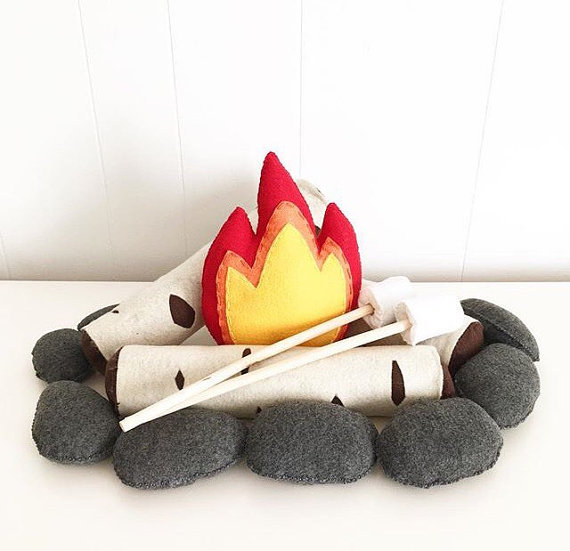
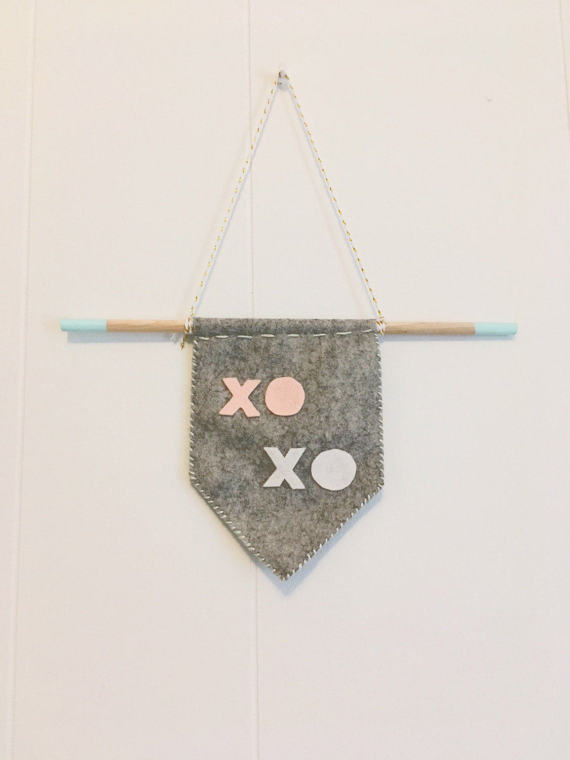
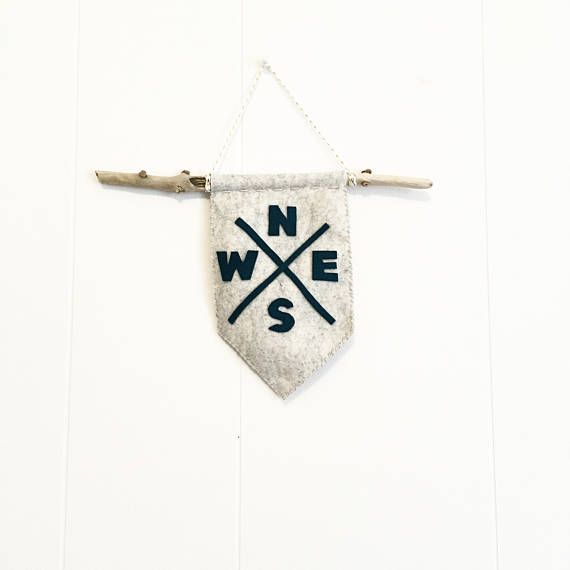
I love supporting small local businesses, so when I met Amanda, the owner of Newmies, at The Bump to Baby Show I knew it was a perfect fit. I absolutely love her handmade stuffed toys, rattles, teethers, painted wooden blocks, and most of all her wall hangings. They have such great positive messages for our kids. We picked the "Love is Love" and "Wild & Free" hangings, but there are tons of adorable ones in her etsy shop, so check it out. Such a unique gift for baby showers or birthday parties. I'm also obsessed with the Farmer's Market set and the Campfire Set that comes complete with S'mores! Enter for a Chance to WIN a $40 shop credit with Newmies. (entry details below)


Enter for a chance to WIN a $100 Credit for a Lorena Canals Rug with Amelie & Max* + a $40 Shop Credit with Newmies! (*Rug design choices subject to availability at www.amelieandmax.ca at time of ordering)
To Enter simply comment below with your name and email address, or alternatively you may comment below and submit your email address to care@with-care.ca for entry. Plus make sure to check out our Facebook page & Instagram feed for 2 more ways to enter! Contest is open worldwide for anyone 25+ and closes Thursday June 22nd at 11pm EST. A winner will be chosen at random and contacted within 24 hours. Good Luck!
*As a special treat use code "WITHCARE" for $10 off your 1st purchase over $50 with Amelie & Max and $10 off your 1st purchase over $40 with Newmies.
Don't wait, Enter NOW! Plus don't forget to enter on Facebook & Instagram. Good luck!
Care
In this post:
Amelie & Max: rug, sheepskin, house shelf, toy hamper, lightbox | Newmies: hand painted blocks, rattle, teether, wall hangings, stuffed unicorn | Ikea: book rails, couch, shelving unit, baskets, play kitchen | With Care: DIY Simple Floor Cushions | Tiny Trendsetters: Penny's dress & bloomers
*This is a sponsored post which means I was provided compensation and/or product for this post. All thoughts and opinions are 100% my own.

Garage Makeover Inspiration + GIVEAWAY! Enter to WIN a "Smart Garage Door System" with Garaga
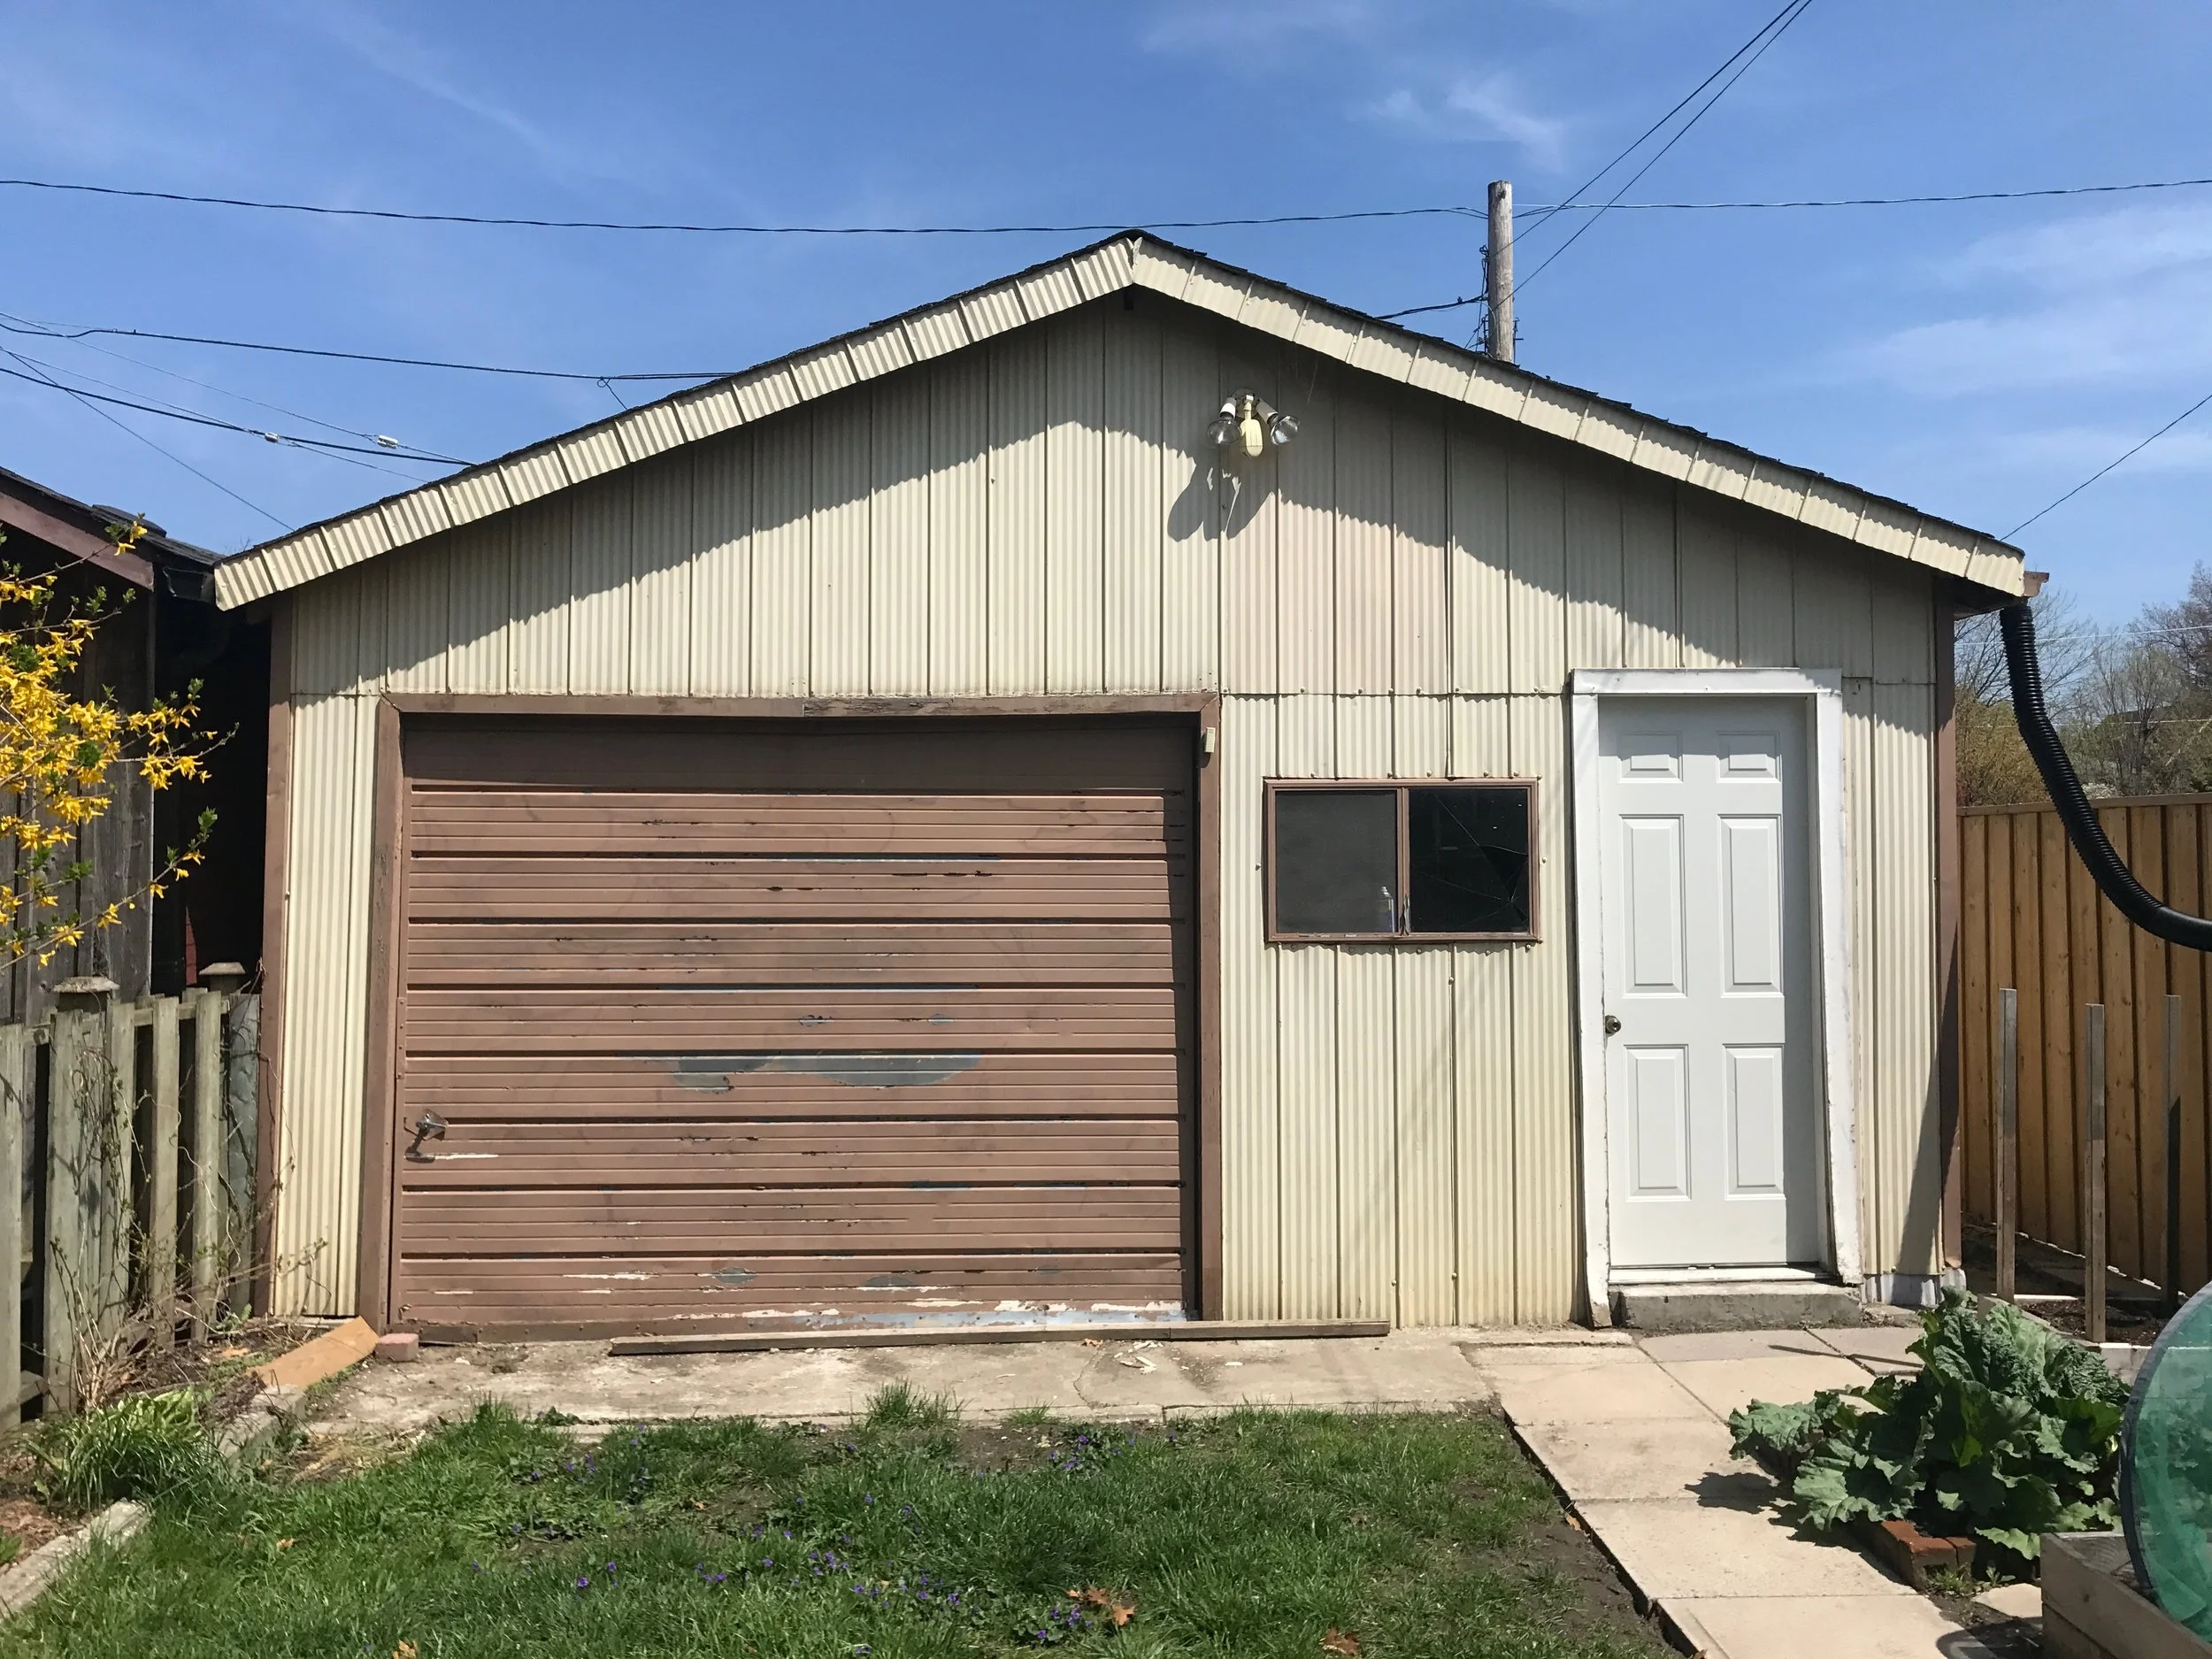
When we were looking to buy a home in Toronto we never thought we would get lucky enough to have a garage, let alone the big 2 car garage we managed to snag. The only issue was that it was a bit of an eyesore with peeling paint, old sharp metal siding and an ugly broken garage door that faces directly into our yard. Fixing up the garage has been on our wish list for the last 4 years, and finally this year we decided to do it. We love our gardens so much, and want to enjoy our beautiful backyard with a fresh backdrop.
When we were looking to buy a home in Toronto we never thought we would get lucky enough to have a garage, let alone the big 2 car garage we managed to snag. The only issue was that it was a bit of an eyesore with peeling paint, old sharp metal siding and an ugly broken garage door that faces directly into our yard. Fixing up the garage has been on our wish list for the last 4 years, and finally this year we decided to do it. We love our gardens so much, and want to enjoy our beautiful backyard with a fresh backdrop.
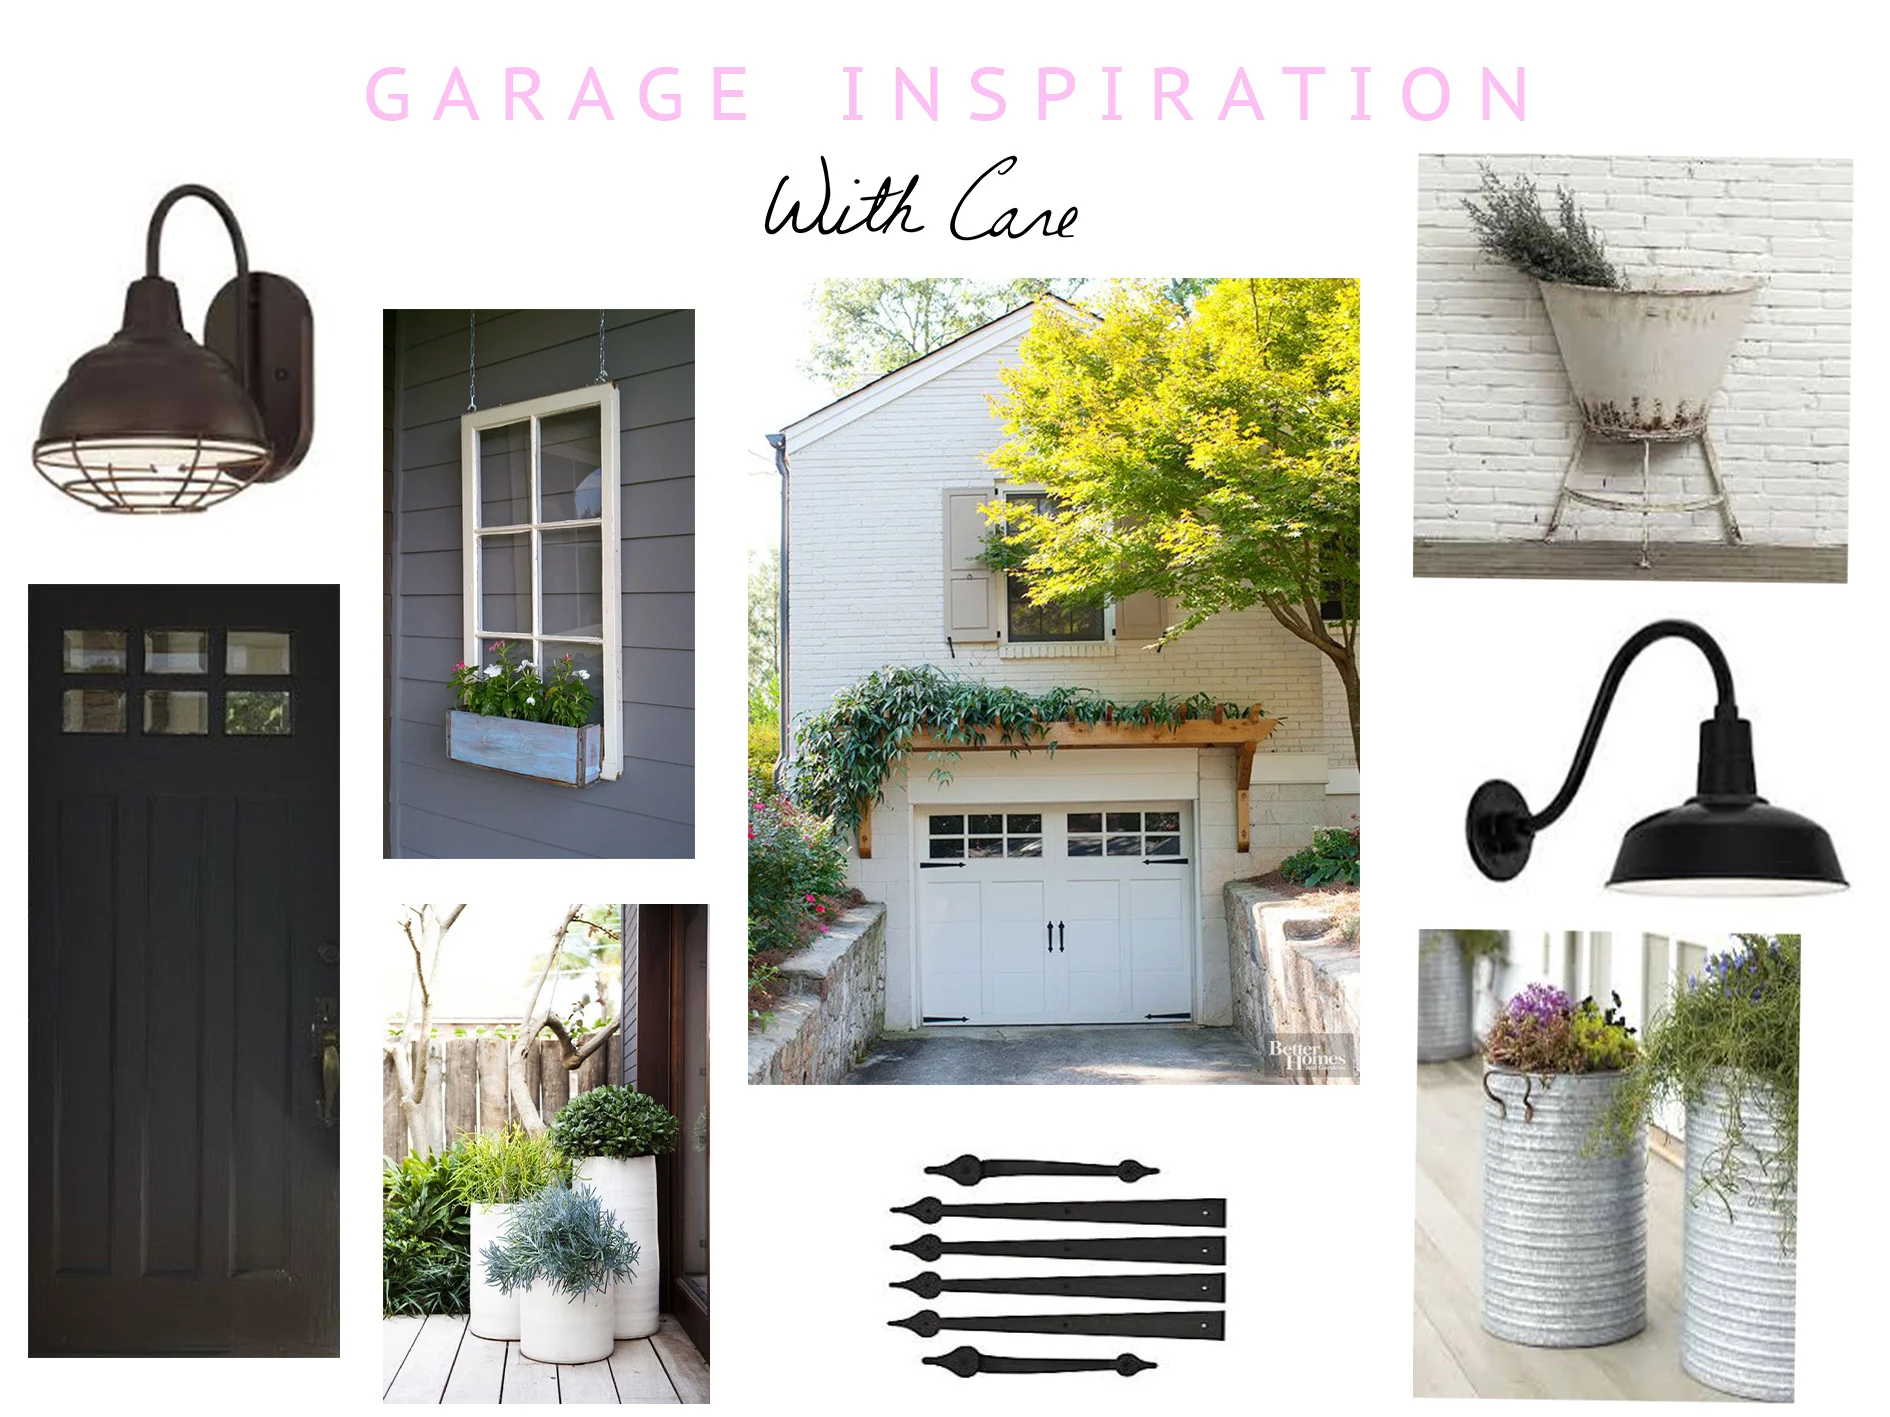
I've been gathering inspiration for our makeover on Pinterest, but it's been tough. I love a combination of old and new, and was originally thinking of going with a sleek contemporary look. After playing around with the options on Garaga's Design Centre I realized that I wanted to go with more of a country rustic vibe. I absoloutely love that you can add your own photo to their online designer to get a realistic sense of what it will look like. For someone like me who isn't as visual, this was a huge help.
Here's the super rough mockup of what we're thinking (I'm definitely not a photoshop expert, but it gives a good idea of the fresh look I'm going for). I'm still debating if we should add windows in the top panels of the door. Any thoughts? I'm also still deciding on what siding to use. I have some beautiful wood siding samples on the way from from Maibec to check out.
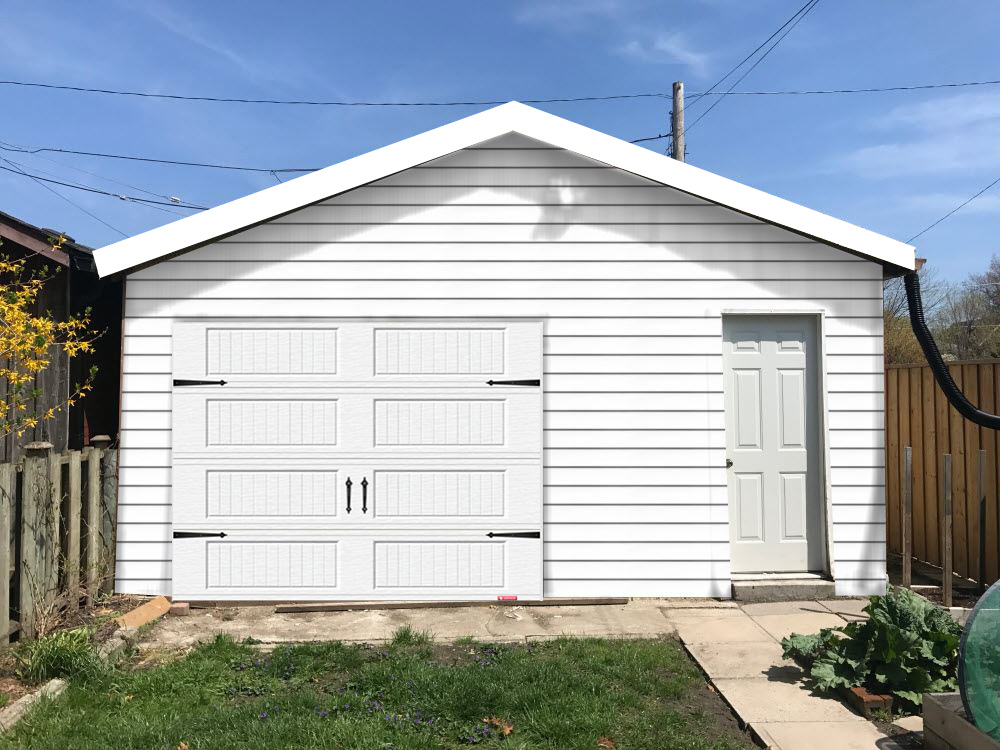
I will be adding a new light fixture and some type of planter for the wall where the window used to be. I'm also debating painting the regular door black or keeping it white. Comment with your vote! Here's some of my inspiration. You can see more on Pinterest.
If you have a garage that could use a little pick me up, check out this AMAZING Giveaway Garaga is hosting. You could Win the Garage Door of your dreams plus a Smart Garage System. AKA a garage door you can control from your smart phone! Genius for people like me who always question whether you actually closed the garage. The contest ends June 28th, so don't wait! See Garaga for full contest details. Enter by simply clicking here and following through to design your dream garage door and fill out your information.
Huge thanks to Diana and the rest of the team at The Garage Door Depot (Local Toronto company who will be installing our new door) for all of your help narrowing down the choices and figuring out what we need.
Stay tuned for our Garage Makeover Reveal this summer and don't forget to Enter Garaga's Smart Garage Giveaway!
Care
*This is a sponsored post which means I was provided compensation and/or product for this post. All thoughts and opinions are 100% my own.

Making Memories & Capturing Moments - GIVEAWAY! Win 1 of 10 Family Lifestyle Photo Sessions!
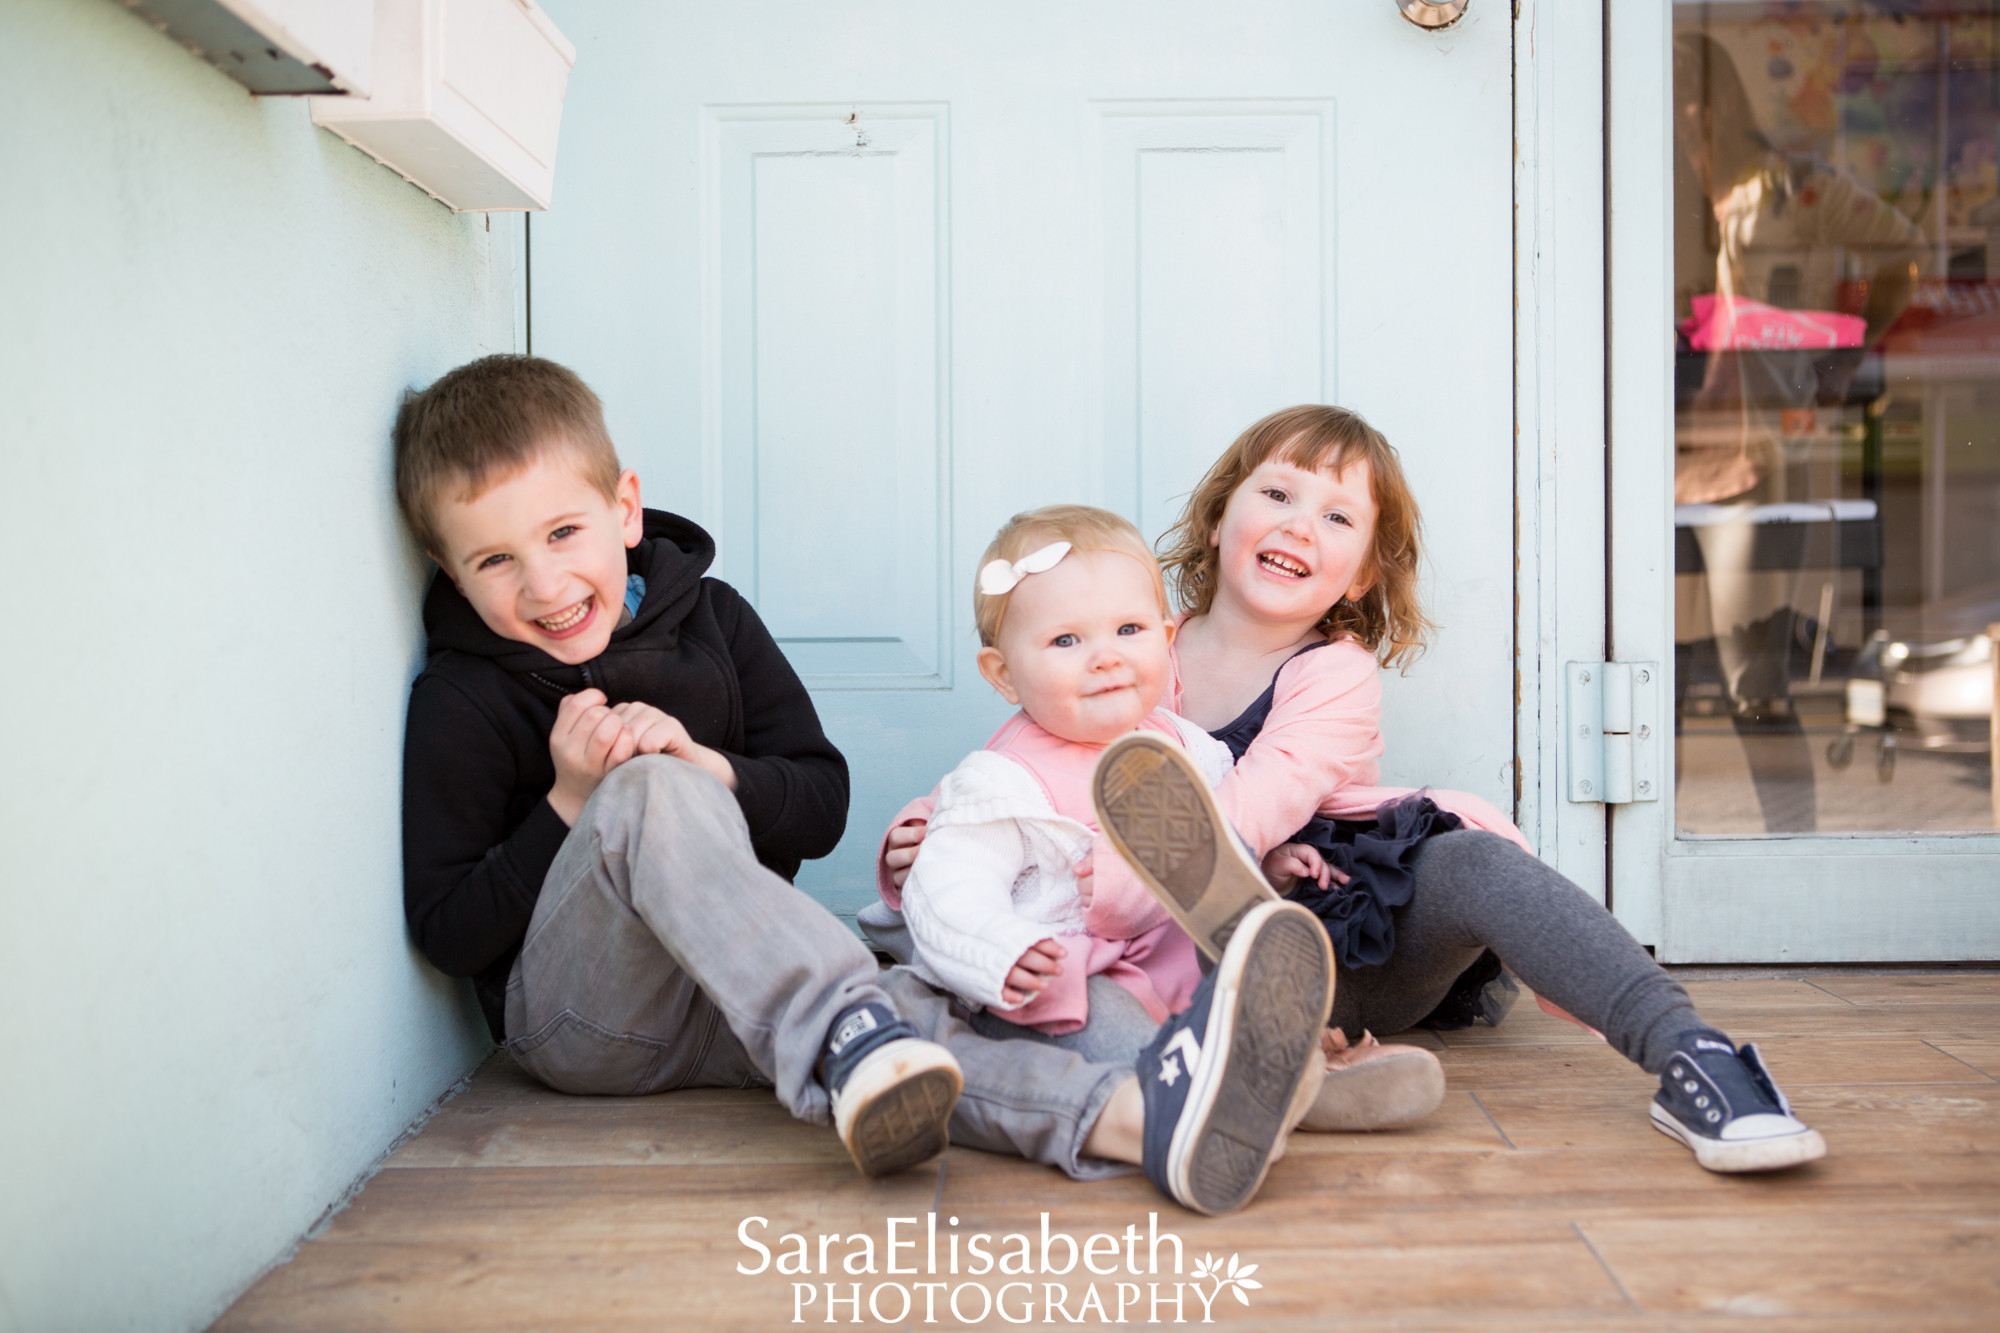
"The days are long, but the years are short". When I look at my kids I feel this sentiment to my core, as I'm sure most parents do. In parenting, some days can feel so long and so trying, so isolating and so overwhelming. Then you look at your kids in a quiet moment and realize it's all flying by in the blink of an eye. You try to soak up every squeeze hug, every sloppy kiss, every sweet cuddle, because you know one day this phase will all be done. It brings tears to my eyes just thinking about it.

"The days are long, but the years are short". When I look at my kids I feel this sentiment to my core, as I'm sure most parents do. In parenting, some days can feel so long and so trying, so isolating and so overwhelming. Then you look at your kids in a quiet moment and realize it's all flying by in the blink of an eye. You try to soak up every squeeze hug, every sloppy kiss, every sweet cuddle, because you know one day this phase will all be done. It brings tears to my eyes just thinking about it.
My mom was amazing at recording memories of our childhood. She was always taking photos, creating slideshows and photo books, and writing down memories and special moments. When I lost my mom I realized just how important this stuff is. It's our way of capturing our life for our kids. A way for them (and us) to look back and see how far we have come. I feel so fortunate to have the wealth of family photos, stories and memories that my mom compiled throughout our lives. I want to make sure I do the same for my kids. That's why I love having family photos taken, to capture our current moment in time. I find it especially important since I'm typically behind the camera. I want my kids to be able to look back and know I was here, and that I loved being their mom.

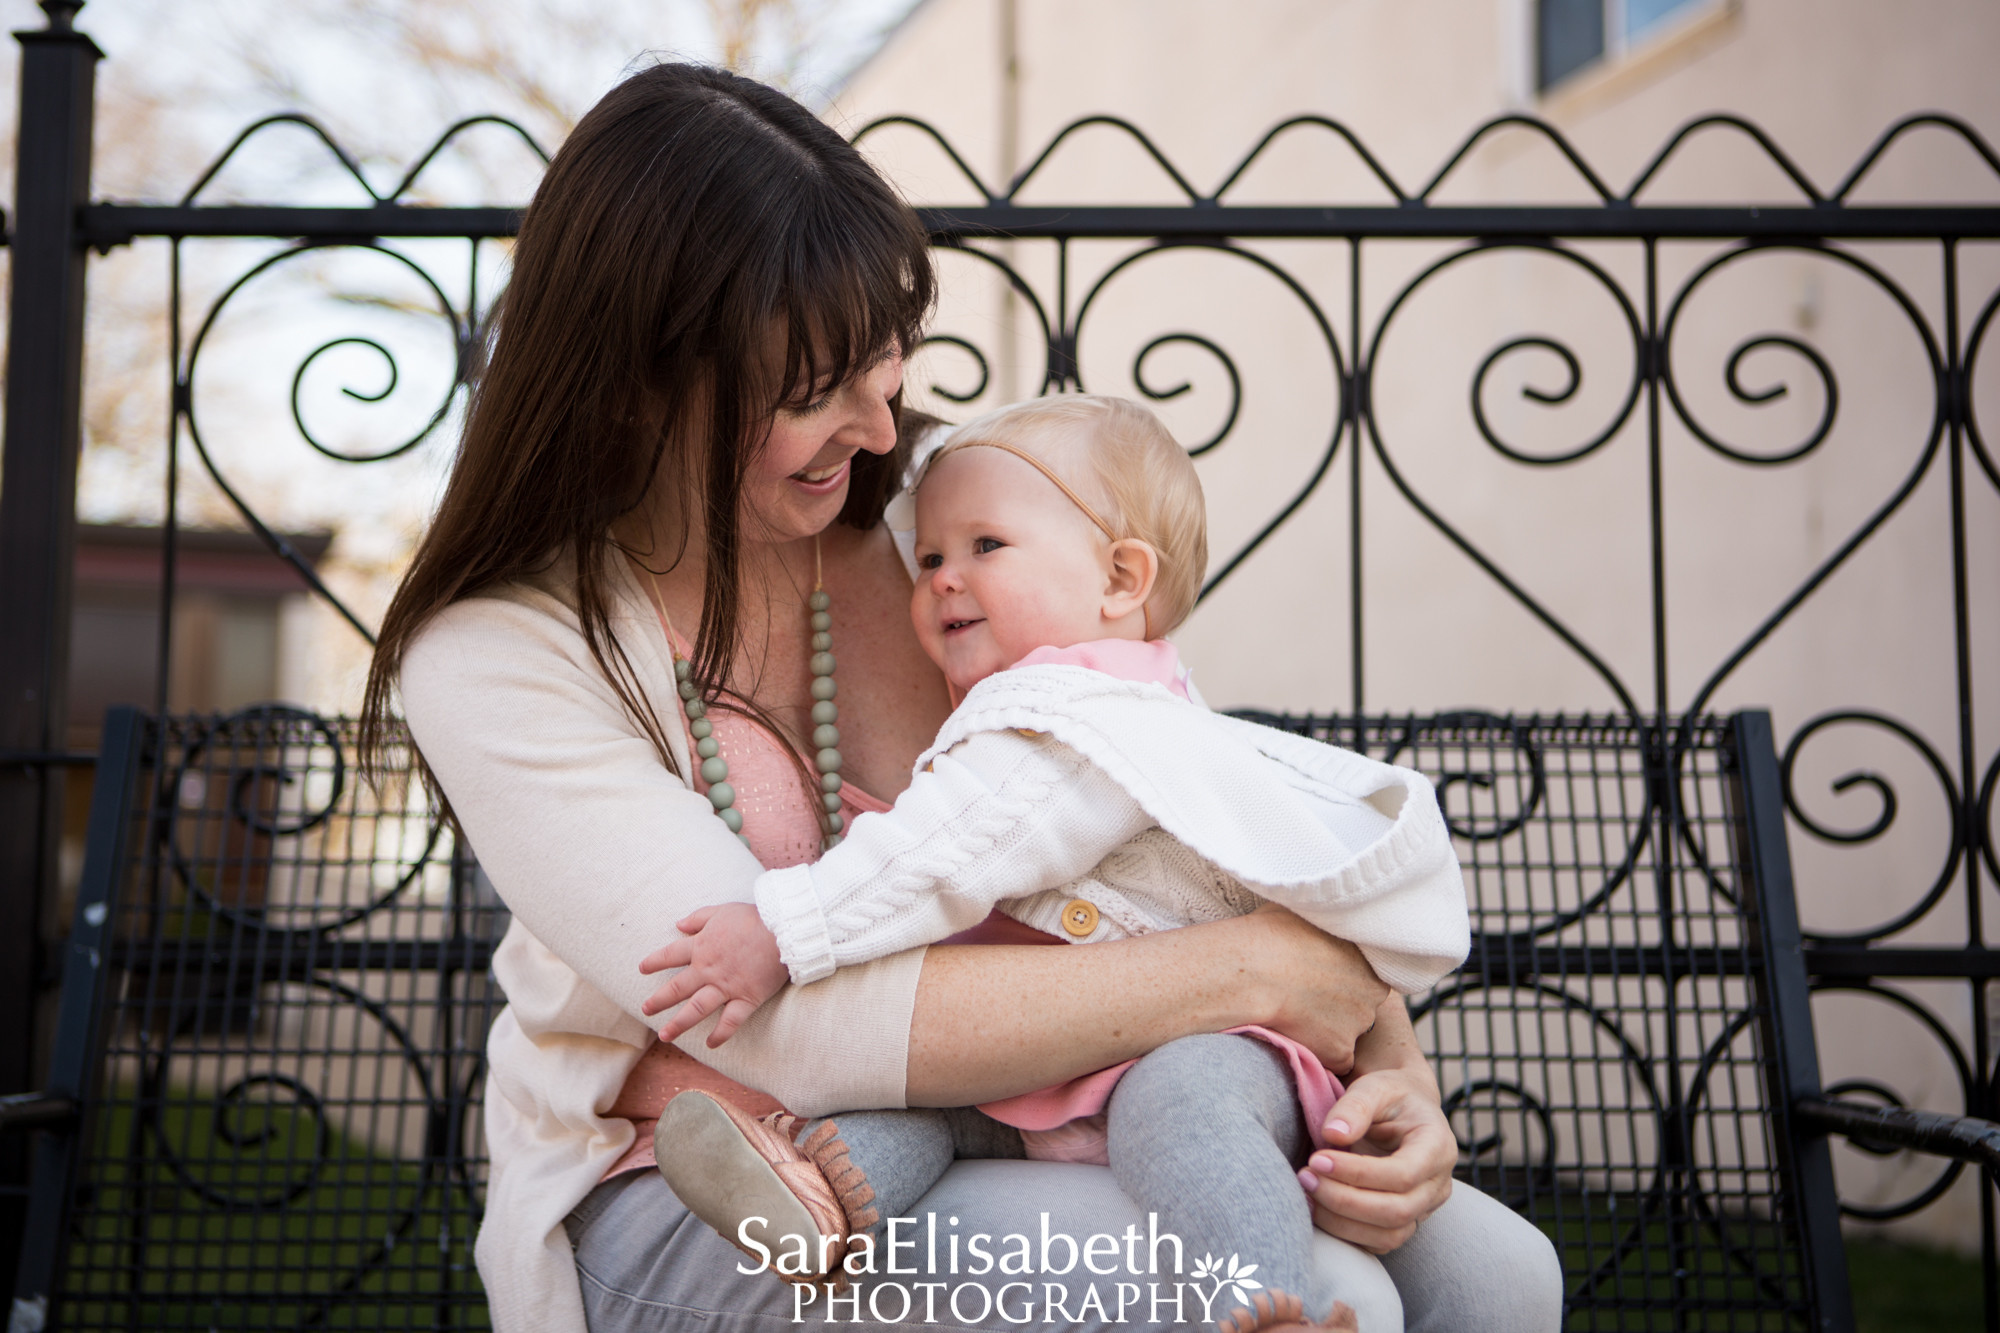
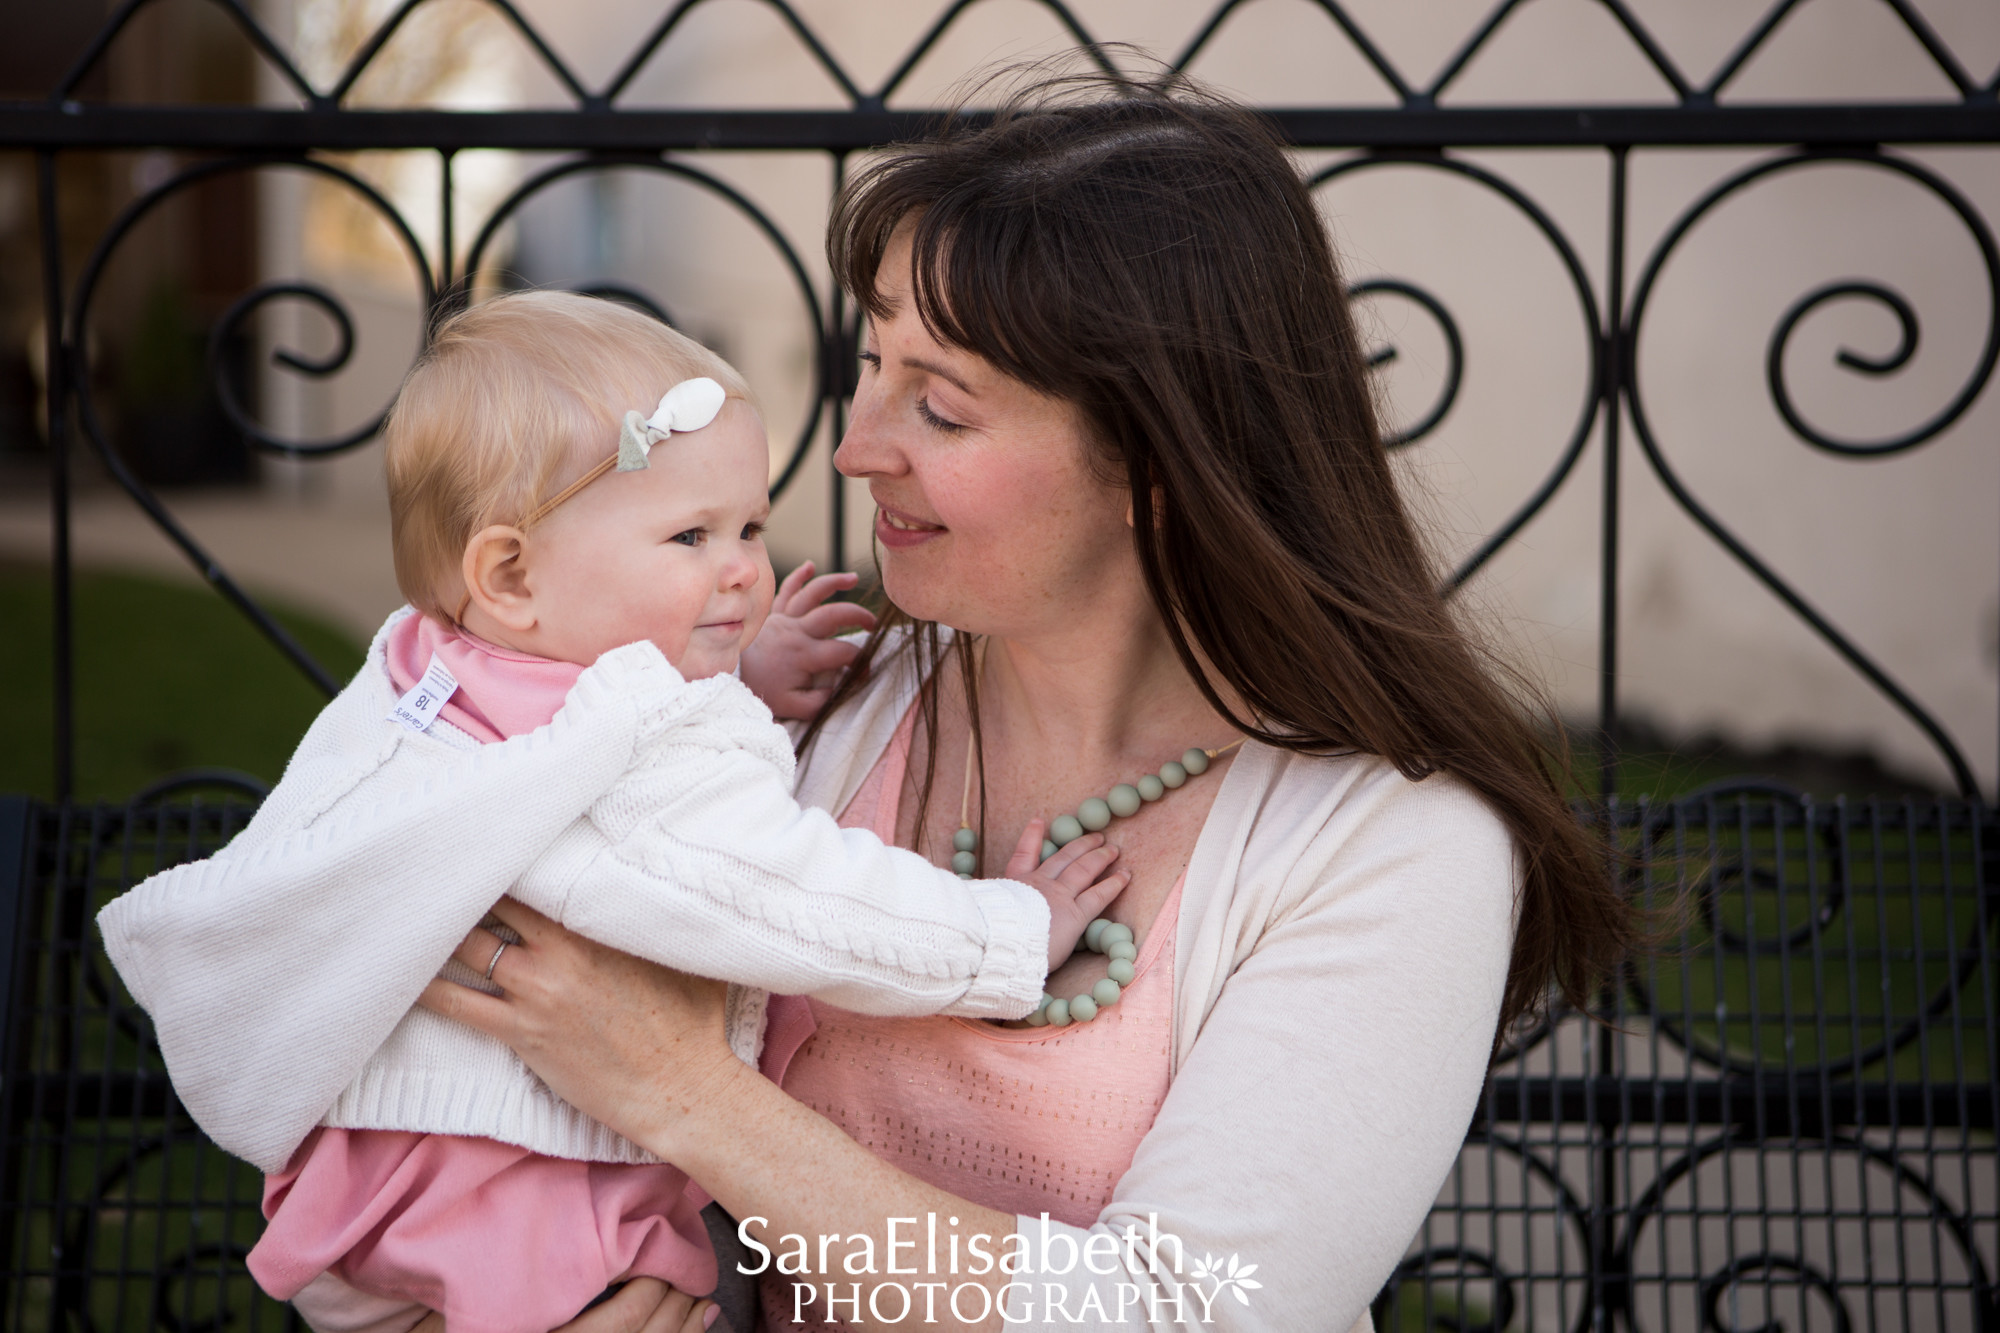
I love capturing memories so much that I thought it was only fair to share. I've partnered with Sara Elisabeth Photography to offer an Incredible Lifestyle Family Photo Shoot GIVEAWAY! Enter for a chance to Win 1 of 10!! Yes 10!! Lifestyle Family Portrait Sessions with Sara Elisabeth Photography. Each Prize includes: 1 Hour Session + Three 8x10 prints + telephone consultation + in-person proof session. Package Valued at $350!
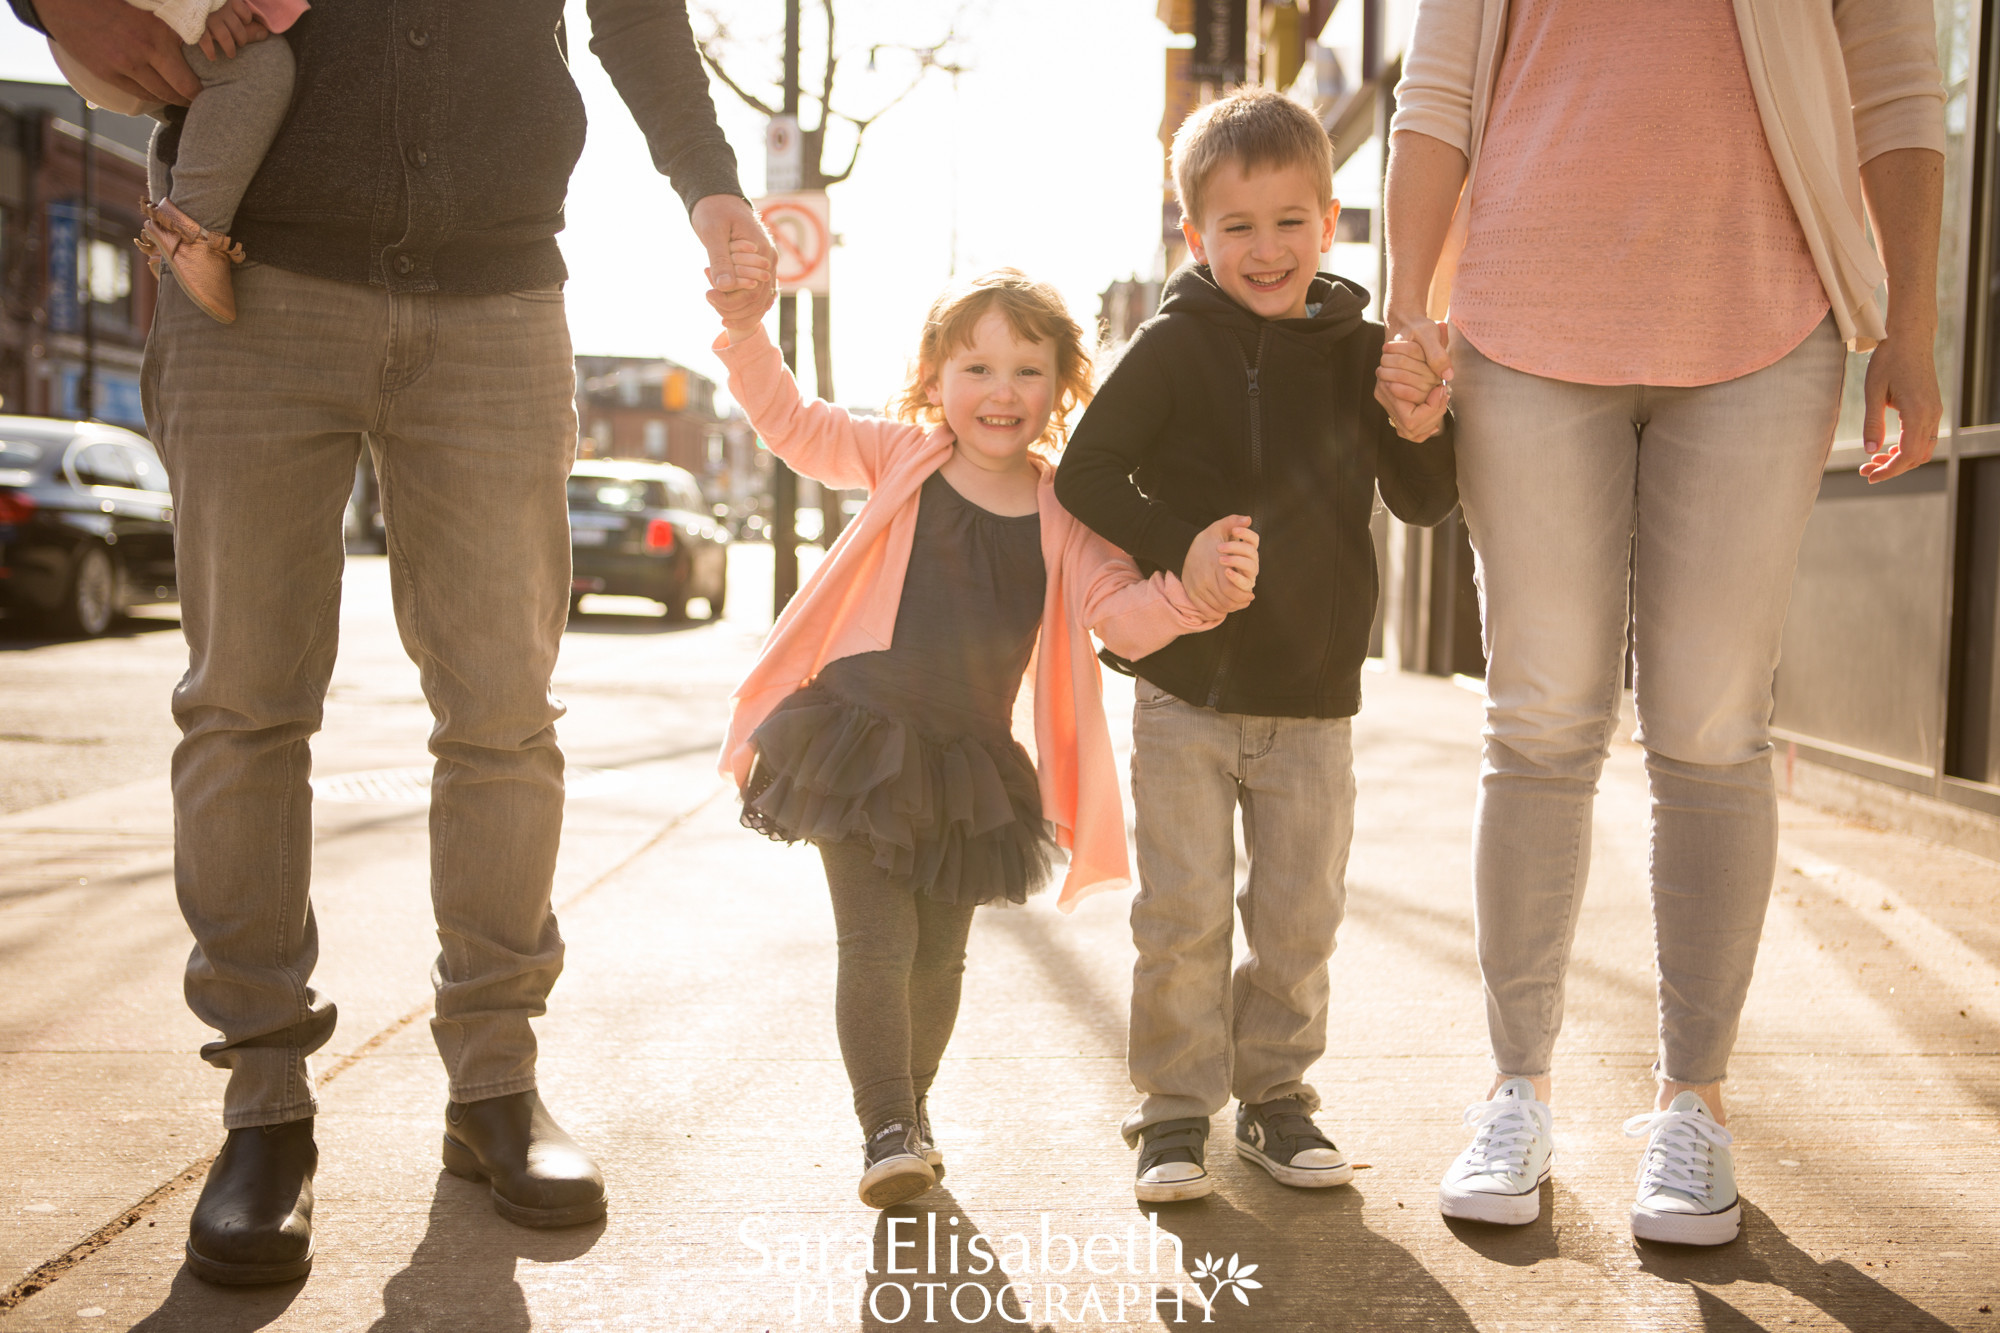
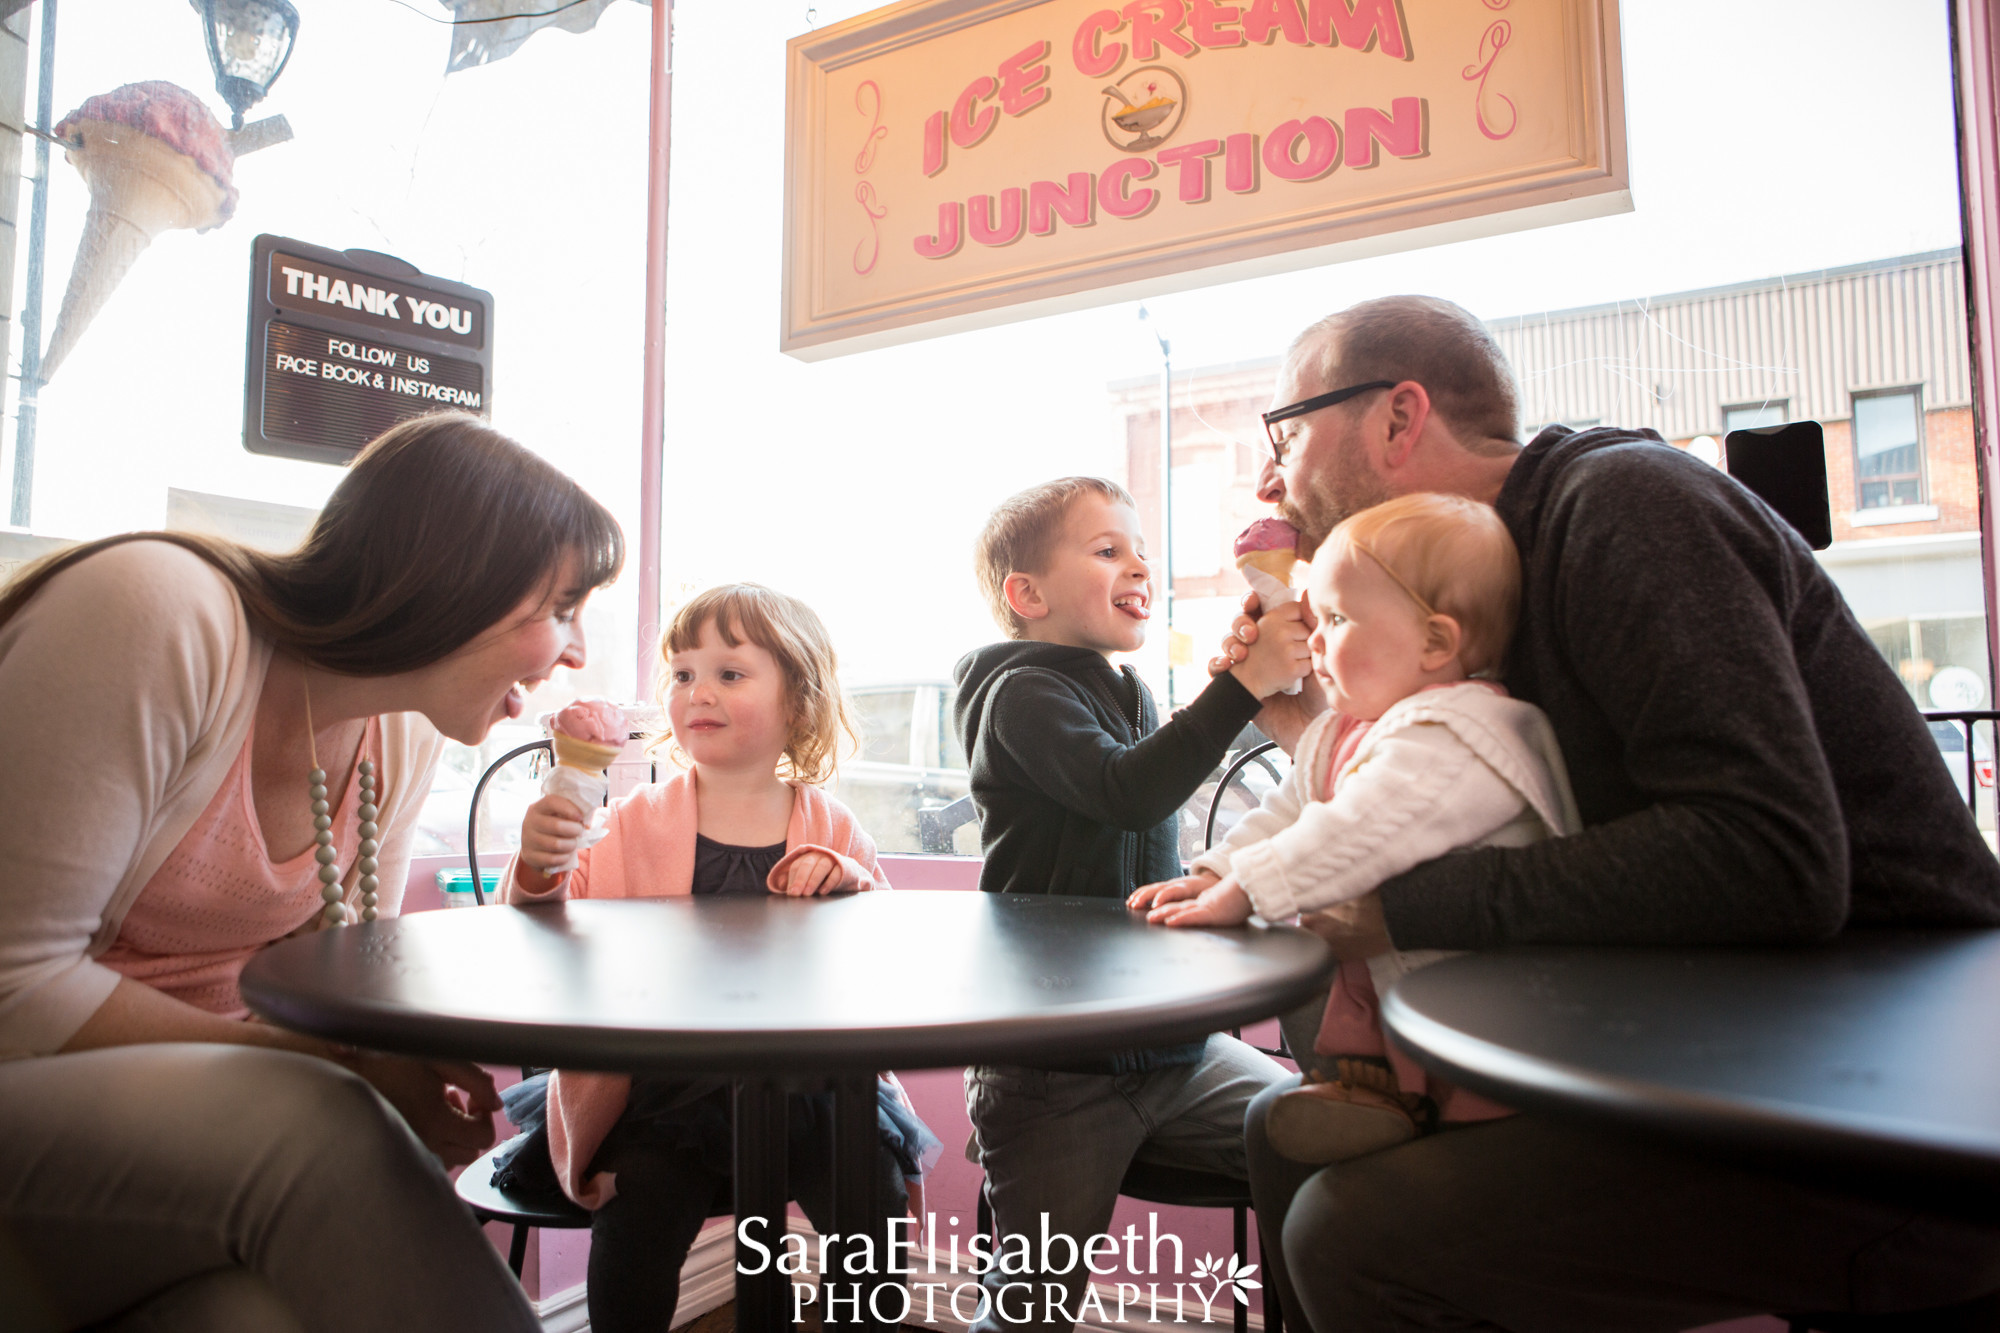
Sara has taken our family photos twice and we have loved it both times (See Our Last Session Here). It’s evident that Sara loves kids and isn’t afraid to joke around and play with them to get a great shot. If you have busy kids like ours, this moving lifestyle session is perfect. No long periods sitting still and lots of chances to get their energy out. I can’t believe how little Ben & Lucy were in this last session, and I absoloutely love the addition of an extra little baby foot in this year's photo.

For our session we went for a walk to the Junction to get ice cream and Sara captured fun moments along the way. It was possibly the windiest day ever, but we made it work. You can choose to go to the park, play in your backyard, bake some cookies or any other family activity that you would love to capture with your littles. That's the best part, it's customized to suit your family.


Enter NOW by simply commenting below with your name and email address (or alternatively you may comment below and submit your email address to care@with-care.ca for entry). Plus make sure to check out our Facebook page & Instagram feed for 2 more ways to enter! **For an additional 5 entries sign up for Sara Elisabeth's Newsletter!
*Contest is open to all Canadian residents 25+, but session must take place within the city of Toronto (no travel costs will be provided). Session is to be scheduled with Sara Elisabeth Photography at a time convenient for both the winner and photographer and must take place before August 31st, 2017. Each session is one hour and includes a telephone consultation, an in-person proof session, and 3 8x10 prints. Contest closes Thursday June 15th at 11pm EST. The winners will be chosen at random and messaged within 24 hours.
Good Luck!
*As a special gift mention With Care at booking and receive $20 off your session with Sara.
Care
Outfit Details
- Lucy's Dress: Tiny Trendsetter
- Ben's Hoodie: MarQ
- Penny's Bow & Booties: Bonjour Baby Baskets
*This is a sponsored post which means I was provided compensation and/or product for this post. All thoughts and opinions are 100% my own.

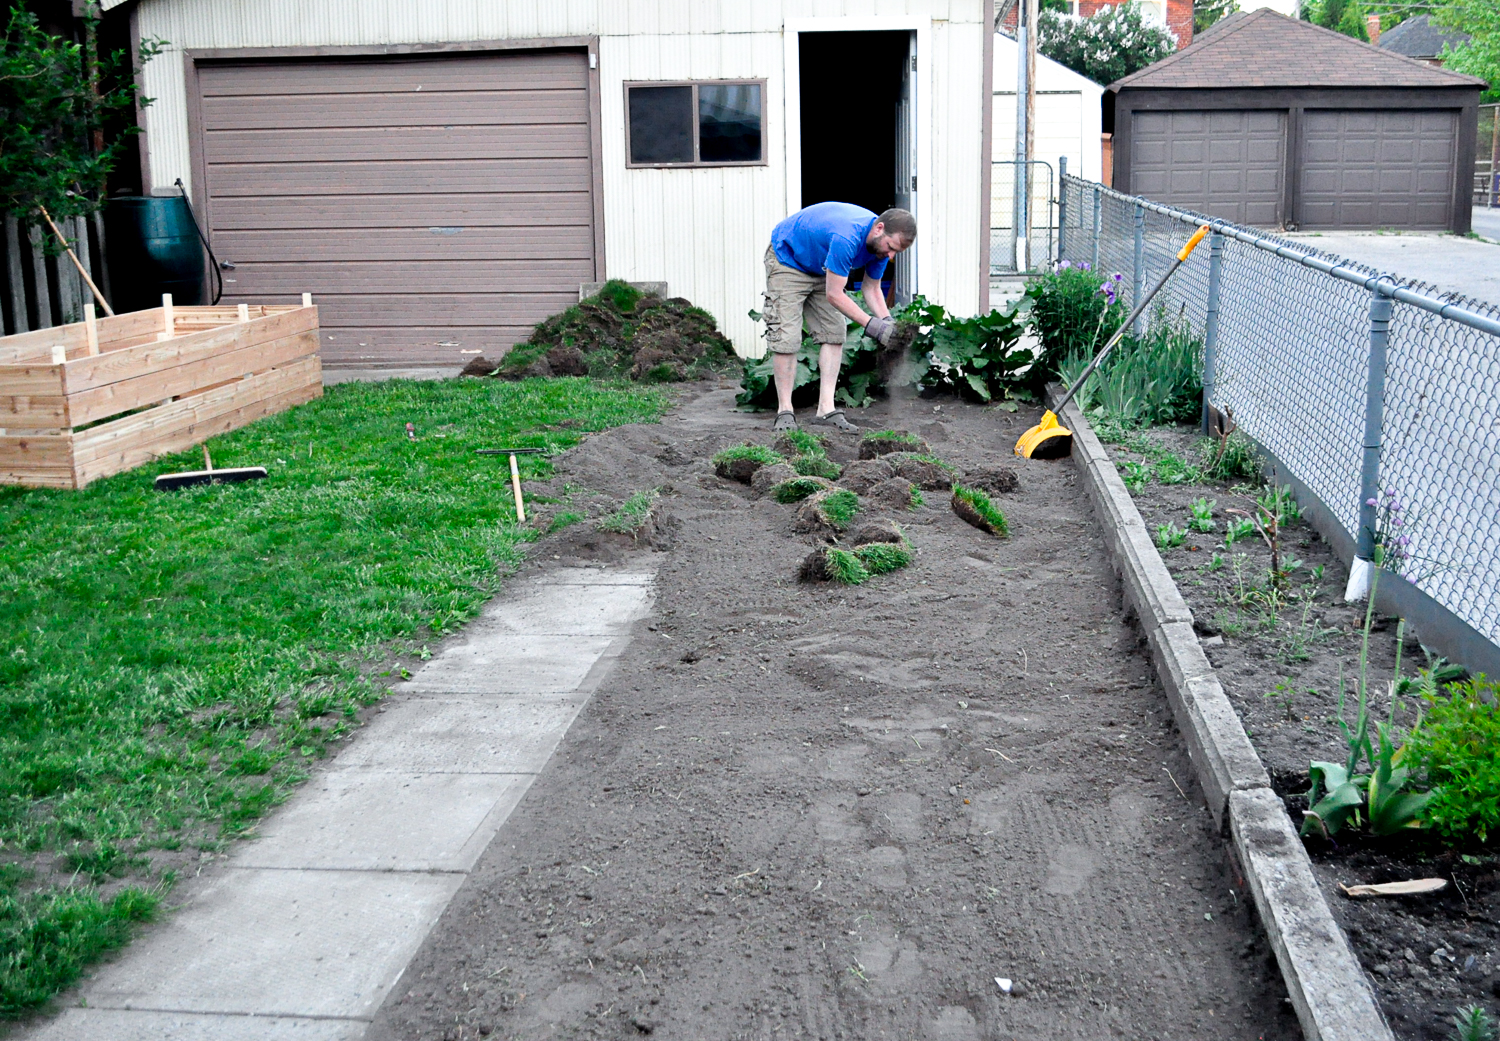
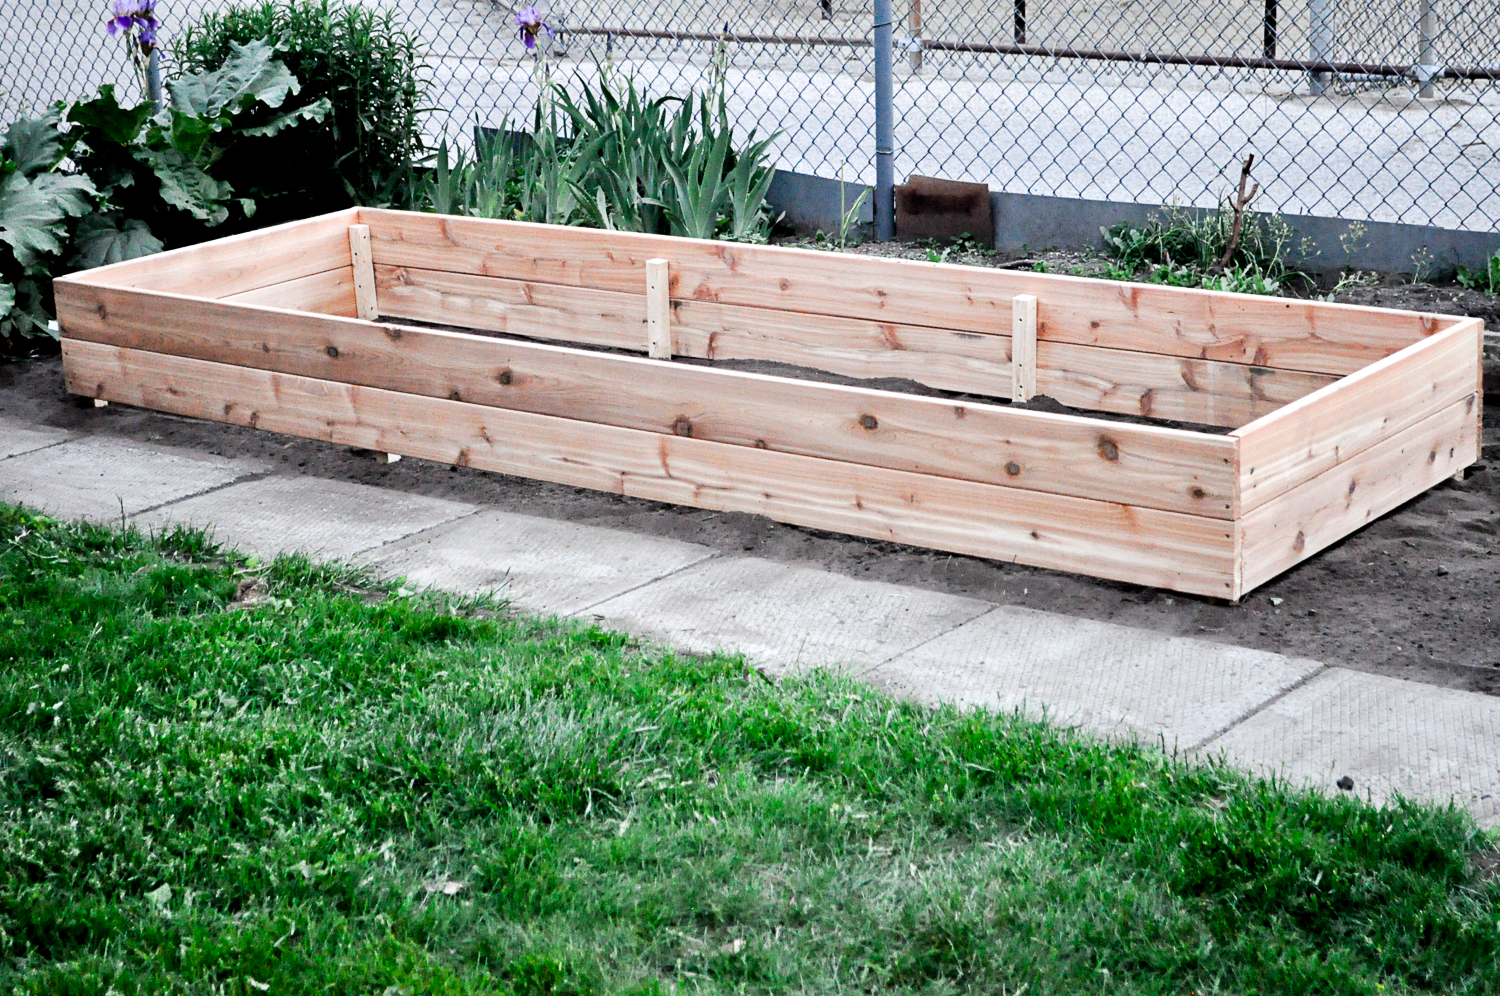
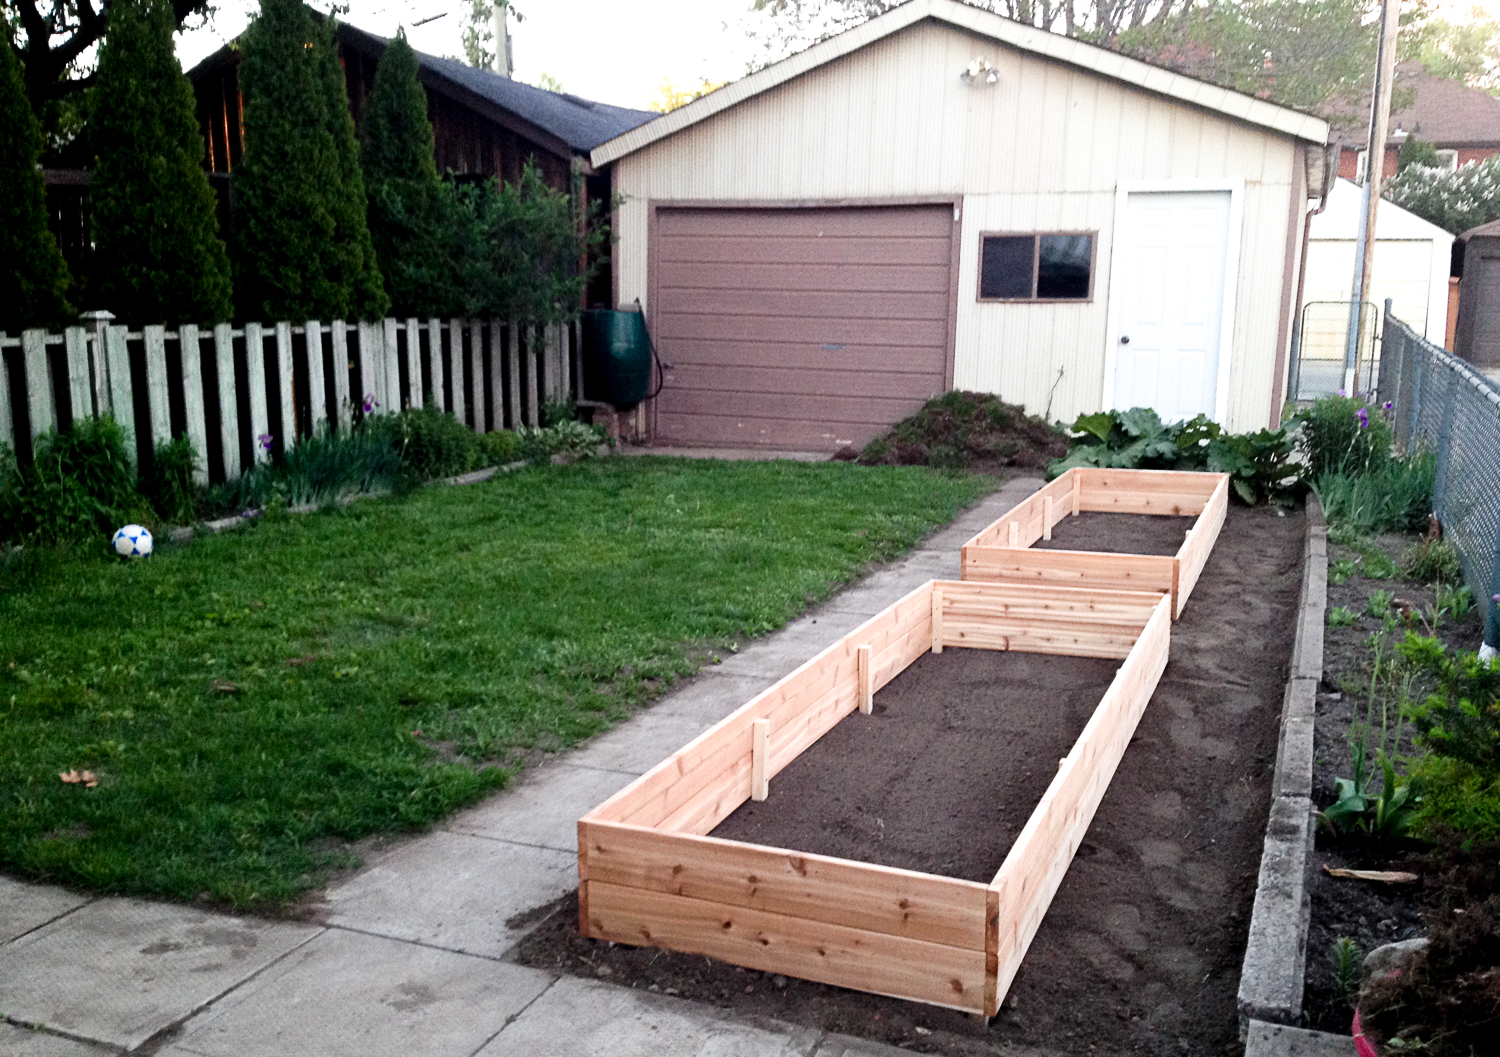
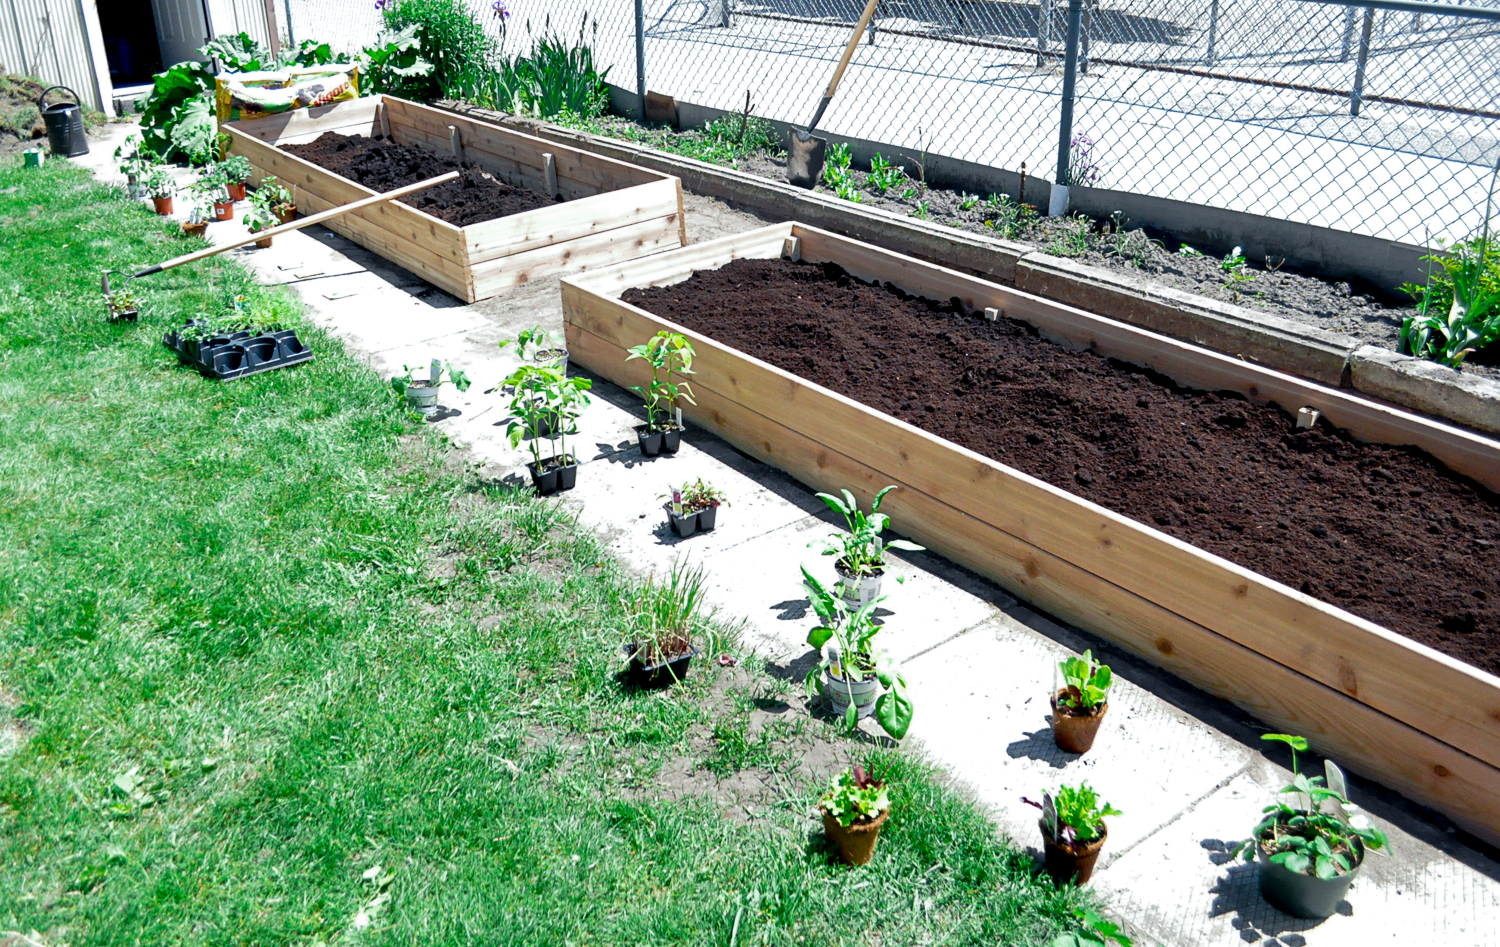
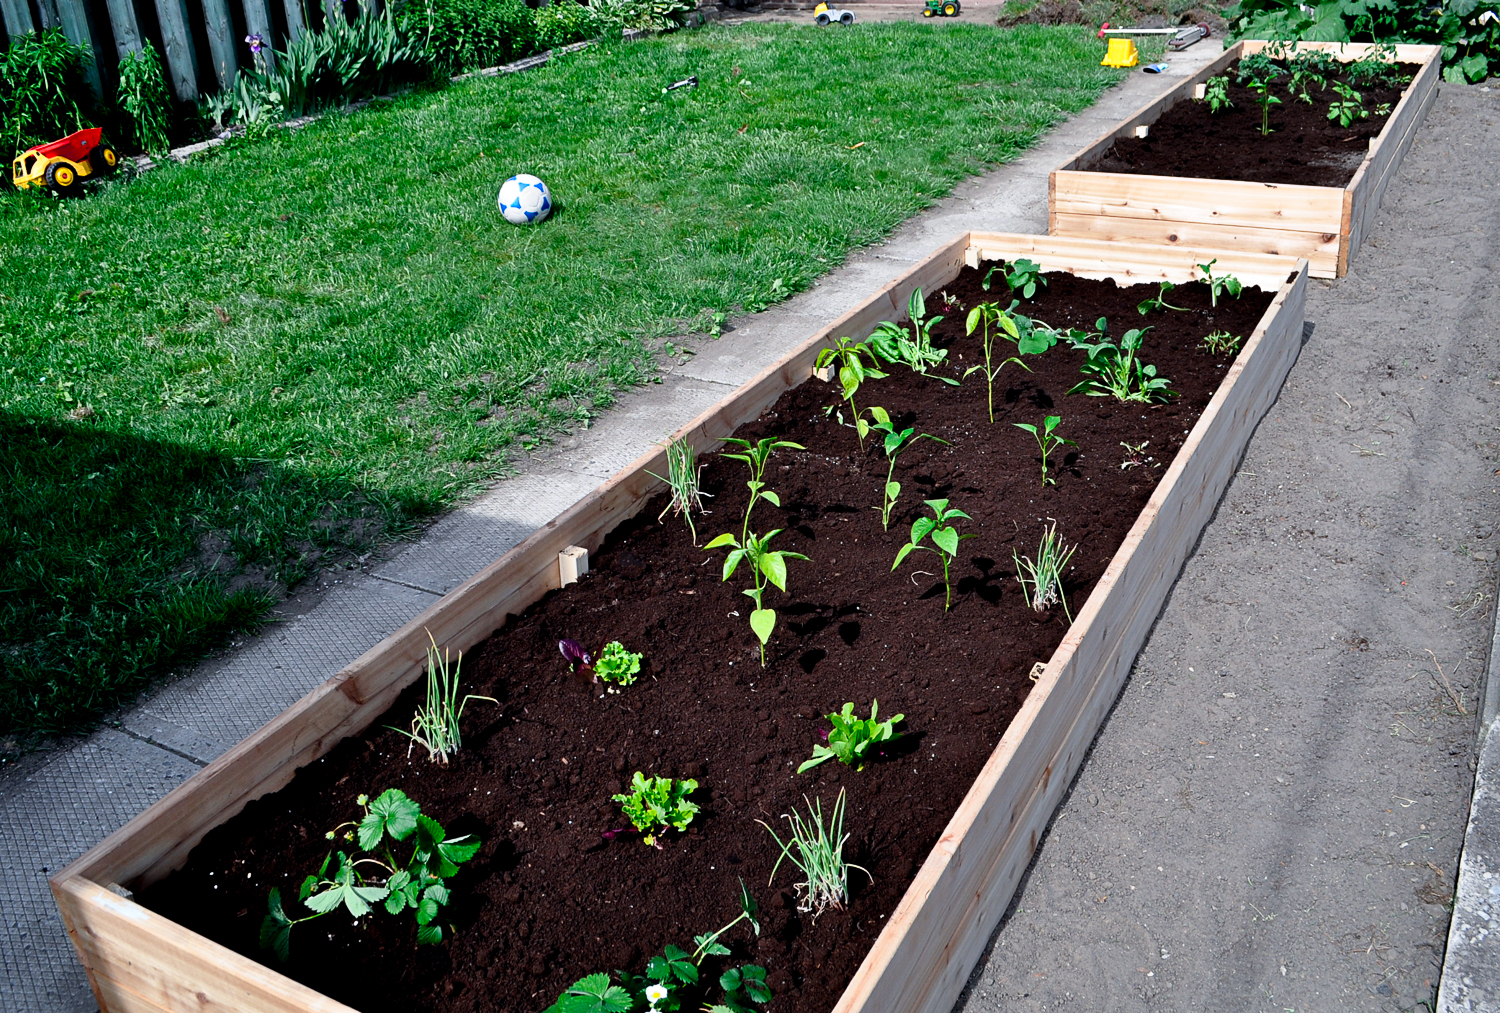
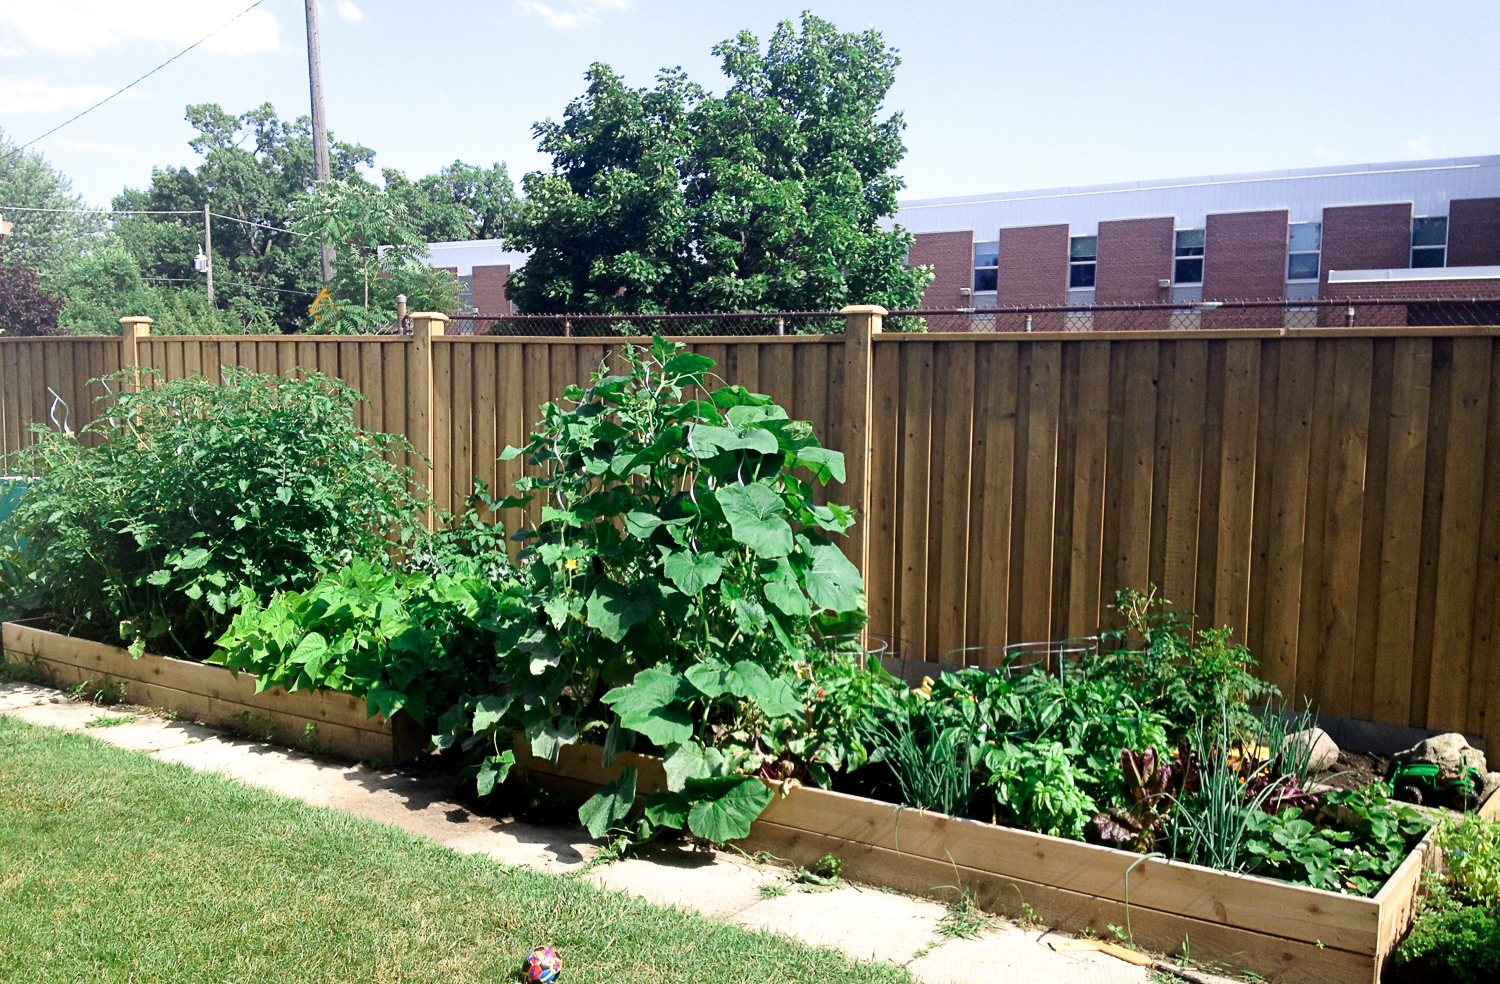
Simple DIY Raised Garden Beds
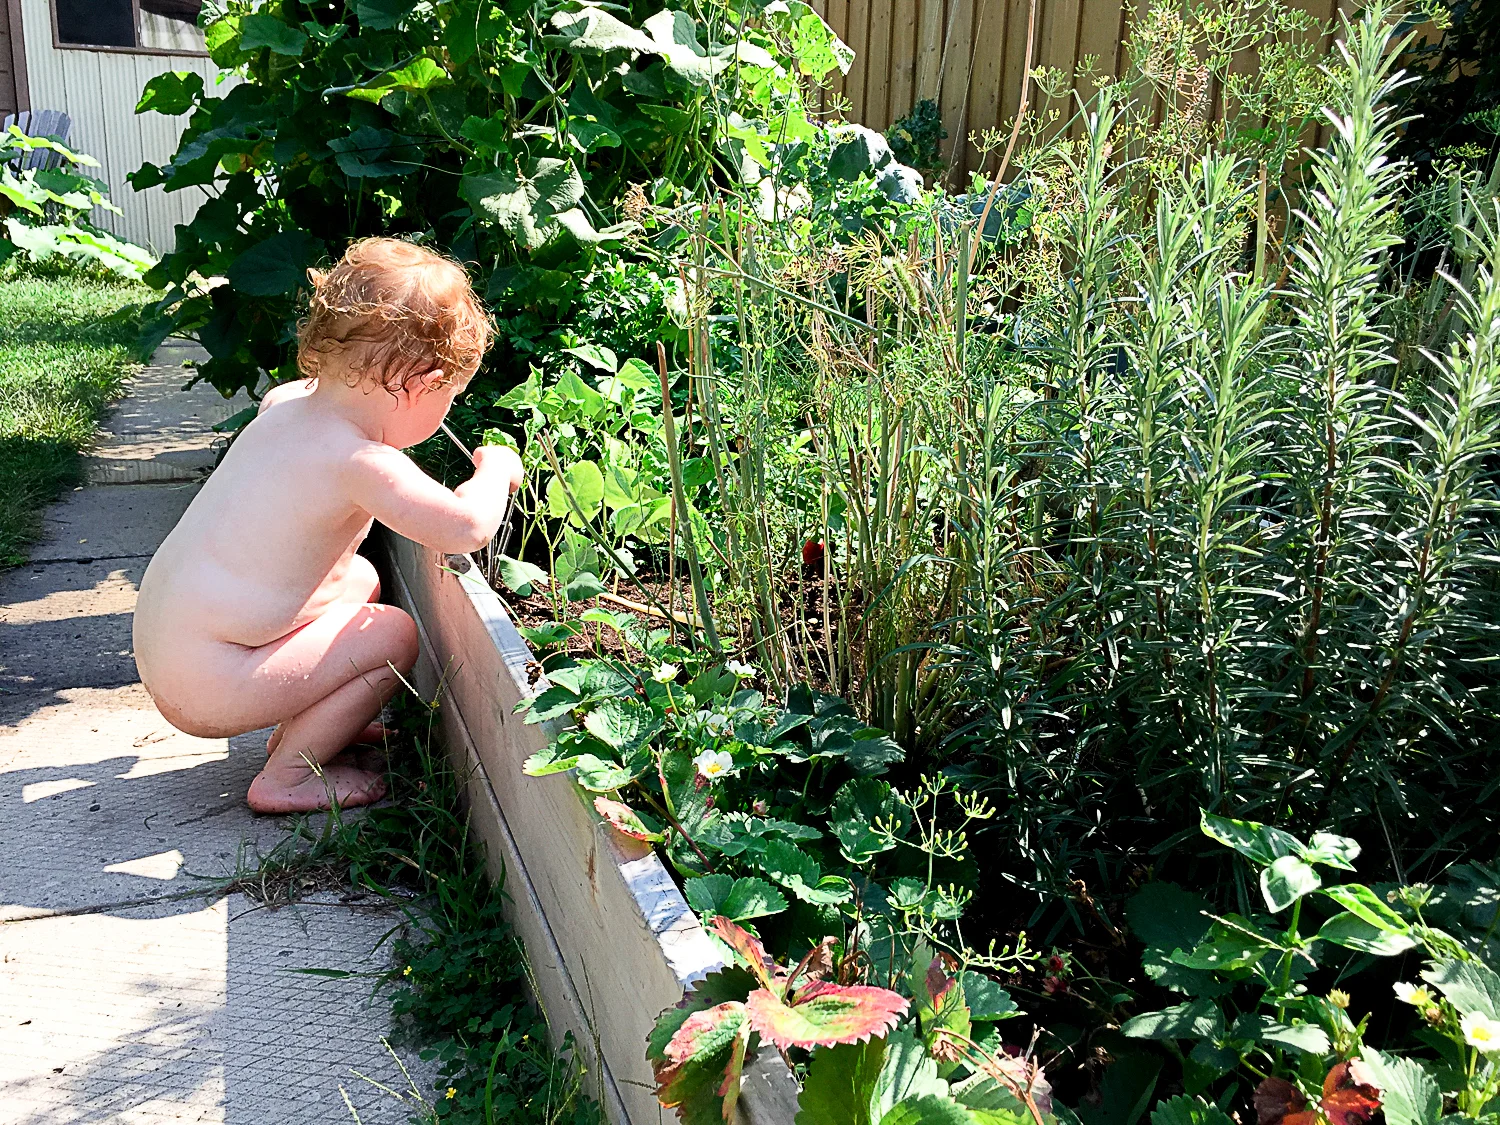
With planting season upon us it seems like the perfect time to share a post that I've been meaning to write for 3 years! I've had tons of requests by readers and friends for a DIY of our raised garden beds, so here it is. Better late than never...right? Some of these photos are really old, so don't get confused. That's little Lucy! These pics are making me so excited for our Garage Makeover on a Budget, coming this summer!
With planting season upon us it seems like the perfect time to share a post that I've been meaning to write for 3 years! I've had tons of requests by readers and friends for a DIY of our raised garden beds, so here it is. Better late than never...right? Some of these photos are really old, so don't get confused. That's little Lucy! These pics are making me so excited for our Garage Makeover on a Budget, coming this summer!
These raised beds are so simple to make and such a great addition to any garden. You can make them in whatever size and shape works best for your individual space. Keep in mind that it's ideal to be able to crouch, kneel or sit by each side of your garden bed, and be able to reach at least half way across, so you don't have to hurt your back while caring for and harvesting your plants.

Why use raised beds?
You can grow a lot of high quality produce in a small area
They prevent soil compaction a.k.a. keep your kids from falling onto your plants and on the soil ...most of the time ;)
They provide a space to top up with high quality soil which helps your plants grow (Especially important in big cities like Toronto where our soil has been depleted of many minerals and nutrients and filled with many heavy metals and toxins)
The soil warms up faster than than in the ground, so most plants can be added earlier
They keep weeds out of your growing area, and are a barrier for slugs and snails
They provide good drainage. Most vegetables need lots of sun, lots of water, and good drainage with loosely packed soil to grow optimally. *Keep in mind that raised beds will dry out quicker than the ground, but this is good for vegetable crops. Consider a rain barrel to help with your water needs. See my post from a few years ago for 3 Must Haves for Veggie Gardening Success.
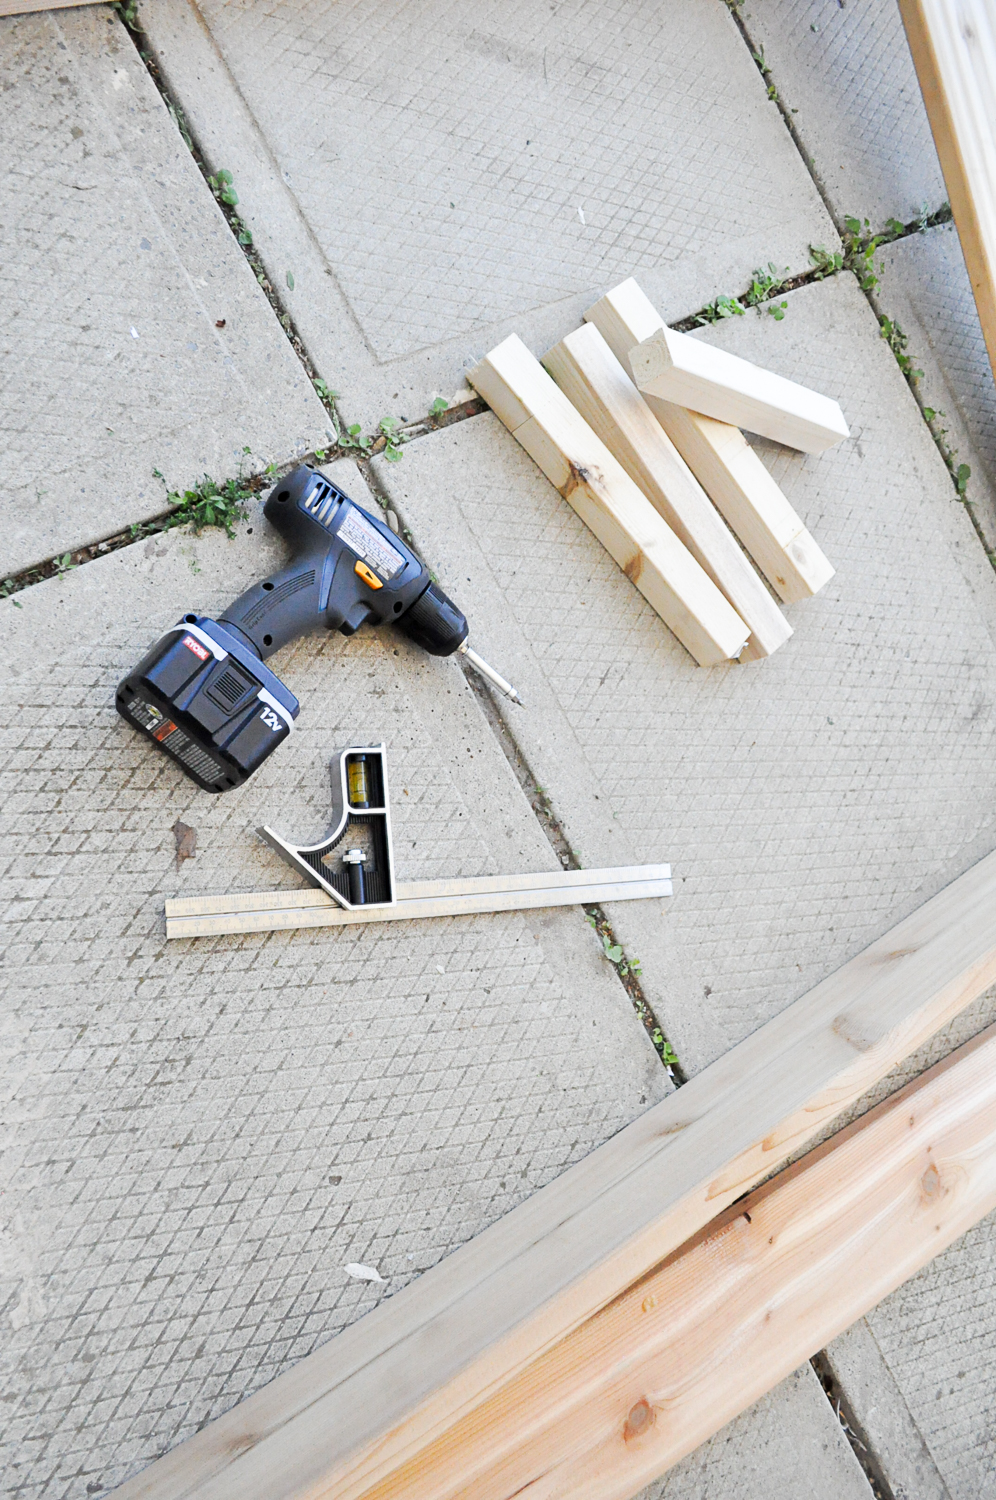
Supplies:
Cedar Lumber to make up the 4 sides of your beds
You needs 2 boards per side for a stacked box like ours. We used 1"x6" boards and made 10' long beds, so we used 12' long boards for the sides and cut them down to size. Our beds are 3' wide so we used a 6' board for each end and cut it in half to make 2 perfect size boards. You will have to choose the appropriate length and width for your space and plan accordingly. Please note that lumber isn't actually the width it says, which is so weird. A 1"x6" board is typically more like 5.25" - 5.5" wide, so keep this in mind with any projects. You could also do 1"x8" boards, or a single board instead of stacking 2 boards. That's the best part about these, you can totally customize them.
2"x2"x8' Framing Lumber
To be cut down to lengths for corner and side supports. We used a support in each corner and then 2 more evenly spaced along each long side. We cut our supports down to about 11.5" in length and constructed our beds upside down so we could offset the stakes (not level with top and bottom of the main boards). This means that when you turn your beds the right way the stakes go down into the ground creating stability and keeping your beds in place. We were able to get all 8 stakes for each bed out of one 8' long piece of framing. You lose a little length when you make your cuts, so we just cut 8 equal pieces and ended up with pieces approximately 11.5" long.
8x2" Deck Screws
Soil & Plants to fill beds
Tools:
Saw (or get the hardware store to cut it for you)
Drill and bits
Square
Rubber Mallet
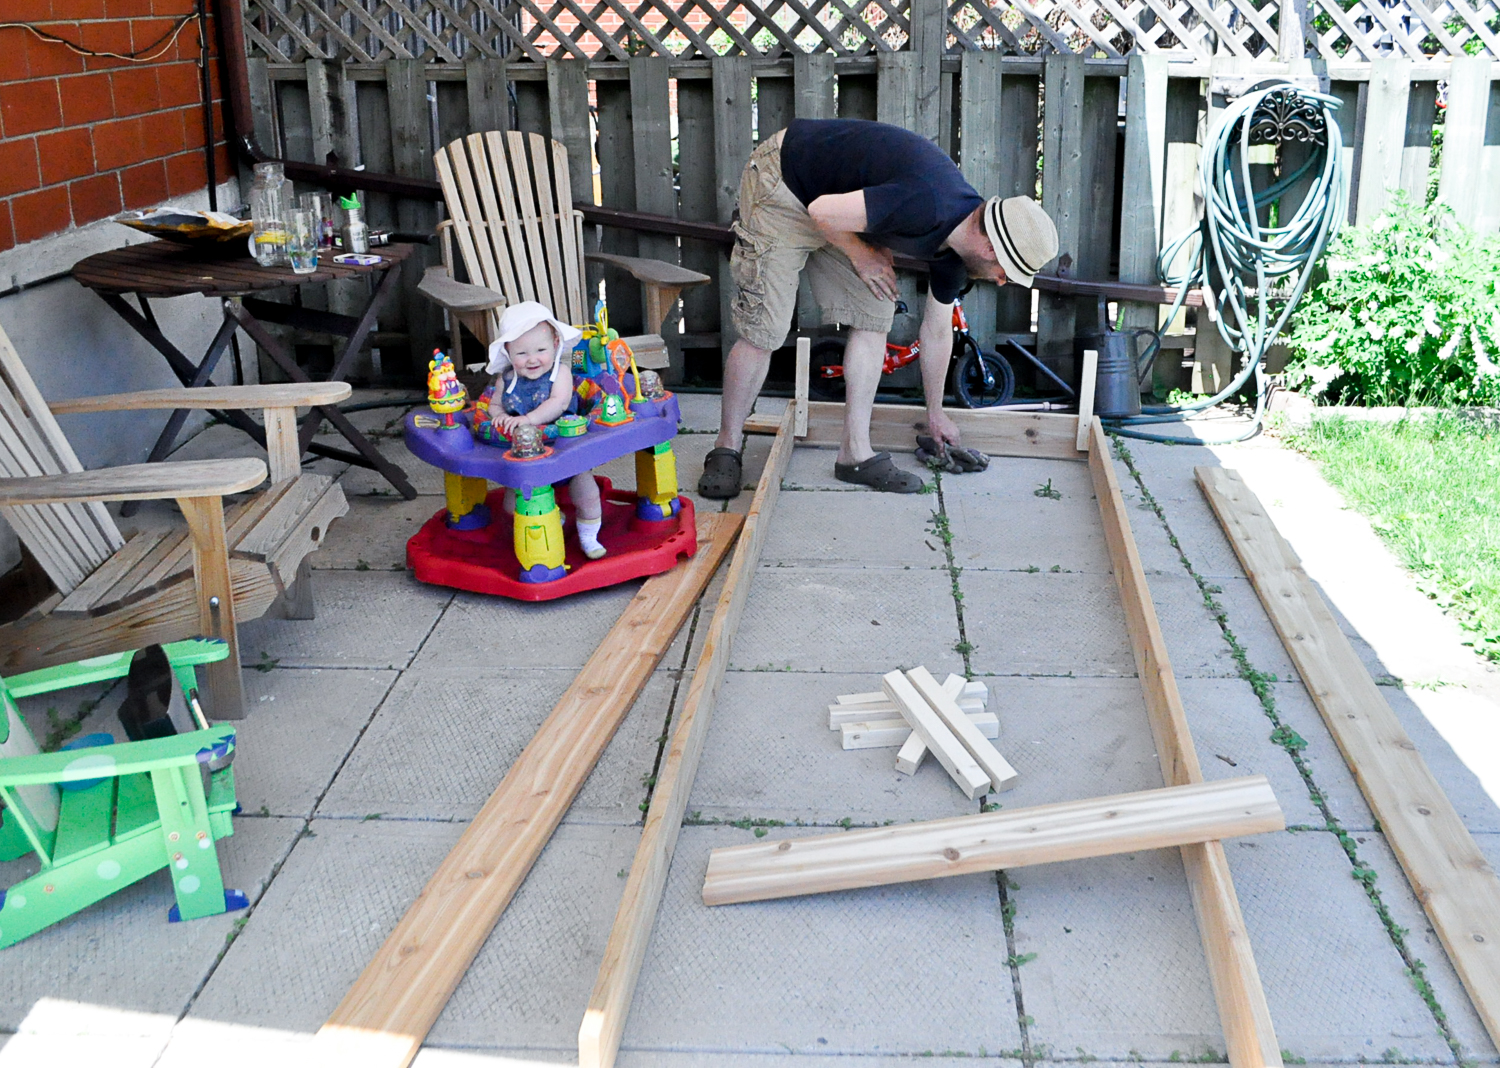
Instructions: *It's best to have 2 people for assembly
Plan your raised bed(s) and size of all lumber needed (Measurements for our 10'x3' beds are included in the supplies section)
Cut all lumber to size (or have them do it for you at the lumber area of the hardware store)
Lay bed out and ensure all pieces are ready
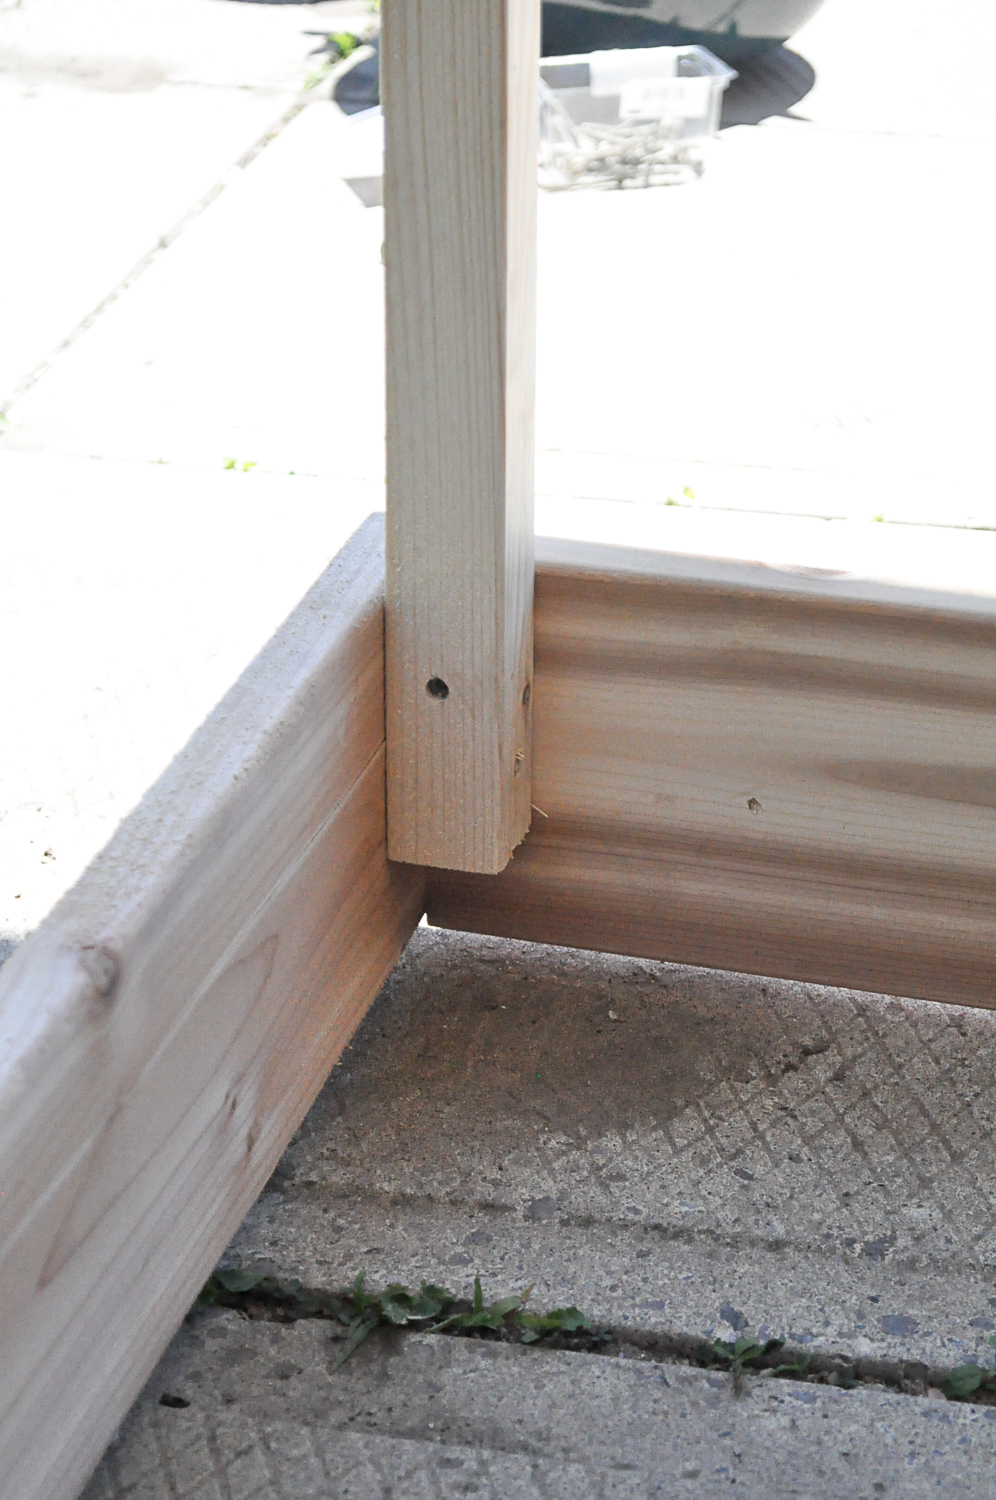
Begin assembly by having one person hold the top long board upright in place (this board will be siting on the ground as we're working upside down).
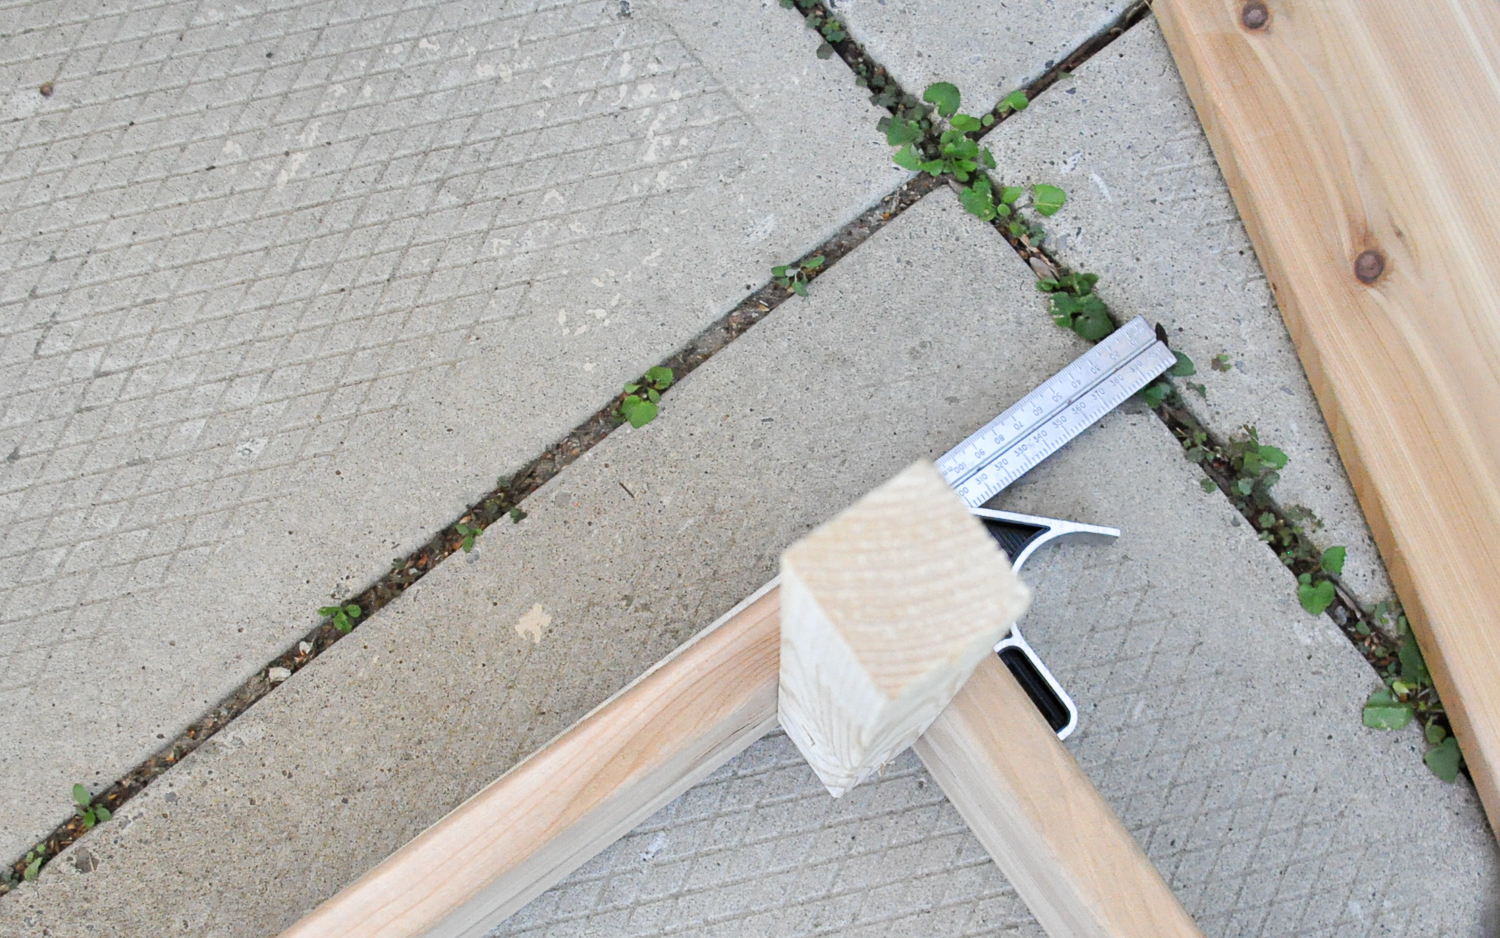
Have the 2nd person screw one of the measured support stakes into the end of the board, flush with the end of the support stake. *Remember to offset the stake a few inches so they will be sunken down when you turn your beds over to install them. This means your stakes should be about 1.5" off the ground. *See photos
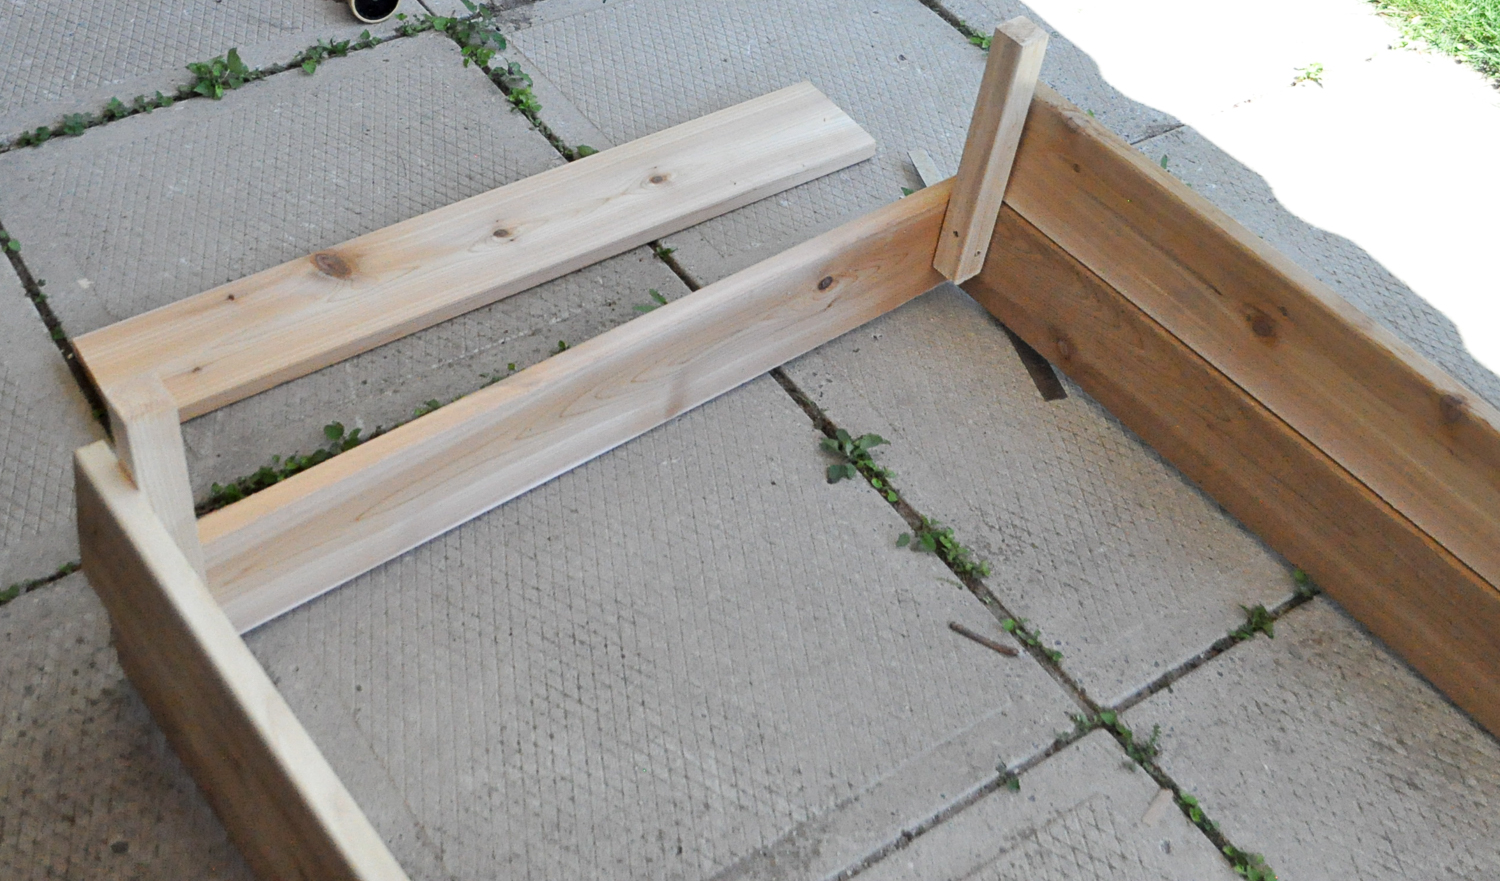
Next, attach the short board to the same stake to create your first corner. Use your square to get an even corner each time.
Continue to work your way around your bed screwing in each corner support to your 4 top boards
Then add your 4 bottom boards (which are on top right now). *Your support stakes should be sticking up above the top of this 2nd row of boards
Screw in additional support stakes spaced evenly along the long sides of beds. We did 2 extra supports on each long side at just over 3' apart each. Depending on the size of your beds you may use more or less.
To reinforce the corners and keep the boards flush together go around the planters and screw through the end of each long board directly into the short end board from the outside in.
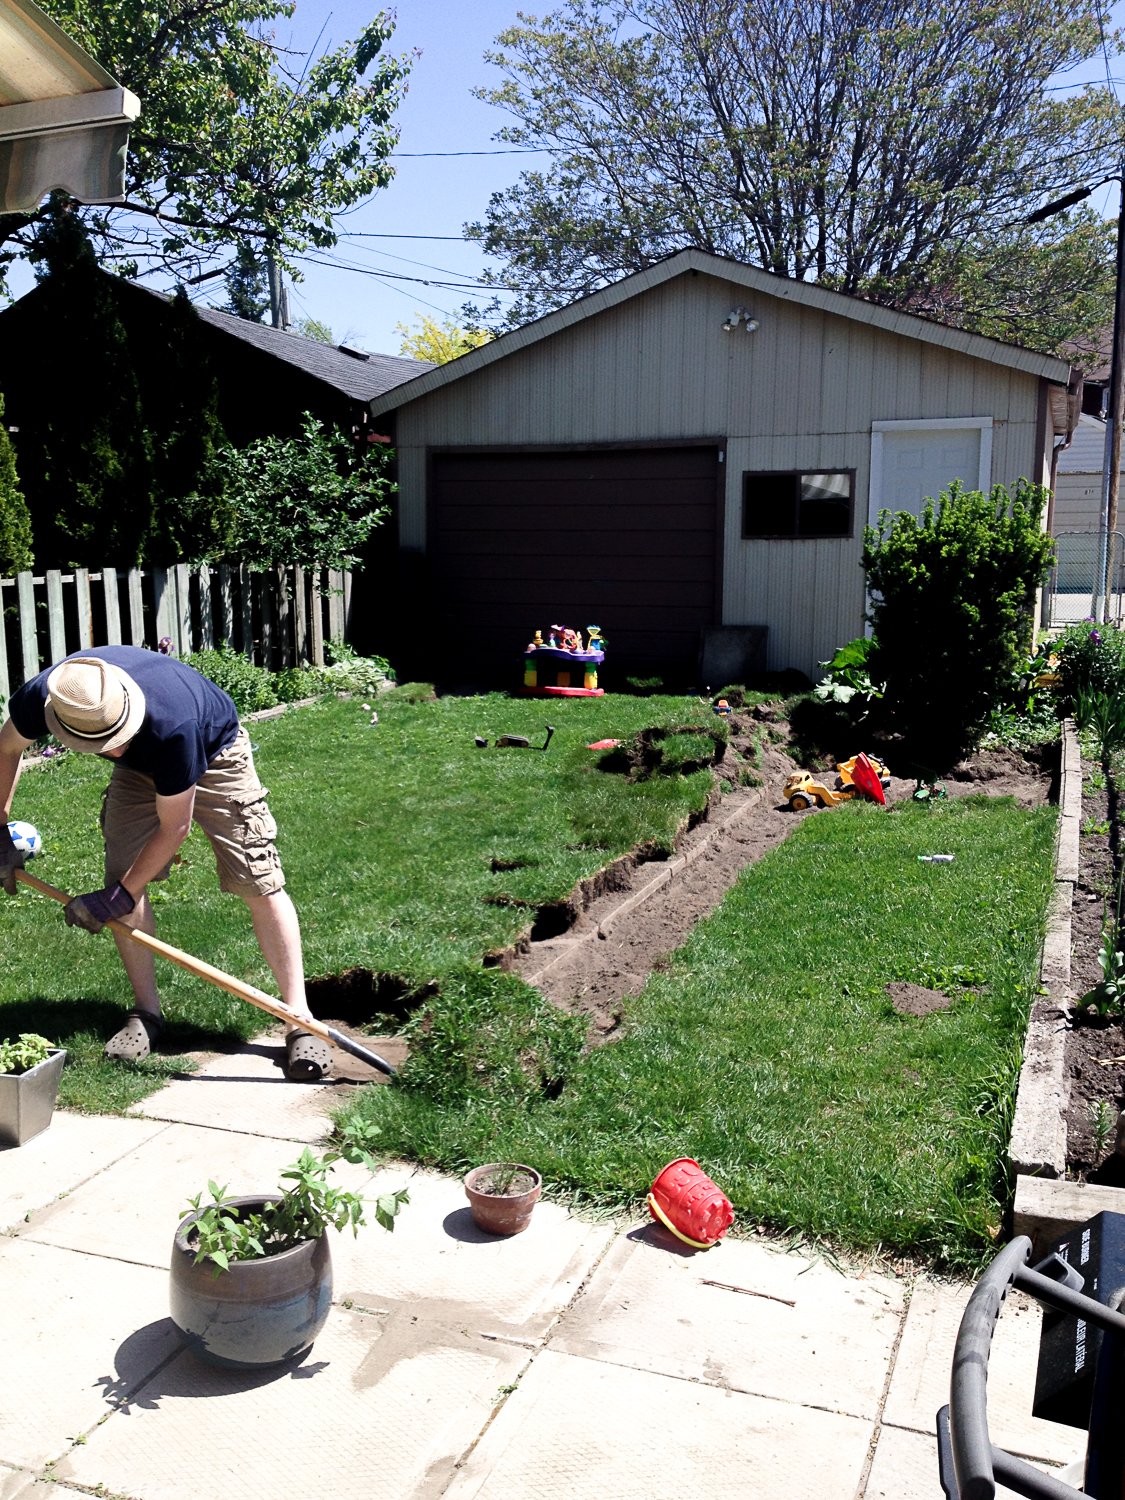
When all of your support stakes and boards are screwed into place you'll need to till up the earth where they are to be placed. This is the most time consuming and tiring parts of the project.
Once area is all prepped, flip beds over and set in place. Tap down each corner and edge gently with a rubber mallet to stabilize.
Fill with fresh soil, add plants & water.
We love using our raised beds with our favourite Garden Covers from Lee Valley.
Hope this gives you a little garden inspiration. Remember you can make these to fit any space, big or small. Don't hesitate to send along questions or projects you would like to see featured.
Care

Cake Smash Fun + Photo Session GIVEAWAY with Anchor Studio
As a 3rd baby there are lots of things that I haven't gotten around to doing for Penny (eg. a baby book or a real first birthday party), so when Silvia from Anchor Studio suggested a Cake Smash session, I decided to go for it. I knew it would be a special way to mark Penny's 1st year, and get some sweet shots of our growing babe. I didn't realize just how adorable it would all turn out. Take a look.
As a 3rd baby there are lots of things that I haven't gotten around to doing for Penny (eg. a baby book or a real first birthday party), so when Silvia from Anchor Studio suggested a Cake Smash session, I decided to go for it. I knew it would be a special way to mark Penny's 1st year, and get some sweet shots of our growing babe. I didn't realize just how adorable it would all turn out. Take a look.


For a great cake smash you obviously need a cute baby and a pretty cake. While I usually love to bake, I've been so busy and knew I wouldn't be able to get it done. I decided to push the mom guilt aside and opt for the next best thing, a locally made cake with all real fresh ingredients. I picked up this sweet Strawberry cake at Bake Sale in Bloor West. They have 3 locations across the West End and even offer delivery.

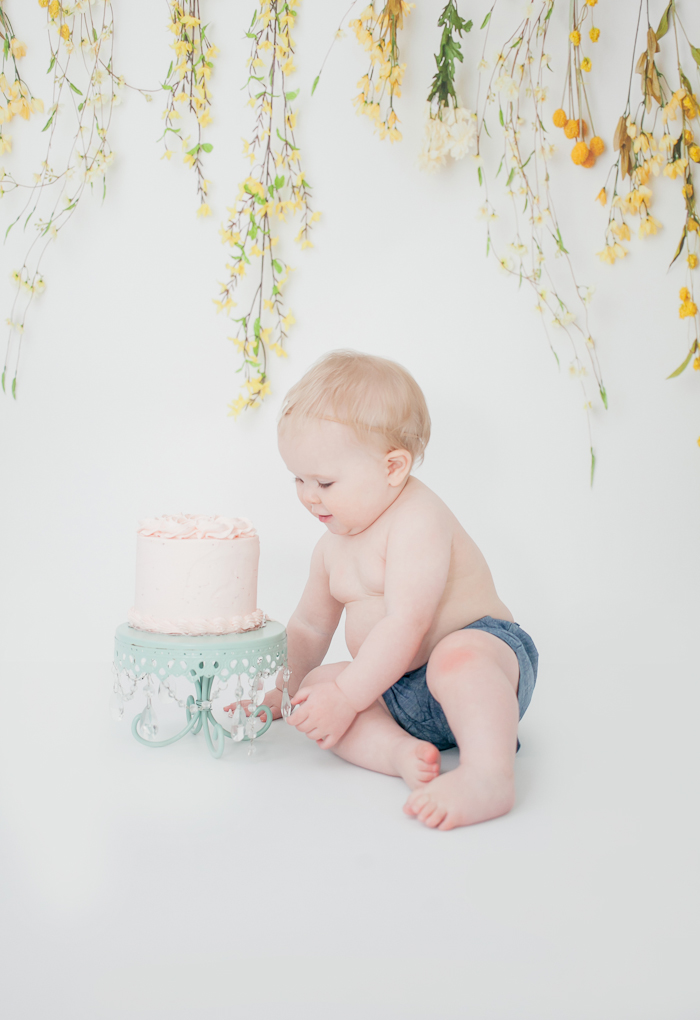
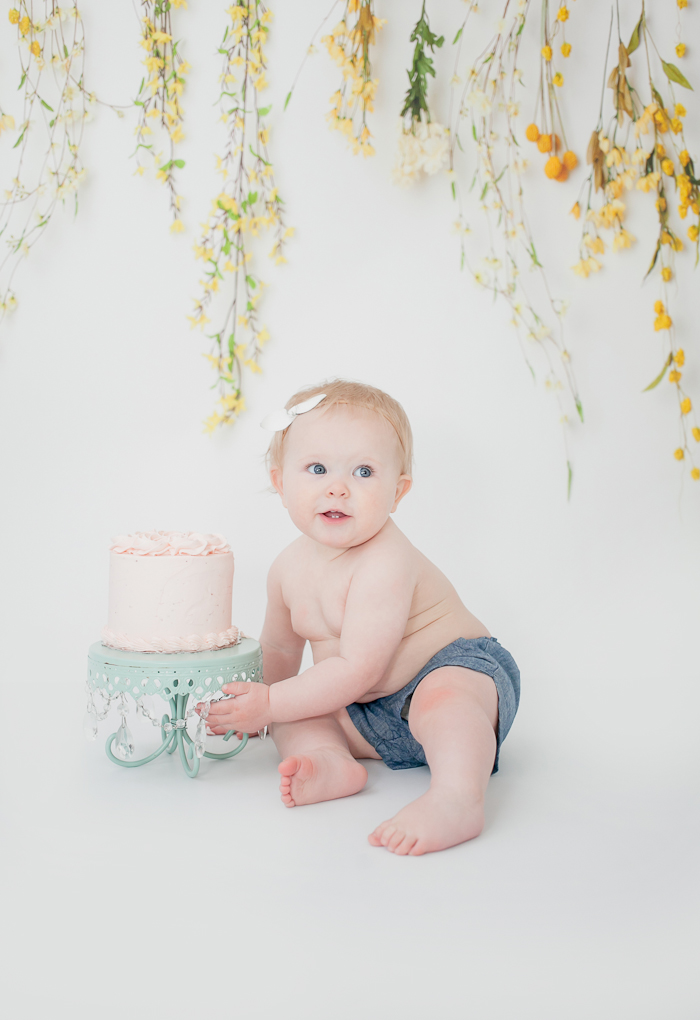
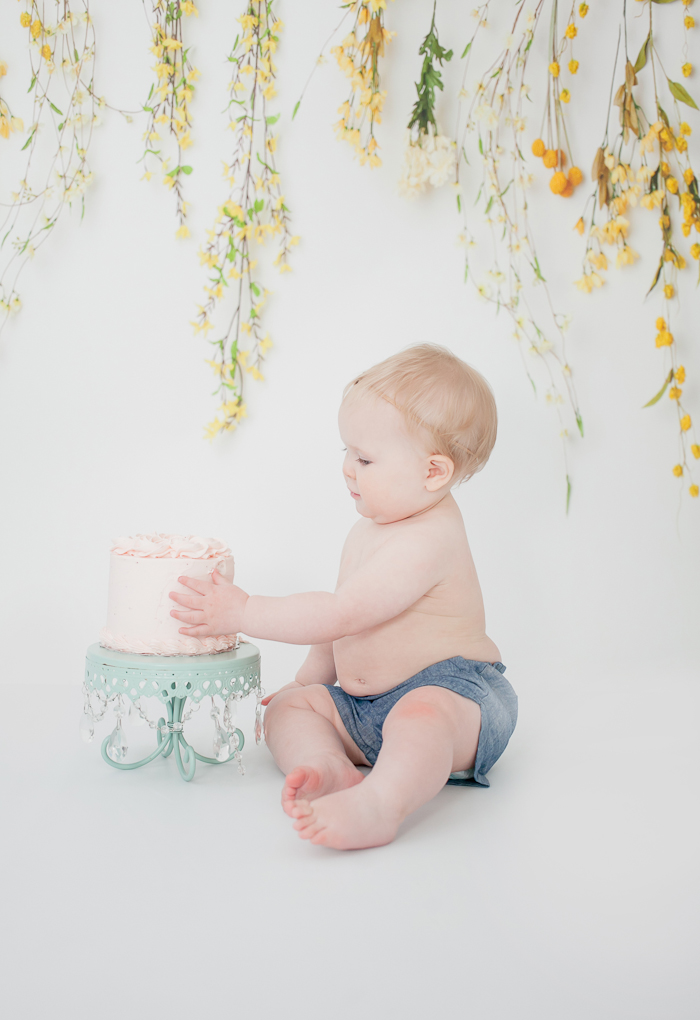


Turns out that babies rarely actually smash the cake and so there are usually leftovers. As a cake addict this was good news to me. As you can see Penny did manage to put her foot in the cake at the very end, but she had a bath right before, so I figure it was a pretty clean foot and therefore the cake was still good to eat ;)
I have to be honest and admit that I very very rarely enjoy store bought cakes. My biggest issue is bad icing. I'm a huge buttercream snob, so the fact that I was blow away by Bake Sale's delicious strawberry buttercream says something.
In celebration of Penny's 1st Birthday I have partnered with Anchor Studio to offer an Amazing GIVEAWAY! Enter for a chance to WIN a Mini In-Studio Photo Session (30 mins) that includes 10 high resolution digital images. This can be used for a Cake Smash session (can take up to 1 hour) or any other family or individual session except newborn sessions. Cute props will be provided for any holiday sessions.
Enter NOW by simply commenting below with your name and email address, or alternatively you may comment below and submit your email address to care@with-care.ca for entry. Plus make sure to check out our Facebook page & Instagram feed for 2 more ways to enter!
Contest is open to all Canadian residents 18+, but session must take place at Anchor Studio at Dupont & Dovercourt in Toronto (no travel costs will be provided). Session is to be scheduled with Anchor Studio at a time convenient for both the winner and photographer. Contest closes Friday May 26th at 11pm EST. A winner will be chosen at random and messaged within 24 hours. Good Luck!
As a special gift mention With Care at booking and receive 10% off Anchor Studio.
Care
*This is a sponsored post which means I was provided compensation and/or product for this post. All thoughts and opinions are 100% my own.